Are you ready to dive into a world of creativity and imagination? Drawing a treasure chest is not just about creating an image; it’s about conjuring up the tales of adventure, mystery, and hidden riches that accompany this iconic symbol. Whether you are a novice artist eager to explore the basics or someone looking to refine your skills, we have crafted a step-by-step guide to help you every step of the way.
Imagine the satisfaction of bringing this classic emblem of treasure hunting to life on paper! With a treasure chest as your subject, you can tap into your creativity and storytelling abilities, expressing not just the physical form, but the essence of what a treasure chest represents—secrets waiting to be uncovered and dreams of fortune. Don’t worry if you’re not familiar with drawing; all you need is a sprinkle of enthusiasm and your preferred drawing materials, and you’ll be well on your way.
So, gather your pencils, erase any doubts, and let’s set sail on this artistic journey. Get ready to unleash your inner artist and discover the joy of creating something truly special. With our guided steps, you’ll turn a simple piece of paper into a treasure trove of imagination. Let’s embark on this adventure together!
Materials Required
Before we dive into the drawing process, let’s gather the materials you’ll need:
- Paper: Start with a blank sheet of paper. You can use any type, but a heavier weight or sketch paper would work best.
- Pencil: A regular graphite pencil will be your best friend during this drawing. Make sure it’s sharp and ready to go.
- Eraser: Have a good eraser on hand to correct any mistakes or guidelines you might want to remove later on.
- Ruler: Although not absolutely necessary, a ruler can come in handy for drawing straight lines and ensuring symmetry.
Now that we have all our materials ready, let’s begin with the step-by-step process of drawing a treasure chest.
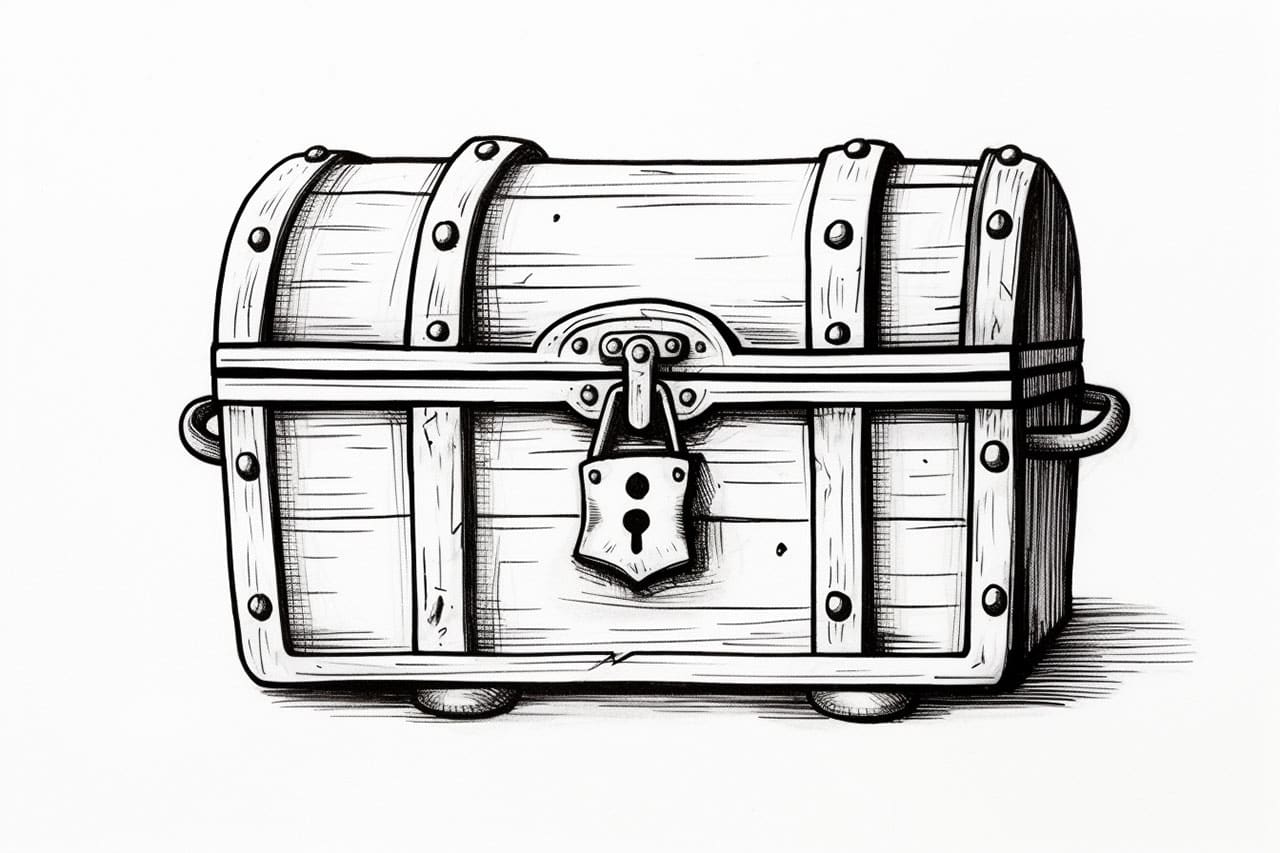
Step 1: Draw the Outline
Start by drawing a rectangle with slightly curved corners in the center of your paper. This will be the main body of the treasure chest. Take your time to make sure the sides are straight and the corners are smooth.
Step 2: Add the Lid
Extend two parallel lines horizontally from the top of the rectangle. These lines will form the lid of the treasure chest. Connect the ends of the lines with a curved line, creating a slightly arched shape.
Step 3: Draw the Lock
Positioned in the center of the chest, draw a small rectangle for the lock. Add a curved line on each side to give it a three-dimensional effect. You can also add a keyhole by drawing a small circle near the top of the lock.
Step 4: Add Details
To give the treasure chest a more realistic look, it’s time to add some details. Draw two vertical lines near the front of the chest to represent the hinges. You can also add small curved lines along the sides and bottom of the chest to show its construction.
Step 5: Enhance the Lid
Draw two small rectangles on the lid, near its edges, to represent metal handles. Add some decorative elements such as circular patterns or small studs on the lid and corners of the chest. These details will give your treasure chest an authentic look.
Step 6: Shade and Add Depth
Now that you have the basic outline and details, it’s time to add shading and depth to your drawing. Start by determining the direction of your light source. Shade the areas that would be in shadow, such as the sides of the chest, the inside of the lid, and the crevices around the decorative elements. Use light strokes to gradually build up the shading and create a sense of volume.
Step 7: Finalize the Details
Take a step back and review your drawing. Are there any areas that need refinement? Make sure all the lines are clean and precise. Erase any unnecessary guidelines or rough sketches that might still be visible. Pay attention to the texture and patterns on the chest and lid, adding any additional details you feel are necessary to complete the overall look.
Conclusion
Congratulations! You’ve successfully learned how to draw a treasure chest from scratch. By following these step-by-step instructions and using your creativity, you’ve brought this iconic object to life on paper. Remember, practice makes perfect, so don’t hesitate to draw more treasure chests or experiment with different styles and designs. Enjoy the journey of artistic exploration and uncover the hidden gems within your imagination.
Fun Facts About Treasure Chests
- Treasure chests were used primarily by sailors and pirates to store valuable goods, often serving as the inspiration for treasure-hunting legends.
- The traditional image of a treasure chest is wooden with metal bindings and a lock, but historical chests also came in other materials like metal and stone.
- Many treasure chests feature intricate carvings and designs to denote wealth and status, as well as to personalize them.
- The concept of a treasure chest in popular culture often includes maps or clues hidden within them to lead to other treasures.
- Some treasure chests are historically linked to the practice of “burying treasure,” often by pirates seeking to secure their loot from others.
- In medieval times, treasure chests were not only for pirates but also used for storing household valuables, such as important documents and family heirlooms.
- Famous treasure chests in fiction have included magical protections or traps to prevent tampering or theft.
- In gaming, treasure chests often reward players with in-game currency, rare items, or even power-ups.
- Treasure chests were sometimes reused or repurposed for storage or furniture, such as in the homes of retired sailors.
- Collectors today might seek out authentic treasure chests or replicas as decorative pieces or novelties due to their rich historical and cultural associations.
Suggestions for Scenes and Settings for Treasure Chest Drawings
- Deserted Island: Picture a treasure chest partially buried in the sand of a sunny, deserted island, with an old pirate map fluttering nearby.
- Sunken Ship: Draw a scene of a rusty treasure chest nestled in the wreckage of a ship, surrounded by colorful fish and coral reefs.
- Mystical Cave: Illustrate an eerie cave with sparkling crystals and a mysterious treasure chest glowing from within.
- Royal Guard Post: Depict a treasure chest heavily guarded in an ancient castle, with knights and mysterious shadows lurking in the corridors.
- Forest Hideaway: Create a whimsical forest clearing where a treasure chest is hidden among roots and leaves, with curious woodland creatures peeking in.
- Space Voyage: Design a futuristic scene with a high-tech treasure chest floating in zero gravity inside a spaceship’s cargo hold.
- Under a Waterfall: Picture a treasure chest concealed behind a cascading waterfall, with rainbows glistening through the mist.
- Pirate Camp: Paint a lively pirate camp where a group of rowdy buccaneers celebrates their find of a treasure chest filled with gold and jewels.
- Ancient Tomb: Craft an atmospheric tomb setting where a treasure chest rests amid cobwebs and dusty artifacts from long-lost civilizations.
- Steampunk Adventure: Envision a steampunk world where a mechanical treasure chest releases gears and steam as it unlocks its secrets.