How to Draw a Halloween House in 7 Spooky Steps
Learn how to draw with this step-by-step tutorial.
Materials You'll Need
- Drawing paper
- Pencil (HB or 2B)
- Eraser
- Colored pencils
- Markers
- Blending stump
Step into the eerie glow of Halloween night and let your imagination run wild as we guide you through creating your very own haunted Halloween house masterpiece. Haunted houses symbolize the spooky season, blending creepy charm with a touch of whimsy. Whether you're a budding artist or a seasoned sketcher, this step-by-step on how to draw a Halloween house will help you capture the essence of a ghostly abode on paper. From crooked windows and creaky doors to bats circling the spired rooftop, you'll learn how to bring a spine-tingling scene to life with simple techniques.
Grab your pencils, erasers, and paper, and prepare to unlock the secrets of a mysterious mansion that's as fun as it is frightful. Let's conjure up some creative magic and get started!
Materials Needed
To create your Halloween house drawing, gather the following materials:
-
Drawing paper: Use a smooth, heavyweight paper that is suitable for your chosen medium. A sketchbook or drawing pad will work well.
-
Pencils: Get a range of graphite pencils, such as HB, 2B, and 4B. These will provide various shades and tones.
-
Erasers: Have a kneaded eraser (for gently lifting graphite) and a regular eraser (for more precise erasures).
-
Sharpener: Keep a pencil sharpener nearby to maintain a fine point on your pencils.
-
Black fine-tip marker: You'll use this to outline and add details to your drawing.
-
Colored pencils or markers (optional): If you'd like to add color to your drawing, have some colored pencils or markers available.
Now that you have your materials ready, let's dive into creating a Halloween house drawing!


How to Draw a Halloween House Step-by-Step
Step 1: Sketch the Foundation of Your Haunted House
Start by lightly sketching the basic structure of your Halloween house to establish its shape and proportions. Begin with a vertical line in the center of your paper to serve as a symmetry guide. Next, draw a horizontal line slightly below the middle of your paper for the base. This line doesn't need to be perfectly straight—a slight curve can add a spooky, distorted effect. Connect these lines to form a rectangle, which will act as the main body of your haunted house.
Step 2: Add the Roof and Chimney
Crowning your haunted house with an eerie roof is the next step. Sketch a triangular roof above the rectangle, ensuring the edges are slightly crooked or uneven to enhance the spooky vibe. Extend diagonal lines from the rectangle's top corners to complete the triangular shape. For extra character, add a leaning chimney to one side of the roof. Use a smaller rectangle to outline the chimney and include horizontal lines to create a brick texture.
Step 3: Shape the Windows and Door
Haunted houses are never short on mysterious windows and ominous doors. Draw a variety of rectangular, square, or arched windows across the house. Make the edges uneven or cracked for an abandoned, eerie feel. For the door, sketch a larger rectangle at the bottom center of the house, adding a curved or broken top for extra spookiness. Detail the windows with crossbars to form windowpanes, and add a small circular or oval doorknob to the door.
Step 4: Add Spooky Exterior Details
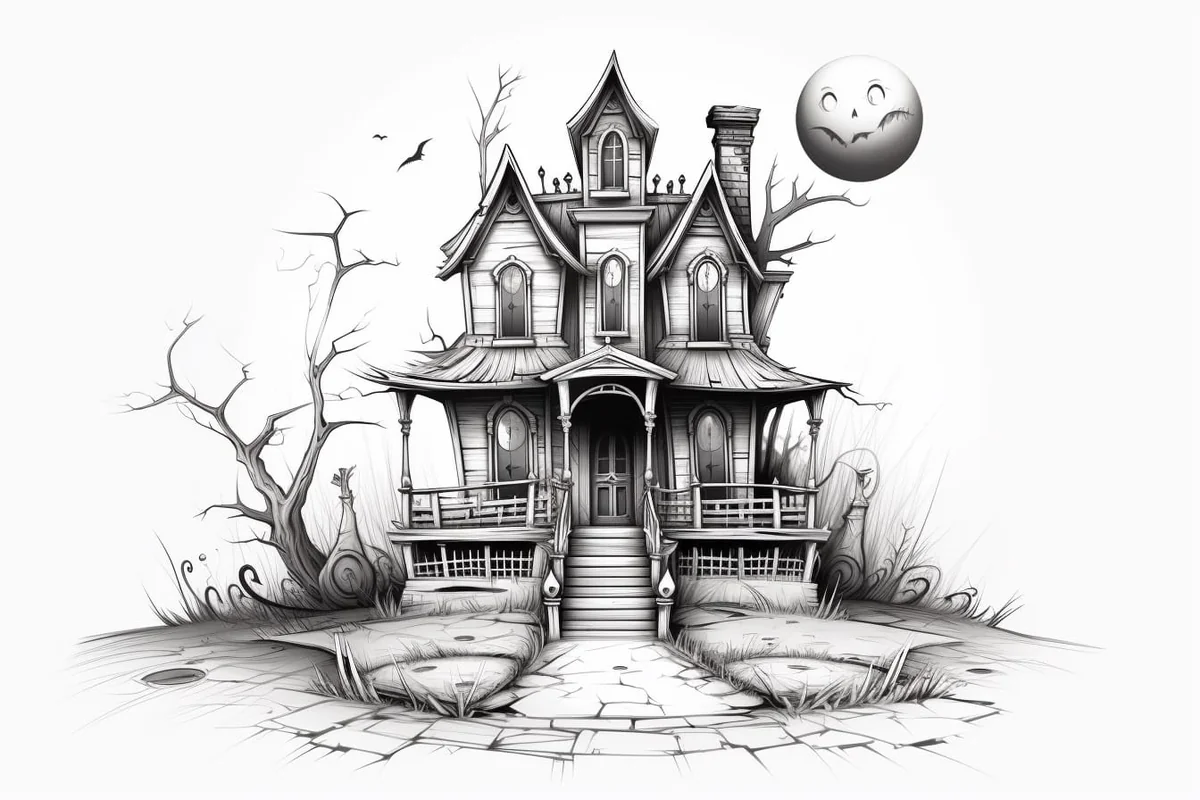
Now it's time to bring your haunted house to life with creepy details! Add cracked walls or jagged edges to the structure. Sketch broken shutters on the windows or cobwebs dangling from the corners. Draw a rickety fence or a creaky gate in front of the house. Surround the house with spooky trees with gnarled branches or a winding path leading to the door. If you want a more atmospheric setting, add bats flying across the sky, a glowing full moon, or even a ghost peeking out of a window!
Step 5: Define the Outline
Take a fine-tip black marker or pen and carefully go over the major lines of your haunted house sketch. This step will give your drawing a bold and polished appearance. Start with the house's main structure, then trace the details like the roof, chimney, windows, and spooky extras. Be deliberate with your lines—thicker outlines can make certain features, like the roof or door, stand out more. Once you've finished outlining, gently erase any remaining pencil marks.
Step 6: Add Shadows and Textures
Give your haunted house depth and dimension with strategic shading and textures. Decide on a light source (such as the moon) and shade areas opposite the light to create realistic shadows. Use darker shading under the roof, around the windows, and at the base of the house. Add textures like cracks in the walls, rough shingles on the roof, or creeping vines crawling up the sides. You can use techniques like cross-hatching or blending to achieve different effects.
Step 7: Optional – Add Color and Finishing Touches
Tip: As you work through your haunted house drawing, remember to take breaks to step back and evaluate your progress from a distance; this can help you spot areas that need more detail or adjustments in proportion and shading. Additionally, don't hesitate to experiment with different techniques, such as layering colors or varying the pressure of your pencil, to create unique textures and enhance the spooky atmosphere of your artwork.
If you'd like to enhance your drawing further, grab your colored pencils or markers and infuse your haunted house with eerie hues. Use muted tones like dark gray, deep purple, and midnight blue for the house itself, while incorporating vibrant oranges and yellows for the moon or jack-o'-lanterns. Add glowing windows or spooky lighting effects to heighten the Halloween ambiance. Consider blending your colors to create smooth gradients and shadows.
A Festive Finale
Congratulations on creating your very own Halloween house drawing! By following this step-by-step guide, you've learned how to sketch the basic structure, add details, outline, and bring depth to your artwork through shading and textures. Don't forget to let your imagination guide you as you add your touch to the drawing. Whether creating Halloween-themed decorations or simply enjoying the creative process, this drawing will surely be a spooky addition to your collection.
Remember, drawing takes practice, so don't be discouraged if your first attempt doesn't turn out exactly as you envisioned. Keep practicing, experimenting, and allowing your creativity to flow. With time, you'll continue to improve and develop your own unique style.
Now, grab your drawing supplies and enjoy the process of bringing Halloween to life on paper! Happy drawing!
Challenge: For this Halloween drawing challenge, take your haunted house sketch to the next level by creating an entire spooky scene that tells a story! Imagine your haunted house surrounded by a dark, twisted forest, with gnarled trees leaning in as if they're whispering secrets. Add eerie elements like glowing jack-o'-lanterns on the porch, a ghost peeking from the attic window, or a black cat slinking through the grass. Consider incorporating a full moon with swirling clouds to enhance the atmosphere. Challenge yourself to use different shading techniques to convey depth and texture, and don't hesitate to play with colors to create a hauntingly beautiful ambiance. Embrace the creative process, and let your imagination bring your chilling scene to life!
Suggested Scenes and Settings for Halloween Haunted House Drawings
-
Foggy Graveyard Approach: Draw a haunted house looming beyond an old, crooked graveyard, with mist curling around leaning tombstones and gnarled trees.
-
Broken Gate Welcome: Picture a haunted mansion behind a rusted, half-open iron gate, with a cracked stone path leading up to a squeaky front door.
-
Full Moon Silhouette: Create a dark silhouette of a haunted house against a huge glowing full moon, bats swooping across the night sky.
-
Windows Full of Eyes: Illustrate a haunted house where mysterious glowing eyes peer out from every window, hinting at ghosts, witches, or monsters inside.
-
Overgrown Vines and Thorns: Show a once-grand house now smothered by creeping vines, thorny bushes, and spiderwebs, with lanterns barely flickering in the wind.
-
Spooky Attic Light: Draw a haunted house where only the attic window is lit—casting an eerie, single beam of light into the swirling darkness below.
-
Witch's Halloween Party: Imagine a haunted house hosting a wild Halloween bash inside, with shadows of dancing witches, floating pumpkins, and enchanted brooms.
-
Flying Ghosts at the Door: Picture a haunted house where playful or spooky ghosts swirl around the entrance, with jack-o'-lanterns grinning on the steps.
-
Stormy Night Scene: Illustrate a haunted house during a lightning storm, with bolts of electricity illuminating the cracked walls and broken towers.
-
Magical Portal Haunted House: For a fantasy twist, show a haunted house with swirling magical portals opening in the yard—leading to unknown (and possibly spooky) realms.