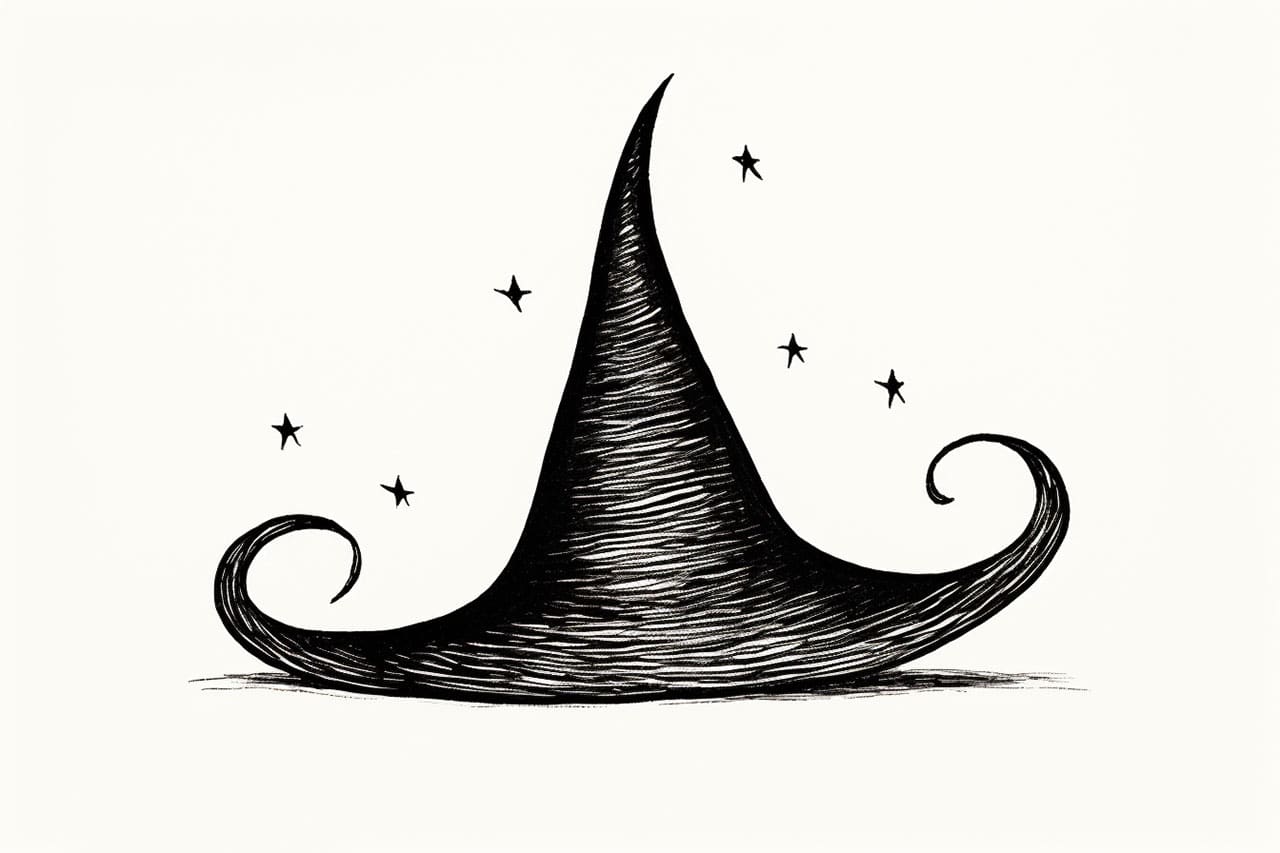
Have you ever wanted to draw a witch hat? Whether it’s for Halloween decorations or just for fun, drawing a witch hat can be a great way to unleash your creativity. In this tutorial, we will guide you through the process of drawing a witch hat step-by-step. So grab your pen and paper, and let’s get started!
Materials Required
To draw a witch hat, you will need the following materials:
- Paper
- Pencil
- Eraser
- Fine-tipped marker or pen
- Colored pencils, markers, or any coloring medium of your choice (optional)
Now that you have your materials ready, let’s begin our witch hat drawing!
Step 1: Draw the Brim
To start, draw a slightly curved horizontal line near the bottom of your paper. This line will serve as the brim of the witch hat. Make sure the line is smooth and even.
Step 2: Shape the Cone
From the center of the brim, draw a long, slightly curved line going upwards. This line will represent the cone or body of the witch hat. Make sure the line tapers as it goes up to create a conical shape.
Step 3: Add Details to the Cone
Next, draw a curved line inside the cone, closer to the brim. This line will represent the crease of the hat. Make the line slightly curved to give the hat some dimension.
Step 4: Refine the Brim
Now, it’s time to refine the brim of the hat. Start by adding some wavy lines along the brim to give it a more natural, flowing appearance. You can add as many or as few waves as you like, depending on your preference.
Step 5: Enhance the Cone
To make the cone of the hat more interesting, draw some vertical lines from the top of the cone to the bottom. These lines will represent folds in the fabric of the hat and add some texture to your drawing.
Step 6: Erase Unnecessary Lines
Carefully erase any unnecessary lines, such as the initial guideline you drew for the shape of the hat. Make sure to keep the essential lines that define the shape of the brim and cone.
Step 7: Outline the Hat
Using a fine-tipped marker or pen, outline the final shape of the witch hat, emphasizing the brim and cone. This will make your drawing more defined and polished.
Step 8: Add Details
Now it’s time to add some fun details to your witch hat. You can draw a buckle or band around the base of the cone, or even add some decorative elements like stars or spider webs. Feel free to get creative and personalize your hat!
Step 9: Color Your Drawing
If you want to add some color to your witch hat drawing, grab your colored pencils, markers, or any coloring medium of your choice. You can make your hat black or go for any color combination that inspires you. Experiment with shading and highlights to bring your drawing to life.
Step 10: Finalize Your Drawing
Once you’re satisfied with the coloring, take a moment to review your drawing. Make any necessary adjustments or touch-ups to ensure the lines and colors are neat and clean.
Conclusion
Congratulations! You have successfully drawn a witch hat. With this step-by-step tutorial, you can create spooktacular witch hat drawings to enhance your Halloween decorations (such as a pumpkin or a cornucopia) or simply have fun with your artistic skills. Remember, practice makes perfect, so keep drawing and exploring your creativity. We hope you enjoyed this guide on how to draw a witch hat, and may your artistic journey continue to flourish!