Welcome to this step-by-step guide on how to draw a cornucopia, also known as a horn of plenty. Whether you’re a beginner or an experienced artist, this tutorial will walk you through the process of how to draw a cornucopia. So grab your drawing supplies and let’s get started!
Materials Required:
To draw a cornucopia, you will need the following materials:
- Paper or sketchbook
- Pencil
- Eraser
- Fine-tip marker or pen
- Colored pencils or markers (optional)
Now that you have your materials ready, let’s begin the exciting journey of drawing a cornucopia!
Step 1: Draw the Basic Outline
Start by drawing a medium-sized oval shape towards the center of your paper. This will serve as the opening of the cornucopia. From the lower end of the oval, draw a curved line extending downwards. This line will form the main body of the cornucopia.
Step 2: Add Detail to the Base
Extend the curved line further downward, creating a wider and rounded base for the cornucopia. Remember, the shape of a cornucopia resembles that of a horn or trumpet, so make sure to maintain a smooth and curved outline.
Step 3: Draw the Horn
From the top end of the oval-shaped opening, draw a long and slightly curved line upwards. This line will form the horn of the cornucopia. Remember to keep the line smooth and gentle, as a cornucopia typically has a graceful shape.
Step 4: Refine the Opening
To give the opening of the cornucopia a more natural and organic look, add some irregular curves and jagged lines along the edge. This will give the impression of woven or overlapping textures, often associated with cornucopias.
Step 5: Create Depth and Texture
To make the cornucopia drawing more realistic, add some shading and texture to the horn. Start by lightly shading the inside of the horn, leaving the outer edges slightly lighter. This will create a sense of depth and dimension.
Use hatching or cross-hatching techniques to add texture and depth to the body of the cornucopia. This can be done by drawing parallel lines or crisscrossing lines to create shadows and highlights.
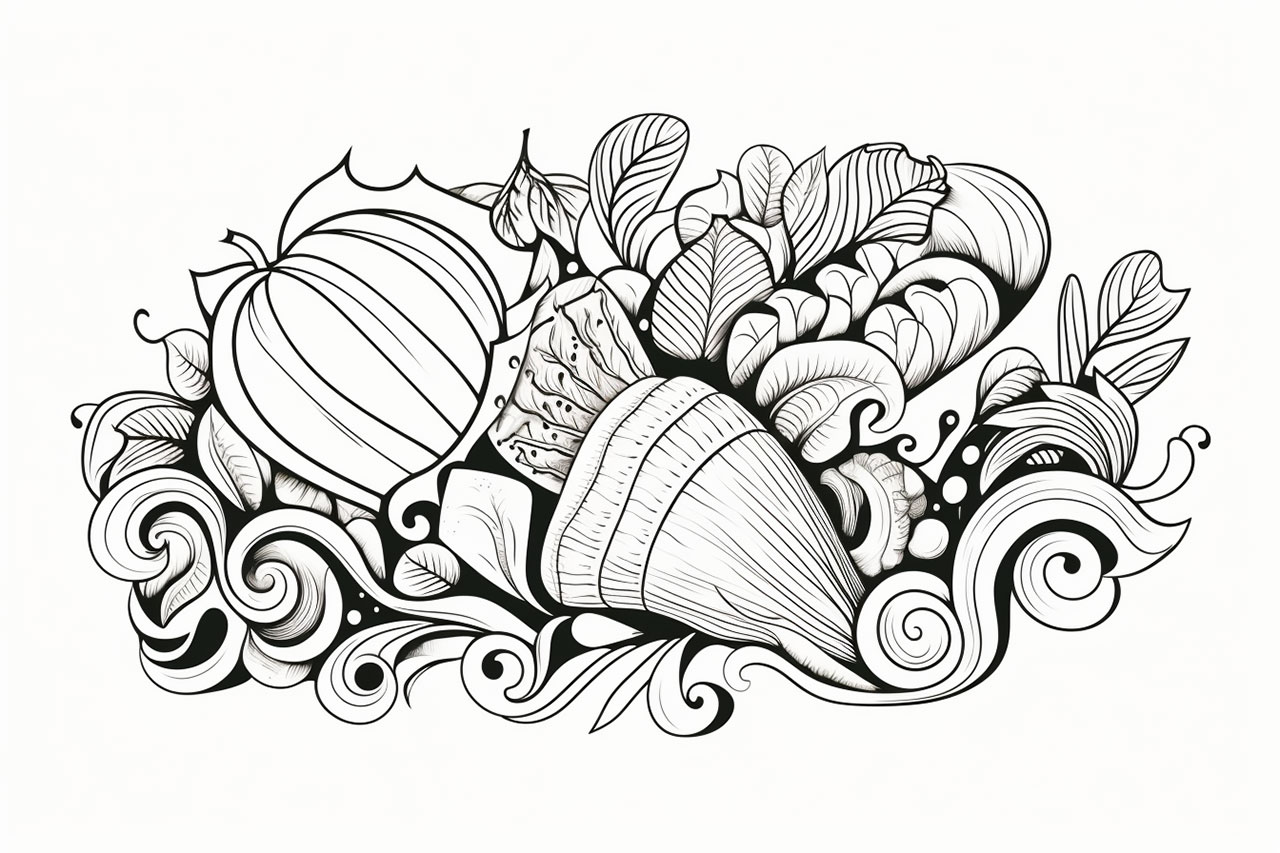
Step 6: Add Fruits, Vegetables, and Flowers
Now it’s time to fill your cornucopia with a bountiful harvest! Begin by drawing the outline of various fruits, such as apples, grapes, or pears. Place them in a cascading manner, allowing them to overflow from the opening of the cornucopia.
Next, add some vegetables like corn, pumpkins, or carrots. Remember to vary the size, shape, and orientation of the fruits and vegetables to create visual interest and a sense of abundance.
To enhance the overall composition, add flowers or leaves around the main body of the cornucopia. This will add a touch of color and liveliness to your drawing.
Step 7: Refine the Details
Take a closer look at your drawing and make any necessary adjustments. Refine the shapes of fruits, vegetables, flowers, and leaves to ensure they are well-proportioned and visually appealing.
Add more texture and details to the individual elements, such as the wrinkles on fruits, the veins on leaves, or the ridges on pumpkins. These subtle details will bring your cornucopia drawing to life.
Step 8: Outline the Final Drawing
Once you are satisfied with the overall composition and details, go over the final lines with a fine-tip marker or pen. This will give your drawing a clean and finished look. Be careful and deliberate as you trace over your pencil lines, emphasizing the most important features of the cornucopia.
Step 9: Add Color (Optional)
If you prefer a colorful cornucopia, now is the time to bring out your colored pencils or markers. Select vibrant shades that complement the fruits, vegetables, and flowers in your drawing. Use light, gentle strokes to fill in the colors, layering them to create a realistic and dimensional effect.
Alternatively, you can leave your drawing in black and white, which can be equally striking and elegant.
Conclusion
Congratulations! You have successfully completed your cornucopia drawing. By following these step-by-step instructions, you have learned how to create a realistic and visually pleasing representation of a cornucopia. Remember to practice and experiment with different shapes, sizes, and textures to develop your unique style.
Drawing a cornucopia allows you to showcase your creativity and celebrate the beauty of nature’s bounty. So grab your drawing supplies and let your artistic skills flourish. Happy drawing!