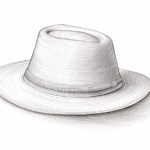
Welcome to this step-by-step guide on how to draw a bucket hat. Whether you are an aspiring artist looking to improve your skills or simply enjoy the art of drawing, this tutorial will walk you through the process of creating a stylish and realistic bucket hat. With clear instructions and helpful tips, you will be able to create a unique and professional-looking drawing. So grab your pencils and let’s get started!
Materials Required
Before we begin, make sure you have the following materials:
- Pencil: Choose a soft graphite pencil with a good range of shading capabilities. You can also use mechanical pencils if you prefer.
- Paper: Use a medium-weight drawing paper that can handle graphite without smudging easily. You can also use a sketchbook if you prefer.
- Eraser: Have a good quality eraser on hand to correct any mistakes or lighten areas when needed.
- Ruler: A straight ruler will be useful for drawing straight lines and measuring proportions.
- Reference Image: Find a clear picture of a bucket hat that you would like to draw. This will help you understand the shape and details of the hat.
Now that you have all your materials ready, let’s start drawing!
Step 1: Basic Outline
Begin by lightly sketching the basic outline of the bucket hat. Draw a horizontal line slightly below the top of your paper to represent the brim of the hat. Then, draw a curved line above it to define the crown of the hat. Make sure to leave enough space for the head to fit inside the hat comfortably. Take your time to get the overall shape and proportions right.
Step 2: Refine the Brim
Next, let’s focus on the brim of the hat. Use your ruler to draw a straight line extending from both ends of the curved line you drew earlier. This line should slope downward slightly on both sides. Connect the two lines at the front and back to complete the brim. Make sure the brim has a consistent width all around. You can adjust the shape and angle to your liking.
Step 3: Define the Crown
Now, let’s add some volume and definition to the crown of the hat. Draw a curved line following the shape of the outline you made earlier. Begin at one end of the brim and extend it up to the top of the crown. Repeat this process on the other side. The crown should have a rounded shape, slightly wider at the bottom and narrower towards the top.
Step 4: Add Details
To make your drawing more realistic, it’s important to add some details to the bucket hat. Start by drawing a small, curved line near the front of the brim to represent the fold or crease. Then, add stitching lines along the brim and the crown to indicate the seams of the hat. Take your time with these details and make sure they are evenly spaced and proportionate.
Step 5: Shading and Textures
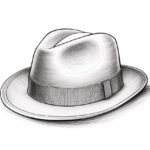
Now that you have the basic structure and details in place, it’s time to add shading and textures to your drawing. Use your pencil to lightly shade the areas that would be in shadow, such as underneath the brim and on the sides of the crown. Gradually build up the darkness by adding more layers of shading. Pay attention to the direction of the strokes to create a sense of texture and depth.
Step 6: Refine and Finalize
Take a step back and assess your drawing so far. Look for any areas that need refinement or adjustment. Use your eraser to lighten any lines or areas that may be too dark. Add more shading or details as necessary to enhance the overall look of the bucket hat. Take your time with this step and make sure you are happy with the final result.
Conclusion
Congratulations! You have successfully learned how to draw a bucket hat. By following this step-by-step guide and using your creativity, you can create realistic and stylish drawings of bucket hats. Remember to practice regularly and experiment with different techniques to further improve your skills. Happy drawing!