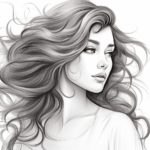
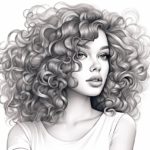
Drawing long hair can be a challenge, but with some practice and guidance, you can create stunning and realistic hair in your artwork. In this step-by-step guide, we will explore the process of how to draw long hair using simple techniques. Whether you are a beginner or an experienced artist, these instructions will help you improve your skills and bring life to your drawings.
Materials Required
Before we begin, gather the following materials:
- Pencil: Use a graphite pencil with varying grades (HB, 2B, 4B) for shading and details.
- Eraser: A kneaded eraser is recommended for easy shaping and lifting of graphite.
- Paper: Choose a smooth, high-quality drawing paper that can handle shading and blending.
- Blending tools: Soft brushes, tissue paper, or blending stumps can be used for blending and softening pencil marks.
Now that we have our materials ready, let’s dive into the process of drawing long hair.
Step 1: Basic Outline
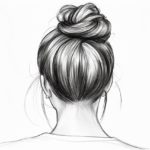
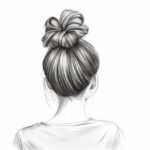
Start by lightly sketching the basic shape of the head. The shape can be oval or slightly rounded depending on the angle and perspective of your drawing. Then, loosely outline the overall direction of the hair. Remember, this is just a rough guideline, so keep your lines light and fluid.
Step 2: Blocking in the Flow
Now, block in the flow of the hair by using simple curved strokes. Visualize the movement and direction of the hair strands as you draw. Keep your strokes loose and flowing, following the general outline you sketched in the previous step. Avoid drawing individual strands at this stage; focus on the overall shape and flow of the hair. Now is the right time to decide on major hairstyle features, such as bangs.
Step 3: Creating Volume with Shadows
To give the hair volume, start shading the areas that would naturally be darker. Observe your reference photo or imagine the light source in your drawing. Typically, the areas underneath the hair and closer to the head will be darker, while the outer areas and tips will be lighter. Use your graphite pencil to gradually build up the shading, starting with lighter strokes and gradually increasing the pressure for darker areas.
Step 4: Adding Texture
Now it’s time to add texture to the hair. Long hair often has fine strands and subtle waves, so we’ll create this texture using a cross-hatching technique. Lightly layer lines in the direction of the hair strands, using varying lengths and thicknesses to imitate the different hair patterns. Remember to keep your strokes loose and natural-looking. Don’t worry about being too precise; a bit of randomness will add to the realism.
Step 5: Refining Details
In this step, we will refine the details of the hair by adding more definition and depth. Use an eraser to gently lift off some graphite in areas that need highlights, such as where the light hits the hair. This will create a sense of shine and luminosity. Pay attention to the strands that fall in front of the face or overlap each other, and add more contrast and definition to these areas.
Step 6: Blending and Smoothing
To create a softer and more realistic look, blend and smooth out the shading and texture of the hair. Use a blending tool, such as a soft brush or blending stump, to gently blend the graphite strokes together. This will create a seamless transition between light and dark areas, giving the hair a more natural and polished appearance. Be careful not to overblend, as you still want to maintain some texture and definition.
Step 7: Final Touches
Take a step back and assess your drawing. Are there any areas that need adjustment or refinement? Make any necessary changes to ensure the overall balance and realism of the hair. Add more highlights or shadows if required, and make sure the hair looks natural and in harmony with the rest of the drawing.
Congratulations! You have successfully drawn long hair using these step-by-step instructions. With practice and experimentation, you can further develop your skills in capturing different hair styles and textures.
Conclusion
Drawing long hair can be a challenging task, but by following these step-by-step instructions, you can create beautiful and realistic hair in your artwork. Remember, practice is key, so keep experimenting and refining your techniques. Through patience and dedication, you will continue to improve and achieve remarkable results in your drawings.
So grab your pencil, gather your materials, and start creating stunning long hair in your artwork today!