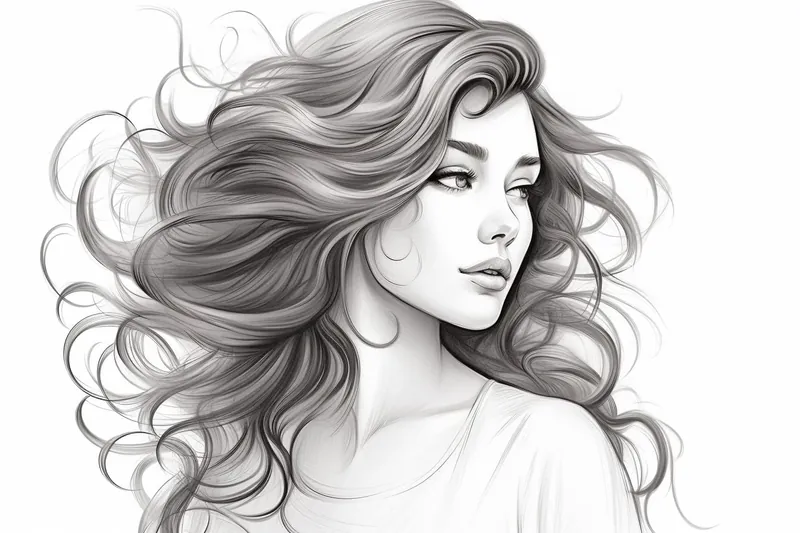
How to Draw Wavy Hair
Learn how to draw wavy hair like an expert artist with this step-by-step guide. Capture the flow and texture of wavy hair in your drawings with these easy-to-follow instructions.
Materials You'll Need
- Pencil
- Paper
- Eraser
Wavy hair possesses a unique charm that blends softness with movement, making it a captivating subject for artists to explore. Whether you're drawing portraits, character designs, or fashion illustrations, mastering how to draw wavy hair can add depth and personality to your artwork. The gentle curves and flowing strands give life to your drawing, capturing not just the shape but also the texture and volume that make hair appear natural and dynamic. Understanding how to depict these subtle waves convincingly allows your characters to feel more lifelike and expressive.Learning how to draw wavy hair involves more than just sketching simple lines. It requires attention to the hair's natural flow, light reflections, and layering of strands to create dimension. This tutorial is designed for artists of all skill levels—whether you're a beginner seeking to build foundational skills or an experienced illustrator aiming to refine your technique. We'll cover essential concepts such as the hair's structure, how light interacts with the waves, and tips for adding fine details that bring texture and realism to your drawing. By breaking down the process step-by-step, you'll gain confidence in rendering wavy hair that looks both natural and expressive.As you embark on this creative journey, remember that practice and patience are key. Every stroke you make brings you closer to capturing the beautiful essence of wavy hair. So, grab your favorite drawing tools, open your sketchbook, and dive into this comprehensive guide on how to draw wavy hair. With dedication and the right guidance, you'll soon be able to create stunning and lifelike hair that enhances your artwork and showcases your growing artistic skills.
Materials Required
To get started on your wavy hair drawing, you will need the following materials:
- Pencil: Start with a pencil, preferably a graphite pencil, which will allow you to create different shades and textures.
- Eraser: Make sure you have a good quality eraser handy for fine-tuning your drawing.
- Paper: Choose a smooth surface paper, such as drawing paper or bristol board, to create clean and defined lines.
- Reference Image: Find a reference image of wavy hair to help you understand its structure and get inspiration for your drawing.
Now that you have all your materials ready, let's begin the journey of drawing wavy hair!
Step 1: Outline the Basic Shape
Start by lightly sketching the basic shape of the head where the wavy hair will be. Use basic shapes like circles or ovals to define the head's size and shape. This will serve as a guideline for your hair drawing, allowing you to maintain proper proportions.
Step 2: Define the Flow of the Hair
Wavy hair has a natural flow and movement, so it's essential to capture this in your drawing. Observe the reference image and identify the direction in which the hair flows. Using light and confident strokes, sketch the general flow of the hair starting from the roots to the ends.
Step 3: Add the Major Hair Strands
Now, it's time to add some major hair strands to give structure to your wavy hair. Observe the reference image carefully and identify the prominent strands of hair. Using your pencil, lightly sketch these strands, following the natural flow you outlined in the previous step. Remember to keep the strokes loose and wavy to capture the essence of wavy hair.
Tip: To enhance your wavy hair drawings, consider practicing with different pencil techniques, such as hatching and cross-hatching, to create varied textures and depths. Experiment with these techniques while observing how light interacts with hair in your reference image, as this will help you achieve more realistic shadows and highlights, making the waves appear more dynamic and lifelike.
Step 4: Enhance the Wave Effect
Wavy hair has a distinctive pattern of waves, and we need to emphasize this in our drawing. Take a closer look at the reference image and observe how the waves are created by alternating curves. Start adding smaller curves to the major strands you previously sketched to enhance the wave effect. Be mindful of the direction and length of the waves, and try to maintain a consistent pattern throughout the drawing.
Step 5: Add Dimension with Shadows and Highlights
To create depth and dimension in your wavy hair drawing, it's crucial to add shadows and highlights. Observe the reference image again and identify the areas where the hair appears darker due to shadows and lighter due to highlights. Use your pencil to add shading accordingly, adding depth to the waves of the hair. Remember to blend the shades gently to create a smooth transition.
Step 6: Refine the Details
Now that you have established the overall structure and shape of the wavy hair, it's time to refine the details. Focus on adding more intricate strands and defining the edges. Pay attention to the areas where strands overlap, creating depth and realism in your drawing. Use your eraser to gently remove any unnecessary lines or smudges, refining the precise details of the wavy hair.
Step 7: Final Touches and Finishing
In the final step, take a step back and evaluate your drawing. Make any necessary adjustments to ensure it matches your desired outcome. Add any additional details or highlights to enhance the overall look of the wavy hair. Once you're satisfied with your drawing, you can finalize it by darkening the lines you want to emphasize and erasing any remaining guidelines.
Drawing wavy hair can be a challenging task, but with practice and patience, you can achieve remarkable results. By following the step-by-step instructions outlined in this guide, you will be able to capture the beauty and flow of wavy hair in your drawings. Remember to observe your reference image closely, pay attention to the natural flow and wave patterns, and add depth and dimension through shading and highlighting. With these techniques in your artistic toolbox, you'll be able to create stunning wavy hair illustrations. So, grab your pencils and start practicing your wavy hair drawing skills today!
Fun Facts About Wavy Hair
- Wavy hair is classified as type 2 hair, which falls between straight and curly hair textures, offering a versatile styling option.
- The natural wave pattern in hair is caused by the shape of the hair follicle and the distribution of keratin proteins.
- Wavy hair tends to be more prone to frizz than straight hair due to its texture and moisture retention properties.
- Many people with wavy hair find that it holds styles longer than straight hair but is easier to manage than curly hair.
- Wavy hair can vary widely in thickness and wave tightness, ranging from loose S-shaped waves to more defined waves.
- Humidity can enhance the natural waves in hair, sometimes making it appear curlier or more voluminous.
- Wavy hair often requires different hair care products than straight or curly hair to maintain its natural texture and prevent damage.
- Historically, wavy hair has been celebrated in art and fashion for its natural, effortless look that adds movement and softness.
Suggestions for Scenes and Settings for Wavy Hair Drawings
- [A wind-swept beach scene where the character's wavy hair flows naturally with the ocean breeze and waves](https://yonderoo.com/how-to-draw-waves/).
- A cozy indoor setting by a window with soft sunlight highlighting the waves and shadows in the hair.
- A lively festival or concert where wavy hair moves dynamically as the character dances or moves.
- A mystical forest glade with dappled light filtering through the trees, enhancing the texture of wavy hair.
- A vintage-inspired portrait featuring wavy hair styled in loose waves, evoking a classic Hollywood glamour look.
- An urban rooftop scene at sunset with city lights glowing behind the character, emphasizing volume and movement in wavy hair.
- A rain-kissed moment with droplets clinging to the waves, capturing a fresh, natural texture.
- A dreamy nighttime setting under stars where wavy hair softly blends into a peaceful atmosphere.
- A sporty or active character mid-motion, showing how wavy hair reacts to physical energy and movement.
- A fantasy character with exaggerated, flowing wavy hair that seems to have a life of its own, incorporating magical or elemental motifs.