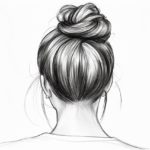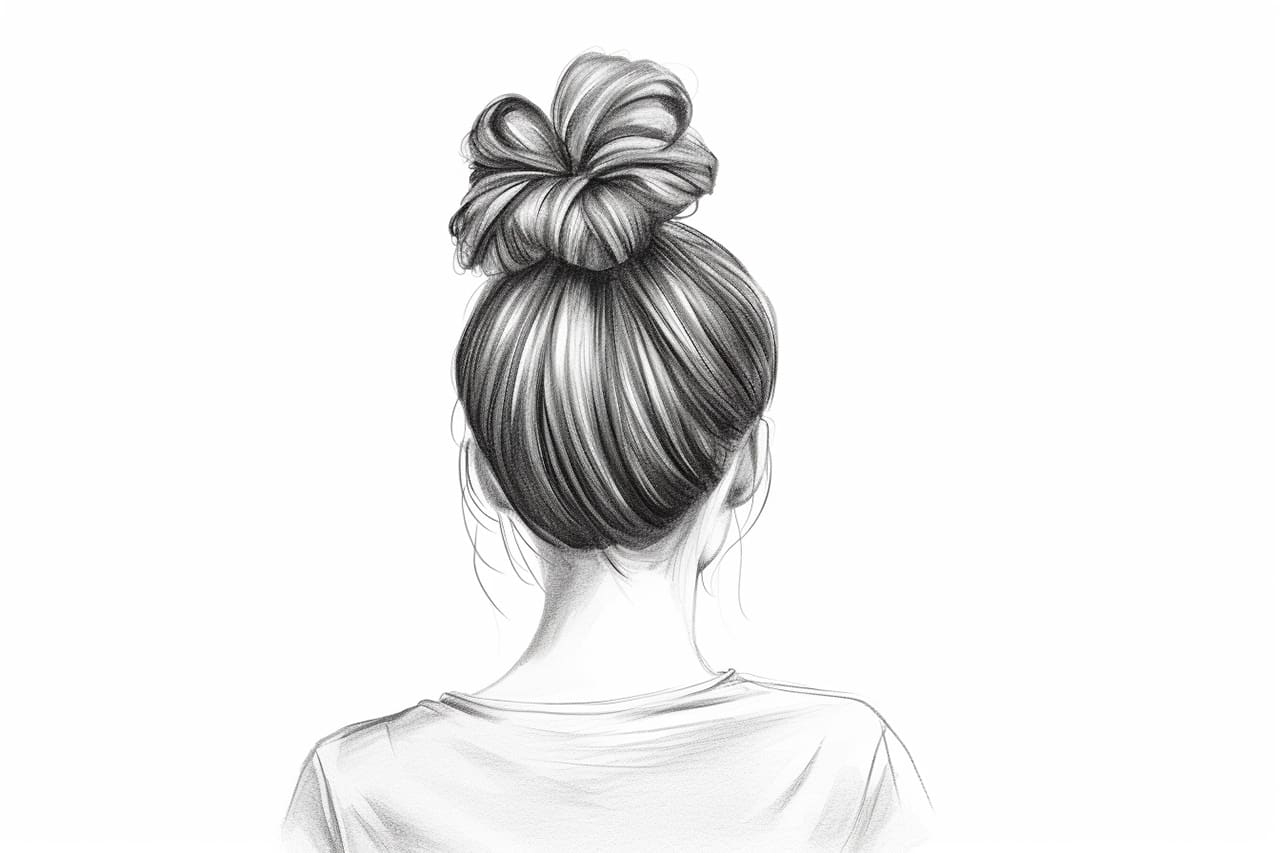
Welcome to this step-by-step guide on how to draw a bun of hair! Whether you’re an aspiring artist or simply looking to enhance your drawing skills, this tutorial will provide you with easy-to-follow instructions. By the end of this article, you’ll be able to create a realistic and beautifully detailed bun drawing. So let’s get started!
Materials Needed
To begin, gather the following materials:
- Pencil
- Eraser
- Paper
- Drawing pen (optional)
With these supplies in hand, you’ll be ready to bring your bun drawing to life.
Step 1: Sketch the Outline
Start by lightly sketching the basic outline of the bun. Begin in the center of your paper and draw a rough circle shape. This will serve as the foundation for the bun. Don’t worry about making it perfect at this stage. Using light strokes will make it easier to erase any mistakes later on.
Step 2: Define the Shape
Next, refine the shape of the bun by adding more details. Think about the size and height of the bun you want to draw, keeping in mind that buns come in various styles and sizes. Adjust the outline accordingly, shaping it to your desired proportions.
Step 3: Add Volume and Texture
To make the bun look more realistic, add volume and texture. Begin by lightly shading the inner part of the bun, creating a sense of depth. Pay attention to the way the hair would wrap around the bun, and use small strokes to add texture and dimension. Remember, buns can vary, so feel free to experiment with different shapes and sizes.
Step 4: Outline the Bun
Once you’re satisfied with the overall shape and texture, it’s time to outline the bun with a darker pencil or a drawing pen. This will make the drawing more defined and polished. Start from the outer edges and gradually work your way inward, paying attention to the flow of the hair.
Step 5: Add Details
Now it’s time to add some finer details to your bun drawing. Take a closer look at the reference image you’re using or visualize the bun you have in mind. Focus on the strands of hair that flow around the bun and add these details to your drawing. Use small, curved lines to depict individual strands, giving the bun a more realistic and textured appearance.
Step 6: Refine the Shading
To further enhance the realism of your bun drawing, refine the shading. Observe the light source in your reference image or imagine one if you’re drawing from imagination. Shade the areas that would be in shadow, using a darker pencil or a cross-hatching technique. Gradually build up the shading, paying attention to the tonal values and creating a sense of depth.
Step 7: Add Highlights
To create a sense of depth and dimension, add highlights to your bun drawing. Locate the areas where the light would hit the bun, and use an eraser to gently lighten those spots. This will give the bun a shiny and textured look, making it appear more realistic. Experiment with different erasers to achieve the desired effect.
Step 8: Clean Up Your Drawing
Now that you’ve finished adding details and highlights, take a moment to clean up your drawing. Use an eraser to remove any stray lines or smudges. Pay close attention to the outline of the bun, ensuring it looks crisp and defined. This step will help your drawing appear more polished and professional.
Conclusion
Congratulations on completing your bun drawing! By following these step-by-step instructions, you’ve learned how to create a realistic and detailed bun. Remember to practice regularly, as the more you draw, the better you’ll become. Experiment with different bun styles and variations to further develop your skills. Keep up the great work, and happy drawing!
Fun Facts about the Hair Bun
- Historical Significance: The hair bun has been a popular hairstyle for centuries, with evidence of its use dating back to ancient civilizations such as Ancient Greece and Rome.
- Cultural Symbolism: In many cultures, the hair bun holds symbolic significance. For example, in Japanese culture, the traditional bun hairstyle known as “chignon” is associated with elegance and formality.
- Functional Design: Hair buns are not only stylish but also practical. They keep hair out of the face and help to maintain a neat appearance, making them a popular choice for both casual and formal occasions.
- Versatile Styles: There are countless variations of the hair bun, ranging from sleek and sophisticated to messy and casual. Some popular styles include the classic ballerina bun, the top knot, the braided bun, and the low bun.
- Celebrities and Icons: Hair buns have been worn by numerous celebrities and icons throughout history, further popularizing the hairstyle. From Audrey Hepburn’s iconic bun in “Breakfast at Tiffany’s” to Princess Leia’s famous “cinnamon bun” hairstyle in Star Wars, the hair bun has made its mark in pop culture.
- DIY and Tutorials: With the rise of social media and online tutorials, more people than ever are learning how to create stylish hair buns at home. Platforms like YouTube and Instagram are filled with tutorials demonstrating various bun styles and techniques.
- Hair Bun Accessories: Accessories such as hairpins, clips, and hair ties can be used to enhance and embellish a hair bun. From decorative pins to floral accents, these accessories add flair and personality to the hairstyle.
- Hair Bun Evolution: Over time, the hair bun has evolved to suit changing fashion trends and cultural preferences. While traditional buns were often sleek and tightly coiled, modern interpretations may incorporate texture, volume, and asymmetry for a more contemporary look.
- Fitness and Sports: The hair bun is a popular choice among athletes and fitness enthusiasts because it keeps hair secure and out of the way during physical activity. It is commonly seen in sports such as ballet, gymnastics, and yoga.
- Timeless Appeal: Despite changes in fashion and hairstyle trends, the hair bun remains a timeless and classic choice for people of all ages and backgrounds. Its simplicity and versatility ensure that it continues to be a beloved hairstyle for years to come.