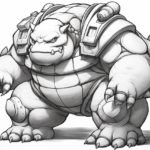
Welcome to this step-by-step tutorial on how to draw Bowser, the iconic video game character from the Super Mario series. Whether you’re a beginner or an experienced artist, this guide will walk you through the process of creating a detailed and accurate representation of Bowser. So grab your drawing materials and let’s get started!
Materials Required
Before we begin, make sure you have the following materials:
- Paper: Choose a smooth and high-quality paper that is suitable for sketching and shading.
- Pencils: You will need a range of pencils with different hardness, such as 2H, HB, and 6B. The harder pencils are used for light sketches, while the softer pencils are for shading and adding depth.
- Erasers: Have both a kneaded eraser and a regular eraser handy. The kneaded eraser is useful for lifting off graphite, while the regular eraser is for larger corrections.
- Blending tools: You can use a blending stump or a tortillon to blend and soften your shading.
- Reference image: It’s always helpful to have a reference image of Bowser as a visual guide. You can print one out or have it displayed on a separate device.
Now that you have your materials ready, let’s dive into the step-by-step process of drawing Bowser.
Step 1: Basic Shapes
Begin by sketching the basic shapes that make up Bowser’s body. Start with an oval shape for his head, a large oval for his body, and smaller ovals for his limbs. Use light strokes to keep the sketch loose and flexible.
Step 2: Facial Features
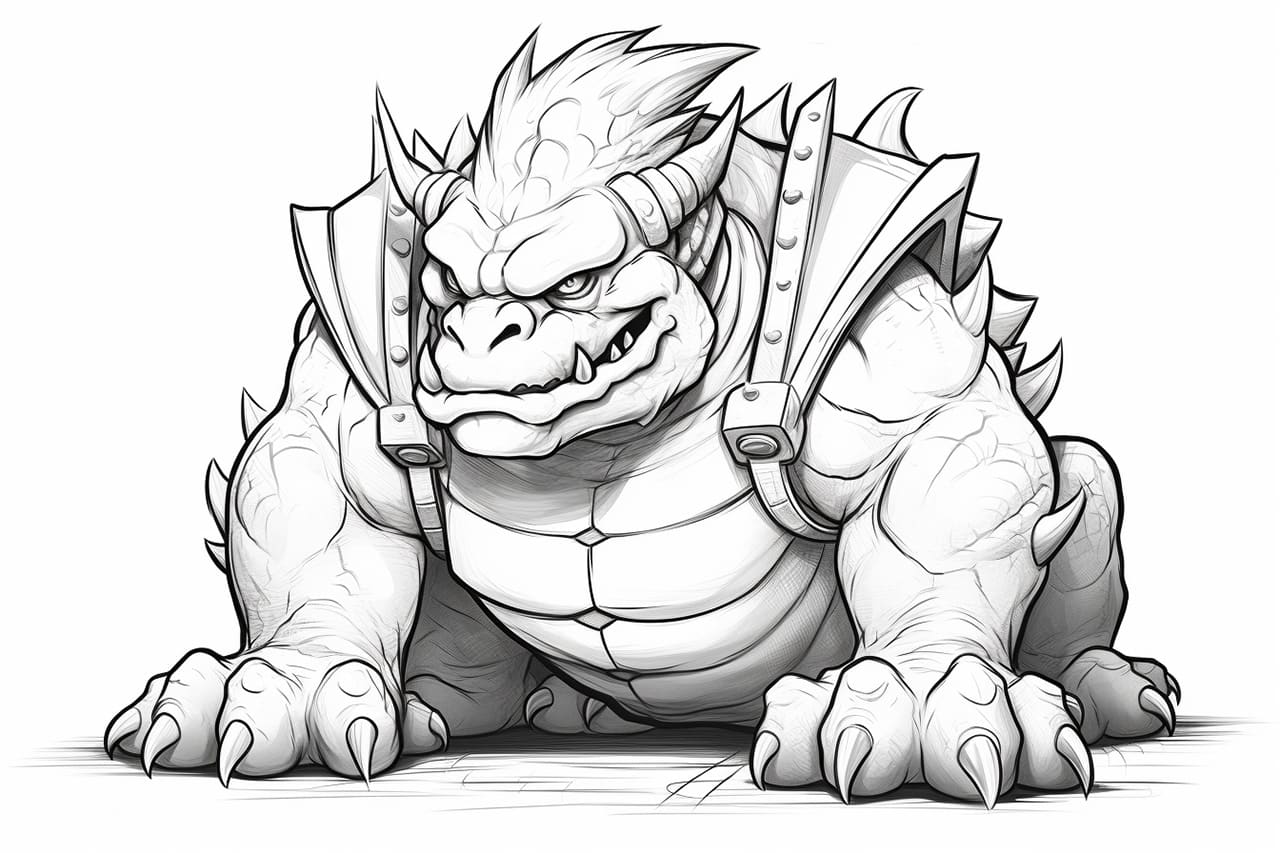
Next, let’s focus on Bowser’s facial features. Draw two small circles for his eyes, leaving enough space between them for his snout. Add a large inverted Y shape below the eyes to represent his snout. Then, sketch two small triangles on top of his head to indicate his horns. Use reference image to get the proportions and placement right.
Step 3: Details of the Face
Now it’s time to add more details to Bowser’s face. Sketch his eyebrows using curved lines above the eyes. Then, draw his large, toothy grin by adding sharp, triangular shapes along the bottom of the snout. Remember to include his sharp teeth and a small tongue inside the mouth. Don’t forget to erase any unnecessary guidelines as you go along.
Step 4: Shell and Spikes
Moving on to Bowser’s shell, draw a large, curved shape that covers his back in the middle of the body. Add the details of the shell by sketching a series of curved lines to represent the individual sections. On the top of the shell, draw a row of large spikes that extend from the neck to the tail.
Step 5: Arms, Legs, and Claws
Now let’s focus on Bowser’s arms, legs, and claws. Sketch the basic shapes for his arms and legs, making them thick and muscular. Add curved lines to indicate the muscles on his arms and legs. For the claws, draw elongated triangles attached to his fingers and toes.
Step 6: Face and Body Details
It’s time to add more details to Bowser’s face and body. Sketch small scales along his snout, eyebrows, and cheeks to give him a reptilian texture. Add wrinkles and creases on his neck, torso, and arms to make him look more rugged and powerful. Don’t forget to include the spikes on his arms and tail.
Step 7: Shading and Texturing
Now that the basic outline is complete, it’s time to bring Bowser to life with shading and texturing. Use the softer pencils, such as 6B, to shade the darker areas, such as the inside of his mouth, the hollows of his eyes, and the shadows created by his spikes. Use light, hatching strokes to create texture on his skin and shell. Take your time with this step, as shading and texturing can greatly enhance the overall look of your drawing.
Step 8: Final Touches
To finish your drawing, go over the lines and details with a darker pencil or a fine liner to make them more defined. Erase any remaining guidelines and smudges, and clean up the drawing as necessary. Take a step back and assess your drawing, making any final adjustments or additions to ensure that you are satisfied with the result.
Conclusion
Congratulations! You have successfully learned how to draw Bowser step by step. By following this tutorial and practicing regularly, you can continue to improve your drawing skills and create amazing artworks of Bowser or any other characters you desire. Remember to be patient, take breaks when needed, and most importantly, have fun throughout the process. Now go grab your pencils and start drawing your very own Bowser masterpiece!