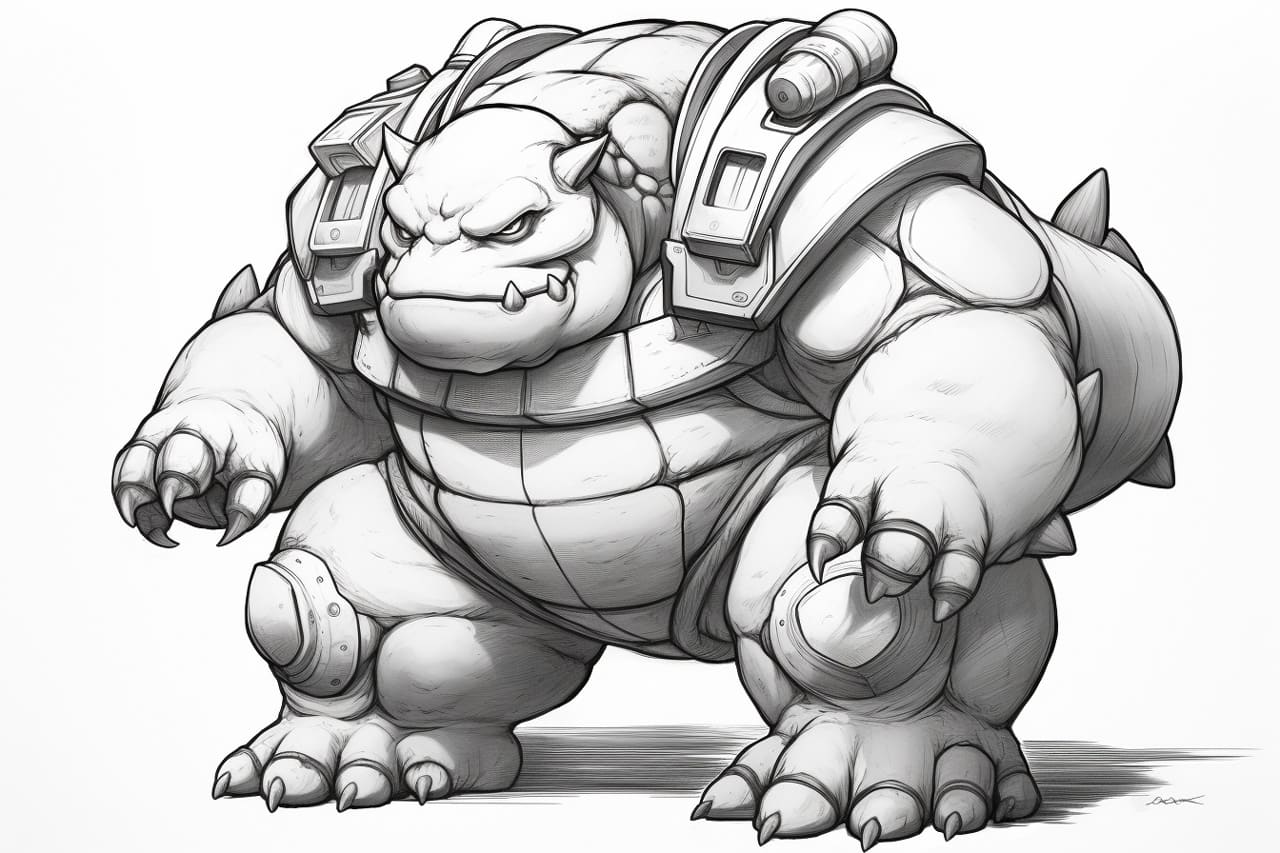
Welcome to this step-by-step guide on how to draw a Blastoise! Whether you are a beginner or an experienced artist, this tutorial will help you create a fantastic drawing of this iconic Pokemon. Blastoise, with its powerful water cannons and tough shell, makes for an exciting subject. So grab your drawing materials and let’s get started!
Materials Required
To draw a Blastoise, you will need the following materials:
- Drawing paper or sketchbook
- Pencil (preferably an HB or 2B)
- Eraser
- Fine-tip black pen or marker (optional, for inking)
- Colored pencils, markers, or any coloring tool of your choice
Now that we have our materials ready, let’s dive into the step-by-step process of drawing Blastoise!
Step 1: Basic Shapes
Start by drawing a circle for the head and a large oval shape for the body of Blastoise. These shapes will act as guidelines for the proportions of our drawing.
Step 2: Outlining the Shell
Now, let’s outline the iconic shell of Blastoise. Draw a shape similar to an upside-down, elongated triangle, curving it around the body, and connect it to the lower part of the body shape.
Step 3: Adding Details to the Shell
In this step, we’ll add some details to the shell. Draw several horizontal lines across the shell to indicate the different sections. Then, within each section, sketch some small triangles pointing towards the center.
Step 4: Drawing the Arms and Legs
Next, we’ll work on the arms and legs of Blastoise. Draw two curved lines extending from the sides of the body to form the upper arms. Then, add two smaller curves to represent the lower arms. For the legs, draw two curved lines extending downwards from the body, slightly bending them towards the end to indicate the feet.
Step 5: Sketching the Head
It’s time to focus on Blastoise’s head. Start by drawing two small circles for the eyes, leaving some space in between for the snout. Connect the circles with a curved line to form the snout. Then, sketch a small triangle at the top of the head for the ears.
Step 6: Adding Facial Features
In this step, we’ll give Blastoise its characteristic facial features. Draw two small circles within the eye circles, leaving a tiny white highlight for reflection. Add a smaller oval shape within the snout for the nose. Finally, draw a wide, curved line underneath the snout to create the mouth.
Step 7: Drawing the Water Cannons
Blastoise is known for its powerful water cannons, so let’s draw them next. Starting from the upper part of the body, draw two long curves that gradually taper towards the ends. Add some small rectangles on top of each cannon to represent the cannons’ nozzle.
Step 8: Refining the Details
Now that we have the basic structure of Blastoise, it’s time to refine the details. Go over your sketch, adding more definition to the shell, arms, legs, and other body parts. Erase any unnecessary lines, and make any adjustments as needed.
Step 9: Inking (Optional)
If you prefer a more defined and finished look, you can ink your drawing. Use a fine-tip black pen or marker to carefully go over the main outlines of your drawing. Let the ink dry completely before erasing any pencil lines.
Step 10: Coloring
Now comes the fun part – coloring your Blastoise drawing! Use colored pencils, markers, or any coloring tool of your choice to bring your artwork to life. Refer to a reference image to ensure you get the colors right, or feel free to add your own creative twist.
Conclusion
Congratulations on completing your Blastoise drawing! By following this step-by-step tutorial, you have learned how to create a fantastic representation of this powerful Pokemon. Remember, practice makes perfect, so keep refining your drawing skills and explore different techniques. Have fun and keep creating!