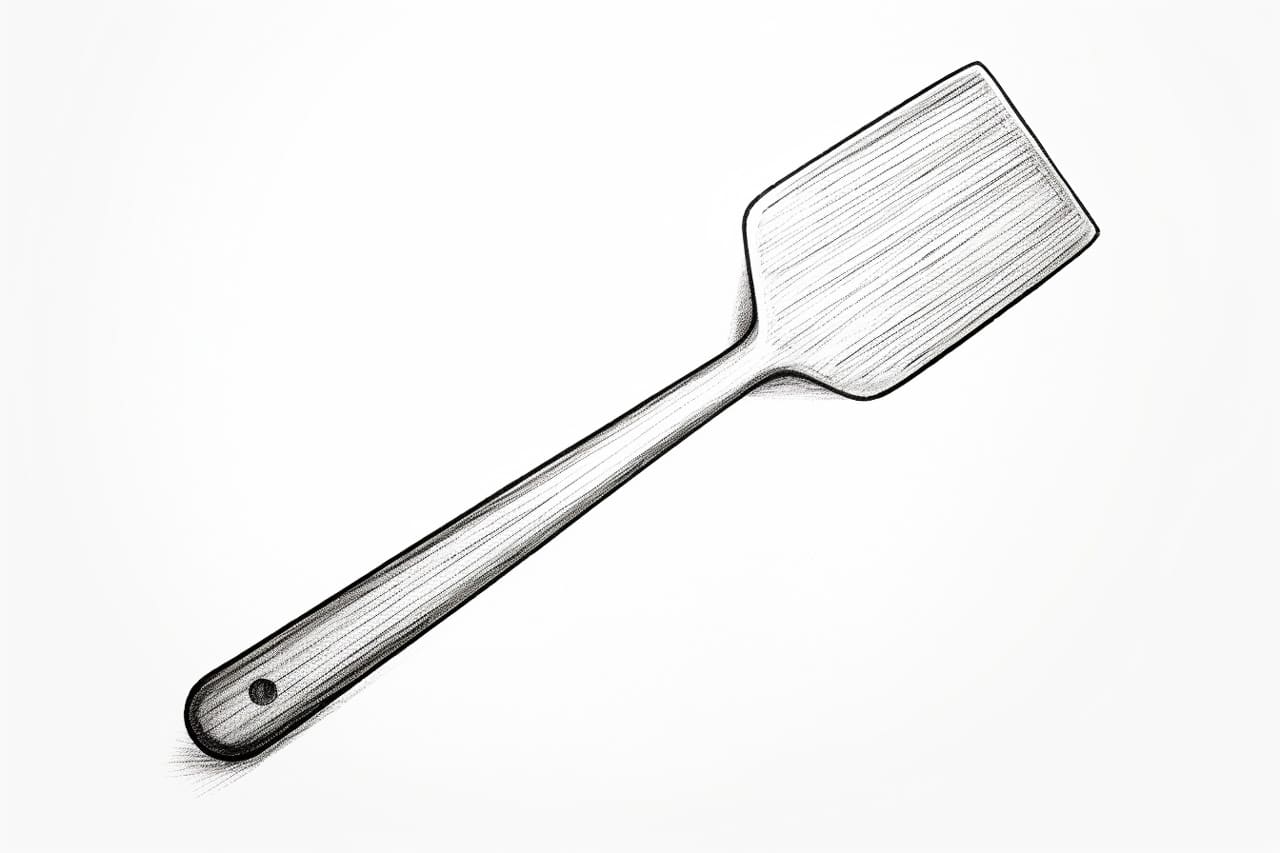
Welcome to this step-by-step guide on how to draw a spatula. Whether you’re an aspiring artist or just looking for a fun activity, drawing can be a great way to express your creativity. In this article, we will walk you through the process of creating a realistic and detailed drawing of a spatula. So, grab your pencils and let’s get started!
Materials Required
Before we begin, make sure you have the following materials ready:
- Drawing paper: Use a high-quality paper that is thick enough to handle pencil shading.
- Pencils: A set of graphite pencils ranging from 2H to 6B will give you a good range of values.
- Eraser: A kneaded eraser is ideal for lifting off graphite and creating highlights.
- Blending stumps/tortillons: These tools will help you to blend and smooth out your pencil strokes.
- Pencil sharpener: Keep your pencils sharp for precise lines and details.
Now that you have all the necessary materials, let’s dive into the step-by-step process of drawing a spatula.
Step 1: Sketch the Basic Shape
Start by lightly sketching a rectangle shape that represents the body of the spatula. Make the rectangle slightly narrower at the top and wider at the bottom to mimic the shape of a real spatula. This will serve as your guideline for the rest of the drawing.
Step 2: Add the Handle
Next, draw a long, narrow rectangle extending from the top of the spatula body. This will be the handle. Add some curvatures to make it look more natural and ergonomic. Remember to keep your lines light and easy to erase if needed.
Step 3: Refine the Spatula Body
Now it’s time to refine the shape of the spatula body. Add rounded corners to the top of the rectangle to create a smooth and polished look. The sides of the spatula body should also be slightly curved inwards to depict its thickness.
Step 4: Detail the Handle
Focus on the handle and add some details to make it more realistic. Sketch a few horizontal lines across the handle to represent the texture or grip. These lines should follow the curvature of the handle.
Step 5: Draw the Base
Move on to the bottom part of the spatula where it meets the handle. Add a small oval shape to represent the base where the spatula connects to the handle. Make sure the base is centered and proportionate to the rest of the drawing.
Step 6: Add a Hole
To make your spatula look more authentic, draw a small circular hole near the top of the handle. This hole is often found in real spatulas and serves as a way to hang or store the utensil. Keep the size of the hole relative to the size of the handle.
Step 7: Shading and Texturing
Now that you have the basic structure, it’s time to add shading and texture to your drawing. Start by identifying the light source and imagine where the shadows would fall. Use a soft pencil to shade the areas that are away from the light, creating a gradual transition from light to dark.
For the texture, lightly draw short diagonal lines across the surface of the spatula body. These lines will simulate the texture and reflection of light on a metallic surface.
Step 8: Create Highlights
To make your drawing look more three-dimensional, add highlights to certain areas of the spatula. Use a kneaded eraser to gently lift off some graphite, creating bright spots where the light hits the surface the most. This will give your drawing a realistic and shiny appearance.
Step 9: Refine and Add Details
Take a step back and assess your drawing. Now is the time to refine any areas that may need additional attention. Pay close attention to the proportions and symmetry of your spatula. Add any necessary details, such as the brand name or logo, if you desire.
Conclusion
Congratulations! You’ve successfully created a realistic and detailed drawing of a spatula. Drawing objects from everyday life can be a great way to improve your observational skills and artistic abilities. Remember to practice regularly, experiment with different techniques, and most importantly, have fun with your drawings. Happy sketching!