Greetings aspiring artists! In this step-by-step tutorial, we will delve into the captivating world of drawing, specifically focusing on how to draw a skull and crossbones. Whether you’re a beginner or an experienced artist, follow along as we unlock the secrets to capturing this timeless symbol of danger and adventure. So grab your pencils and let’s get started!
Materials Required
To bring your skull and crossbones to life, you’ll need the following materials:
- A sheet of paper or sketchbook
- Pencils (preferably a range of hardness, such as 2H, HB, and 4B)
- An eraser
- A sharpener
- Optional: colored pencils or markers for adding vibrant details
Now that you have your materials ready, let us dive into the exciting process of drawing a skull and crossbones.
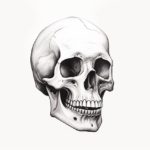
Step 1: Basic Skull Shape
Begin by lightly sketching a circle in the center of your paper. This circle will serve as the foundation for the skull. Next, draw a vertical line cutting through the circle to establish the skull’s centerline. Now, draw a horizontal line intersecting the centerline slightly below the circle. This horizontal line will help you position the eye sockets later on.
Step 2: Eye Sockets and Nose
Using the horizontal line as a guide, draw two almond-shaped eye sockets on either side of the centerline. Don’t worry about perfection at this stage; we’ll refine the details later. Beneath the eye sockets, draw a triangle-like shape for the nose. Keep the lines light and sketchy to allow for adjustments as needed.
Step 3: Jawline and Teeth
Connect the bottom of the nose to the circle with two curved lines to indicate the jawline. From the center of the jawline, draw a horizontal line for the teeth. The number of teeth may vary, but typically eight on top and eight on bottom is a good starting point. Sketch small triangles or rectangles along the line to represent the teeth.
Step 4: Eye and Nose Details
Now it’s time to bring the skull to life! Refine the shape of the eye sockets by adding a slight curve at the top and bottom, giving them a more realistic appearance. Within each eye socket, draw a small circle for the iris and fill it in with a dark pencil. Add a smaller circle inside the iris to represent the pupil. Next, refine the shape of the nose by rounding the edges and adding nostril openings.
Step 5: Creases and Shadows
To add depth and realism to your skull, start by sketching curved lines around the eyes and nose to create creases in the skull’s surface. This will give it a weathered and aged look. Shade the areas around the creases and beneath the skull to create shadows and enhance the three-dimensional effect.
Step 6: Crossbones
Now that the skull is complete, let’s move on to the crossbones. Draw two slightly curved lines intersecting at the bottom of the skull. These will serve as the bones. At the end of each line, sketch a shape resembling an elongated “U” to represent the bone ends. Add details such as small lines for texture to make the bones more realistic.
Step 7: Refining and Adding Details
Take a moment to step back and assess your work so far. If necessary, erase any unnecessary guidelines or adjust the proportions to your liking. Refine the skull’s features by darkening the lines and adding any additional details you desire. You can also experiment with shading and highlighting to give your drawing more depth.
Step 8: Adding Color (optional)
If you’d like to add a touch of color to your drawing, now is the time! Select your preferred coloring medium, whether it’s colored pencils, markers, or even watercolors. Begin by lightly layering the colors, gradually building up the intensity. Pay attention to light and shadow, using different shades to create a more realistic appearance.
Conclusion
Congratulations on completing your skull and crossbones drawing! Remember, practice makes perfect, so don’t be discouraged if your first attempt doesn’t meet your expectations. Keep refining your skills and experimenting with different techniques. Soon enough, you’ll be able to create stunning skull and crossbones drawings that capture the essence of danger and adventure.
Do you have any tips or techniques you’d like to share with fellow artists? Feel free to leave your comments below. Happy drawing!