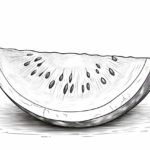
Welcome to this step-by-step tutorial on how to draw a watermelon. Drawing a watermelon can be a delightful and refreshing experience. Whether you want to create a mouthwatering illustration for a summer-themed project or simply enjoy the process of sketching, this tutorial will guide you through each step. With attention to detail and a touch of creativity, you can create a realistic and delicious watermelon drawing. Let’s dive in and explore the juicy world of watermelon art!
Materials Required
- Pencil
- Eraser
- Drawing paper
- Reference picture of a watermelon
Step 1: Draw the Basic Shape
To start, draw the basic shape of the watermelon. Draw an oval in the center of your paper. This oval will be the main body of the watermelon. Make sure to leave enough space for the rind and seeds.
Step 2: Add the Rind
Next, let’s add the rind to the watermelon. Draw a curved line around the edge of the oval to create the rind. Make the rind slightly uneven to give it a natural and organic look.
Step 3: Draw the Seeds
Now it’s time to add the seeds to the watermelon. Draw small ovals or teardrop shapes on the red part of the watermelon. Make sure to vary the size and placement of the seeds to make the drawing look more realistic.
Step 4: Add the Green Stripes
To give the watermelon a classic look, add some green stripes to the rind. Draw wavy lines across the rind, making sure to leave some space between the lines to create the stripes.
Step 5: Detail the Watermelon
Next, add some details to the watermelon to make it look more lifelike. Draw some light lines and shadows on the red part of the watermelon to create the illusion of texture and volume.
Step 6: Add Shading and Highlights
Now it’s time to add shading and highlights to your drawing to give it depth and dimension. Shade in the areas where shadows would naturally fall, such as the edges of the watermelon and the spaces between the seeds. Add highlights to the watermelon by leaving some areas white or lightly shading them to create a glossy effect.
Step 7: Final Touches
Take a step back and look at your drawing as a whole. Make any necessary adjustments and add any final touches that you feel are necessary to make your watermelon drawing look fresh and tempting.
Conclusion
Congratulations! You have successfully drawn a delicious watermelon. With practice and a sprinkle of creativity, you can draw a variety of watermelons with different shapes and sizes. Now you have the skills to create juicy watermelon illustrations that will make everyone’s mouth water. So, grab your pencil and let your artistic journey continue with more delightful creations!


