If you have ever wanted to know how to draw a bag of chips but didn’t know where to start, you’ve come to the right place! In this step-by-step guide, I will show you how to draw a realistic and delicious-looking bag of chips. Whether you are a beginner or an experienced artist, you will find these instructions easy to follow. So, grab your pencils and let’s get started!
Materials Required
To begin drawing a bag of chips, you will need the following materials:
- Drawing paper or sketchbook
- Pencils (preferably HB, 2B, and 4B)
- Eraser
- Ruler
- Colored pencils or markers (optional)
Now that you have gathered your materials, let’s dive into the step-by-step instructions!
Step 1: Outline the Shape of the Bag
Start by lightly sketching the outline of the bag on your drawing paper. Use a ruler to draw straight lines and create a rectangular shape. Remember that the bag of chips is usually slightly taller than it is wide. Take your time to get the proportions right, as this will be the foundation of your drawing.
Step 2: Add the Opening
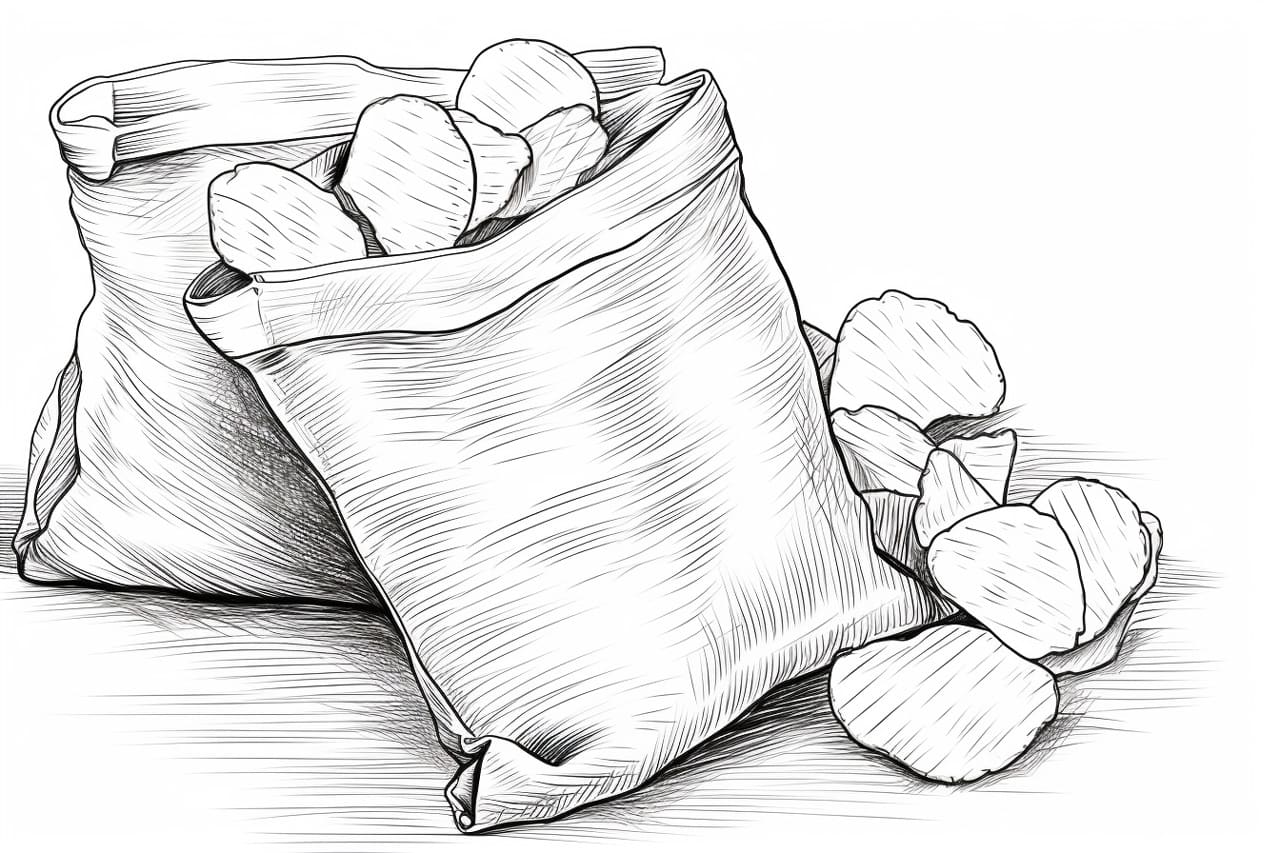
Draw a curved line at the top of the bag to indicate the opening. The shape of the opening can vary depending on the type of chips you want to draw. For example, if you are drawing a bag of potato chips, the opening may have a wavy or irregular shape.
Step 3: Create Folds and Wrinkles
To make the bag look more realistic, add some folds and wrinkles. Draw curved lines across the bag to represent creases and areas where the bag has been crumpled. Remember to keep these lines soft and subtle, as the bag should still appear smooth.
Step 4: Outline the Chip Design
Next, draw the design of the chips on the front of the bag. This could be a logo or a pattern that represents the brand of chips you are drawing. Take your time to sketch the details accurately, paying attention to any typography or intricate patterns.
Step 5: Add Shadows and Highlights
To give your drawing depth and dimension, it’s important to add shadows and highlights. Start by shading the areas of the bag that are away from the light source. Use your pencils to create smooth gradients, gradually darkening the shadows. Leave some areas lighter to indicate highlights where the light hits the bag.
Step 6: Texture the Chips
Now it’s time to add texture to the chips. Using short, jagged lines, lightly sketch the texture of the chips to make them appear crunchy and realistic. Pay attention to the direction of the lines, as this will add to the overall effect. Vary the length and angle of the lines to create a natural-looking texture.
Step 7: Color the Chips and Bag (Optional)a
If you prefer a colored drawing, you can now use colored pencils or markers to add color to your bag of chips. Choose colors that closely resemble the actual chips you are drawing, and carefully fill in the design on the front of the bag. Use light pressure for a more subtle effect and layer the colors to achieve depth.
Conclusion
Congratulations! You have successfully drawn a delicious bag of chips. By following these step-by-step instructions, you have learned how to create a realistic bag of chips drawing. Feel free to experiment with different chip flavors, designs, and coloring techniques to make your drawing unique. Remember, practice makes perfect, so keep honing your skills and enjoy the process of drawing.