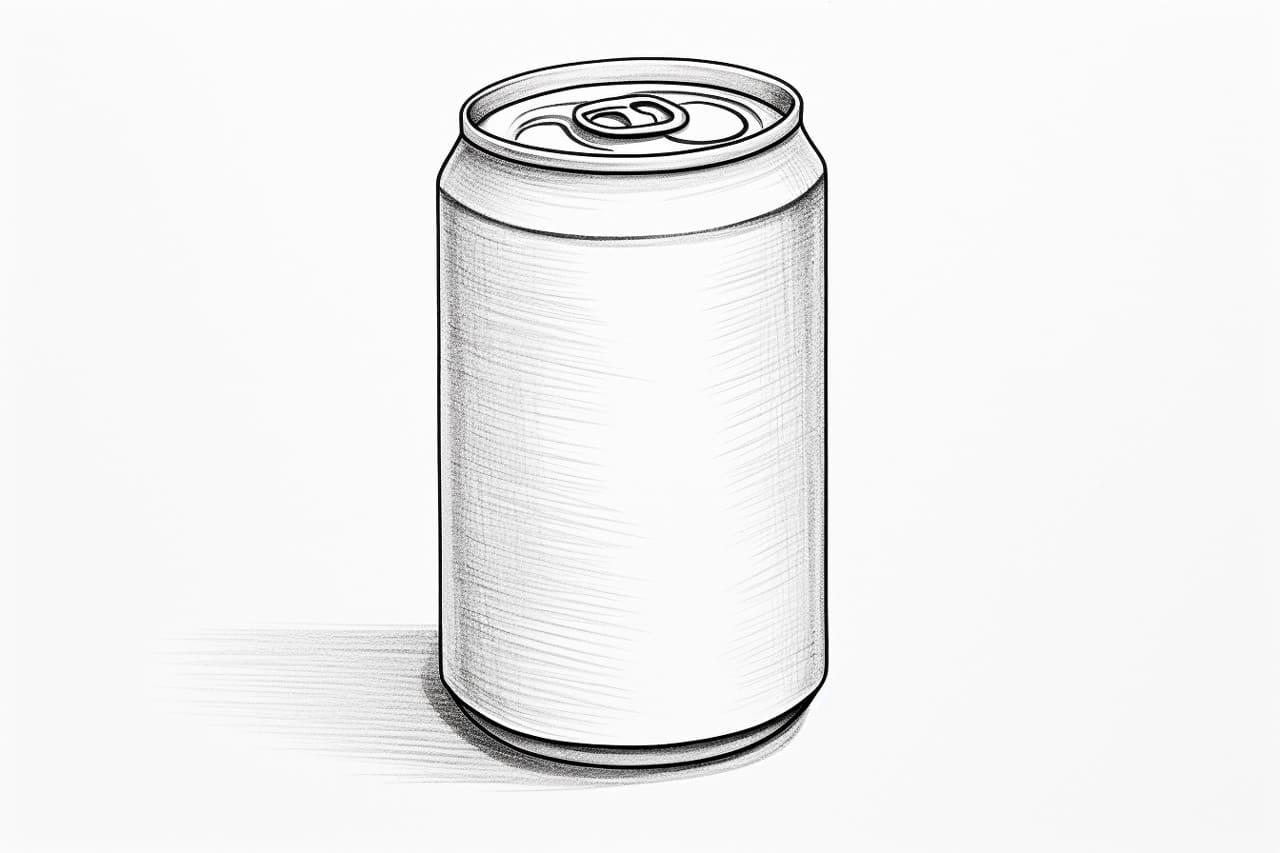
Welcome to this step-by-step guide on how to draw a can! Whether you are a beginner or an experienced artist, this tutorial will help you create a realistic and three-dimensional representation of a can. Grab your drawing materials and let’s get started!
Materials Required
Before we begin, gather the following materials:
- Drawing paper
- Pencil
- Eraser
- Ruler
- Compass
- Colored pencils or markers (optional)
With these materials in hand, you’re ready to embark on your artistic journey!
Step 1: Outline the Shape
To start, draw a vertical line in the center of your paper. This line will serve as the axis of your can. Then, draw a circle at the top of the line, representing the opening of the can. Make sure the circle is slightly wider than the diameter you want for your can.
Step 2: Create the Top and Bottom of the Can
Next, draw two smaller circles, one at the top and one at the bottom of the axis line. These circles will form the top and bottom surfaces of the can. Ensure that these circles are of the same size and proportionate to the opening circle.
Step 3: Connect the Circles
Using straight lines, connect the outer edges of the top and bottom circles with the vertical axis line. These lines will form the sides of the can. Be careful to maintain the same distance between the lines on both sides, ensuring a symmetrical look.
Step 4: Add Thickness to the Can
To create a three-dimensional appearance, add thickness to your can. Draw parallel lines around the circumference of the top and bottom circles. These lines should follow the curvature of the circles and connect with the corresponding lines on the opposite side of the can.
Step 5: Refine the Shape
Now, it’s time to refine the shape of your can. Adjust the lines you have drawn so far to ensure that they are smooth and proportionate. Pay attention to the curvature and angles to achieve a realistic representation.
Step 6: Draw the Details
To make your can more realistic, add some details. Draw a small circle in the center of the top surface, representing the pull tab or opening mechanism. Then, draw a curved line near the bottom surface, indicating the rim of the can. You can also add some texture lines or labels to make your can look more authentic.
Step 7: Shade and Add Depth
To give your can a sense of depth, add shading. Determine the position of the light source and shade one side of the can accordingly. Use a softer pencil or a blending tool to create a smooth transition between the shaded and non-shaded areas. Pay attention to the reflections and highlights on the surface of the can to enhance its realism.
Step 8: Color Your Drawing (Optional)
If you prefer a colored representation, feel free to use colored pencils or markers to add color to your can. Look at reference images or real cans to match the colors and textures accurately.
Conclusion
Congratulations! You have successfully learned how to draw a can. By following these step-by-step instructions, you can create a realistic and three-dimensional representation of a can. Remember to practice and experiment with different shapes and sizes to expand your drawing skills. Enjoy the process and have fun with your art!