Are you ready to unleash your inner artist? In this step-by-step guide, we will explore the fascinating process of how to draw a cone, a fundamental shape that serves as the building block for countless objects in our daily lives. Whether you are an eager beginner, a curious student, or simply someone looking to indulge in a fun artistic activity, understanding how to render basic shapes like cones is an essential skill that can enhance your overall drawing proficiency.
Cones are fascinating three-dimensional forms that can be found everywhere, from the delicious ice cream cones we enjoy on hot summer days to the brightly colored traffic cones that help us navigate city streets. By mastering the technique of drawing a cone, you will not only gain confidence in your artistic abilities but also expand your repertoire for creating more complex shapes and forms. Drawing cones can be a rewarding experience, offering both a satisfying challenge and a chance to hone your skills.
So gather your materials, and let’s embark on this artistic journey together. With clear instructions and simple steps, you will be able to create a stunning cone in no time. Whether you want to use it in broader illustrations or simply perfect your technique, let’s take the first step towards bringing this classic shape to life!
Materials Required
Before we begin, let’s gather the materials you will need for this drawing tutorial:
- A pencil
- Paper
- An eraser
- A ruler (optional)
Ensure that you have all these materials within reach so you can easily follow along as we go through each step.
Step 1: Draw the Base Circle
Start by drawing a medium-sized circle near the middle of your paper using your pencil. Remember, the size of the circle will determine the overall size of your cone, so adjust accordingly. If you want a larger cone, draw a larger circle, and for a smaller cone, draw a smaller circle. Use your ruler if needed to help create a perfect circular shape.
Step 2: Draw the Vertical Axis
Next, draw a straight line passing through the center of the circle vertically. This line will serve as a guide to help us position the apex (tip) of the cone later on. It should extend both above and below the base circle, allowing enough space for the entire length of the cone.
Step 3: Connect the Axis to the Circle
Connect the ends of the vertical axis to the base circle, creating a triangle-like shape. Start at the bottom of the axis and draw two lines that slant towards the edges of the base circle. These lines represent the sides of the cone.
Step 4: Draw the Apex
At the top of the vertical axis, draw a small point or triangle to represent the apex of the cone. This is the pointed tip of the cone and helps create the illusion of a three-dimensional object.
Step 5: Add Depth and Dimension
To make the drawing more realistic, we need to give our cone depth and dimension. Begin by drawing a curved line connecting the apex with the base circle. This line should have a gentle curve that slightly bulges outwards, mimicking the shape of a cone.
Step 6: Erase Unnecessary Lines
Now that the basic structure of the cone is complete, use your eraser to remove any unnecessary lines or guide marks that are no longer needed. This will leave you with a clean and refined cone shape.
Step 7: Shade the Cone
To add further realism to your drawing, we can shade the cone. Start by identifying the light source in your drawing, which will determine the areas of light and shadow. Typically, the light source comes from the top of the cone. Shade the lower part of the cone by adding darker tones, gradually getting lighter towards the top.
Step 8: Add Details (Optional)
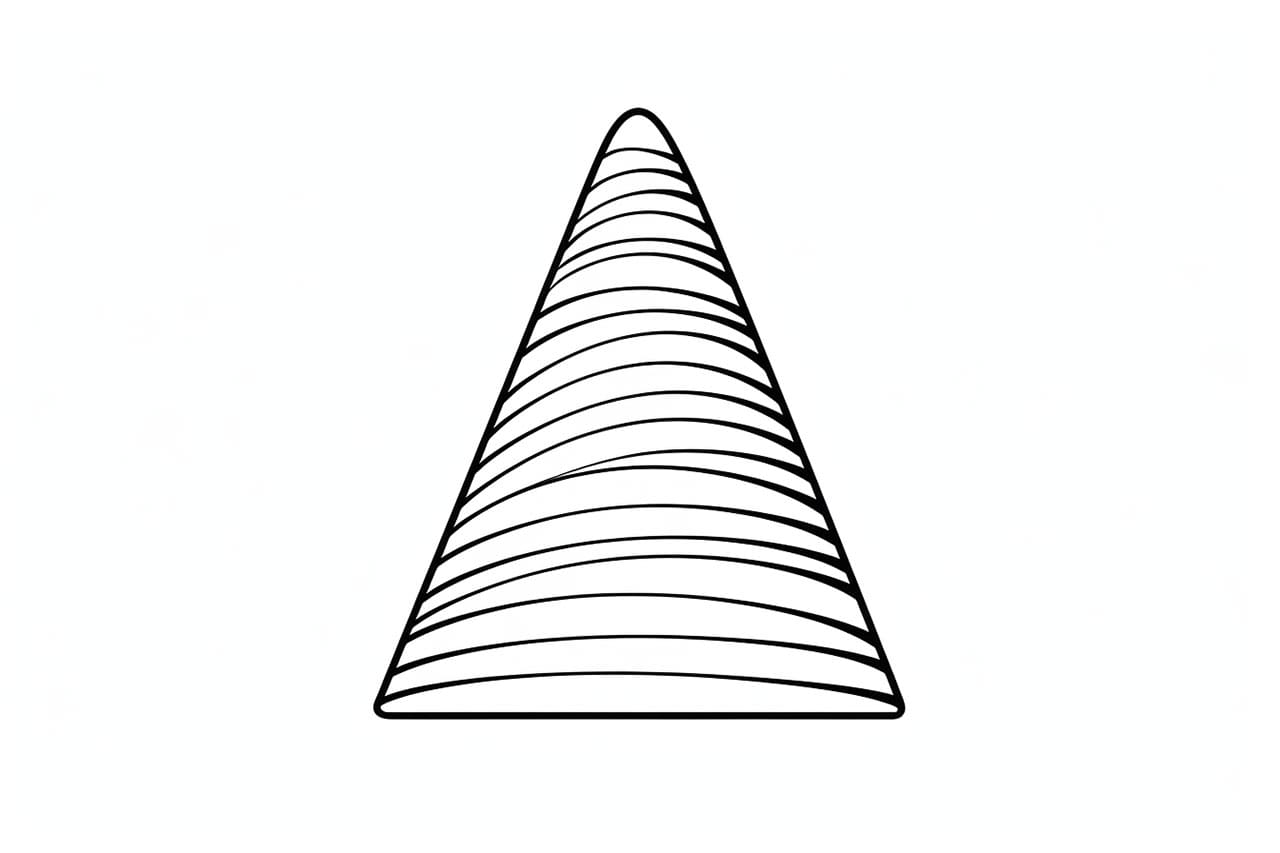
If you want to add more detail to your cone drawing, you can create texture by lightly sketching diagonal lines from the top to the bottom. This will give the cone a ridged appearance, similar to the texture of an ice cream cone.
Conclusion
Congratulations! You have successfully learned how to draw a cone. By following these step-by-step instructions, you can create realistic and visually appealing cone drawings. Remember to practice regularly to improve your drawing skills and explore different variations of cones. Whether it be a classic ice cream cone or an elaborate traffic cone, the possibilities are endless. So grab your pencil and start drawing cones today!
Fun Facts About Cones
- Cones are geometric shapes that have been used in architecture and design for their structural strength and aesthetic appeal.
- The ice cream cone was invented in the early 20th century, and it was an accidental discovery at the time of a St. Louis World’s Fair.
- Cones appear in nature, notably in pine cones, which are essential for the reproduction of pine trees.
- The tip of a cone is called the apex, and it’s the point where all the straight lines, called generatrix, converge.
- Cones have been used in art, from the Egyptian pyramids to modern sculptures, symbolizing stability and harmony.
- In mathematics, the volume of a cone is a third of the volume of a cylinder with the same base and height.
- Cones are important in optics and physics, described in the shape of light beams and sound waves.
- The human eye has cone cells that are responsible for color vision, different from the cone shapes typically thought of in geometry.
- Animals like the rhinoceros have cone-shaped horns, which are used for defense and attracting mates.
- The conical hat has been a symbol of witchcraft and wizardry in folklore and popular culture.
Suggestions for Scenes and Settings for Cone Drawings
- Ice Cream Parlour: Illustrate an array of colorful ice cream cones stacked high, surrounded by toppings like sprinkles and cherries.
- Pine Forest: Show a close-up view of a tree branch filled with pine cones, with a backdrop of a serene forest landscape.
- Conical Mountain: Create a majestic mountain scene where the peaks resemble perfect cones, perhaps with climbers approaching the summit.
- Festival of Lights: Picture a night scene with cone-shaped lanterns glowing softly, reflecting on a calm lake below.
- Sorcerer’s Tower: Design a whimsical tower that narrows into a cone at the top, surrounded by mist and magical symbols.
- Soundwave Space: Imagine a futuristic setting where cones represent the visualization of sound waves pulsing through the air.
- Desert Oasis: Draw a tranquil scene with sand dunes shaped like cones, an oasis nestled between them under a clear blue sky.
- Carnival Cones: Capture the excitement of a carnival, with cone-shaped tents offering games, performances, and sweet treats.
- Oceanic Shells: Depict a beach scene littered with conical seashells glistening in the tide, hinting at the diversity of marine life.
- Planetary Peaks: Envision a distant planet’s landscape with towering cone-like mountains, under a sky filled with stars and distant planets.