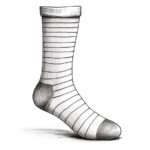
Are you eager to learn how to draw socks? Whether you are an aspiring artist or simply want to explore your creativity, drawing socks can be a fun and rewarding activity. In this step-by-step guide, I will take you through the process of drawing socks, from the basic outline to adding details and shading. So grab your drawing materials and let’s get started!
Materials Required
Before we delve into the wonderful world of sock drawing, gather the following materials:
- Drawing paper
- Pencil
- Eraser
- Fine-tip black pen or marker
- Colored pencils or markers (optional)
- Reference image of socks (optional)
Now that you have your materials ready, let’s move on to the first step.
Step 1: Basic Outline
Begin by drawing a simple rectangle or oval shape. This will serve as the outline for the sock. You can make the shape as small or as large as you like, depending on the size of the sock you want to draw. Remember to keep your pencil lines light and faint, as you will be erasing them later.
Step 2: Draw the Cuff
The cuff is the top part of the sock that folds over. Start by drawing a wavy line above the sock outline. This line should follow the shape of the sock but with slightly more curves. Make sure the cuff is wider at the top and gradually narrows down towards the sock’s opening.
Step 3: Add the Heel and Toe
To give your sock depth and dimension, draw a curved line extending from the bottom of the cuff towards the center of the sock outline. This line represents the heel. Next, draw a curved line at the front of the sock, slightly below the cuff. This line will represent the toe.
Step 4: Detail the Sock
Now it’s time to add some details to make your sock more realistic. Draw horizontal lines across the cuff and the sock body to represent the knitting pattern. You can add as many or as few lines as you prefer, depending on the style of sock you’re drawing.
Step 5: Shading and Texturing
To make your sock drawing pop, it’s important to add shading and texture. Start by lightly shading the areas where the sock folds or overlaps. This will create a sense of depth. Use your pencil to lightly blend the shading, ensuring a smooth transition between light and dark areas.
For texture, you can lightly draw diagonal or horizontal lines across the sock’s body, mimicking the look of knit fabric. Be careful not to press too hard, as you want the lines to be faint and subtle.
Step 6: Ink and Erase
Once you are satisfied with your pencil drawing, use a fine-tip black pen or marker to go over the final lines. This will make your drawing more defined and polished. Let the ink dry completely before erasing any remaining pencil marks.
Step 7: Color your Sock (Optional)
If you want to add some color to your drawing, now is the time. Use colored pencils or markers to fill in the sock with your desired hues. You can choose realistic colors or get creative with bold and vibrant shades. Consider using reference images or real socks as inspiration for color choices.
Conclusion
Congratulations! You have successfully learned how to draw socks. From the basic outline to adding details and shading, each step contributes to creating a realistic and visually appealing sock drawing. Remember to practice regularly and explore different sock styles and patterns to enhance your drawing skills.
So grab your materials, put your creativity to the test, and start sketching some socks! Whether you’re drawing cozy winter socks or funky patterned ones, the possibilities are endless. Happy drawing!