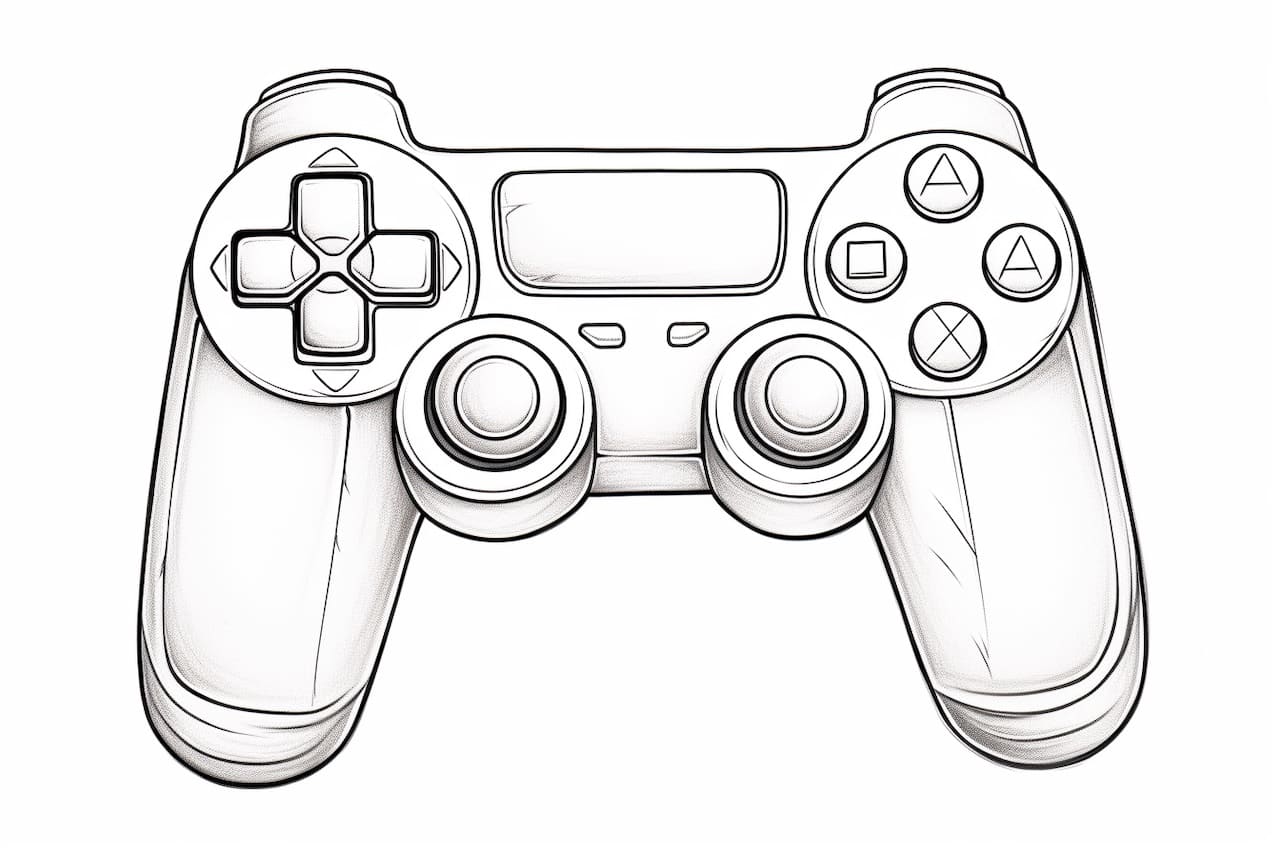
Welcome to this step-by-step guide on how to draw a game controller. Whether you’re an experienced artist or just getting started, this tutorial will help you create a realistic and detailed representation of a gaming controller. So grab your pencils, paper, and let’s get drawing!
Materials Required
To successfully complete this tutorial, you will need the following materials:
- A piece of paper or a sketchbook
- A pencil (HB or 2B is recommended)
- An eraser
- A ruler (optional)
- Colored pencils (optional)
Now that you have your materials ready, let’s begin!
Step 1: Basic Shape
Start by drawing a rectangular shape in the center of your paper. This will be the main body of the controller. You can use a ruler to ensure straight lines if you prefer.
Step 2: Buttons and Sticks
Next, draw the buttons and control sticks. These are typically located on the front of the controller. Use small circles and rectangles to represent the buttons and elongated shapes for the sticks. Place them in the appropriate positions according to the reference image you are using.
Step 3: D-Pad
Now, it’s time to add the directional pad, also known as the D-pad. This is usually located on the left side of the controller. Draw a square or a cross-shaped outline for the D-pad, depending on the style of the controller you are drawing.
Step 4: Triggers and Bumpers
Moving on to the topside of the controller, draw the triggers and bumpers. Triggers are typically elongated buttons, while bumpers are slender and curved. Make sure to place them correctly and proportionally in relation to the buttons and sticks.
Step 5: Joystick and Trackpad (Optional)
If you are drawing a more advanced controller, it might include a joystick and a trackpad. The joystick is usually located on the right side of the controller, and the trackpad can be found in the center. Draw circular shapes for both, with the joystick having a small handle sticking out.
Step 6: Additional Details
To add more realism to your game controller drawing, it’s time to add some extra details. This could include labeling buttons, drawing texture on the grips, or adding logo and brand markings. Pay close attention to the reference image you are using and recreate these details as accurately as possible.
Step 7: Shadows and Highlights
To make your drawing pop, it’s important to add shadows and highlights. Determine the light source direction and shade the areas where shadows would naturally occur. Use a slightly darker shade of pencil or cross-hatching technique for this. Similarly, use a lighter shade or leave some areas blank to represent highlights and reflections.
Step 8: Coloring (Optional)
If you prefer to add color to your drawing, now is the time to do so. Game controllers come in various colors, so use colored pencils or markers to bring life to your artwork. Refer to the reference image or let your imagination guide you in choosing the colors.
Step 9: Final Touches
Once you have added all the desired details and colors, take a moment to review your drawing. Make any necessary adjustments or corrections before moving on to the final step.
Step 10: Outline and Erase
To finalize your artwork, carefully trace over the main lines with a pen or a darker pencil. This will make your drawing stand out and give it a polished look. Once you are satisfied with the outline, erase any unnecessary pencil marks.
And there you have it! You’ve successfully drawn a game controller. With practice, you can refine your skills and create even more intricate and detailed drawings of various gaming accessories.
Conclusion
In this step-by-step tutorial, we have learned how to draw a game controller. By following these instructions and using your creativity, you can create stunning artwork that showcases your love for gaming. Remember to practice regularly and experiment with your own unique style. Enjoy the process and let your imagination soar!