Welcome to this step-by-step guide on how to draw Drogon, the fierce and majestic dragon from the popular TV series, Game of Thrones. Drawing dragons can be a thrilling experience, and with a little practice and guidance, you’ll be able to bring Drogon to life on paper. Whether you’re a beginner or an experienced artist, this tutorial will provide the necessary steps to create a stunning representation of Drogon. So, let’s get started!
Materials Required
Before we begin, make sure you have the following materials on hand:
- Drawing paper: Choose a smooth, heavyweight paper suitable for drawing. A size of 9×12 inches or larger is recommended.
- Pencils: Have a range of graphite pencils, such as 2H, HB, 2B, 4B, and 6B, for shading and outlining.
- Erasers: A kneaded eraser is ideal for lifting graphite and creating highlights. A regular eraser will also be useful for precise erasing.
- Pencil sharpener: Keep your pencils sharp for crisp lines and details.
- Fine-tip markers or pens: Optional, but can be useful for adding bold outlines or details at the end.
Now that you have your materials ready, let’s dive into the step-by-step process of drawing Drogon!
Step 1: Basic Shapes
Start by sketching the basic shapes that will serve as the foundation of Drogon’s body. Begin with a large oval for the body and a smaller oval for the head. Connect these shapes with a curving line for the neck.
Step 2: Facial Features
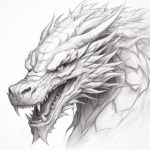
Now, let’s add the facial features of Drogon. Draw two almond-shaped eyes within the head oval, leaving a small space in between. Add a curved line below the eyes for the snout. Then, sketch two small nostrils near the top part of the snout. Finally, draw a wide, open mouth with sharp teeth protruding from the upper and lower jaws.
Step 3: Wings and Limbs
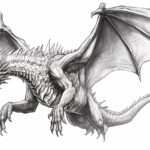
Next, we will draw Drogon’s wings and limbs. Start by sketching two large, triangular shapes on each side of the body for the wings. Make sure the top corners of the triangles extend upward slightly. Add details to the wings by drawing smaller, curved lines to represent the texture of the wings. For the limbs, sketch four curved lines that extend downward from the body. Add small, claw-like shapes at the end of each limb.
Step 4: Tail and Body Details
In this step, we will add the tail and additional details to the body. Extend a long, curving line from the back of Drogon’s body to create the tail. Make sure the tail tapers towards the end and add some texture by drawing smaller curves along the length. Now, add scales to the body and limbs by drawing curved lines in a repetitive pattern. This will give Drogon a more realistic appearance.
Step 5: Refine and Shade
Now that we have the basic structure of Drogon, it’s time to refine the drawing and add shading for depth. Use a darker pencil, such as a 4B or 6B, to outline the main features of the dragon, such as the eyes, snout, teeth, and scales. Then, start adding shading to create volume and define the form of Drogon. Pay attention to the direction of light and use hatching or cross-hatching techniques to create shadows and highlights. Take your time with this step, as shading is crucial in bringing out the three-dimensional aspect of the drawing.
Step 6: Final Details
To complete your drawing of Drogon, make any necessary adjustments and add final details. Add texture to the wings, tail, and body by adding more lines or cross-hatching. Enhance the eyes by darkening the pupils and adding highlights with an eraser. If you prefer a bolder look, you can use fine-tip markers or pens to outline certain areas or add more definition to specific details. Just be careful not to overpower the drawing with excessive ink.
Conclusion
Congratulations! You have successfully learned how to draw Drogon, the impressive dragon from Game of Thrones. By following these step-by-step instructions, you’ve created a detailed and captivating representation of Drogon. Remember, practice is key when it comes to improving your artistic skills, so don’t be discouraged if your first attempt is not perfect. With time and dedication, you’ll continue to develop your drawing abilities. So grab your pencils and start bringing more mythical creatures to life on paper! Happy drawing!