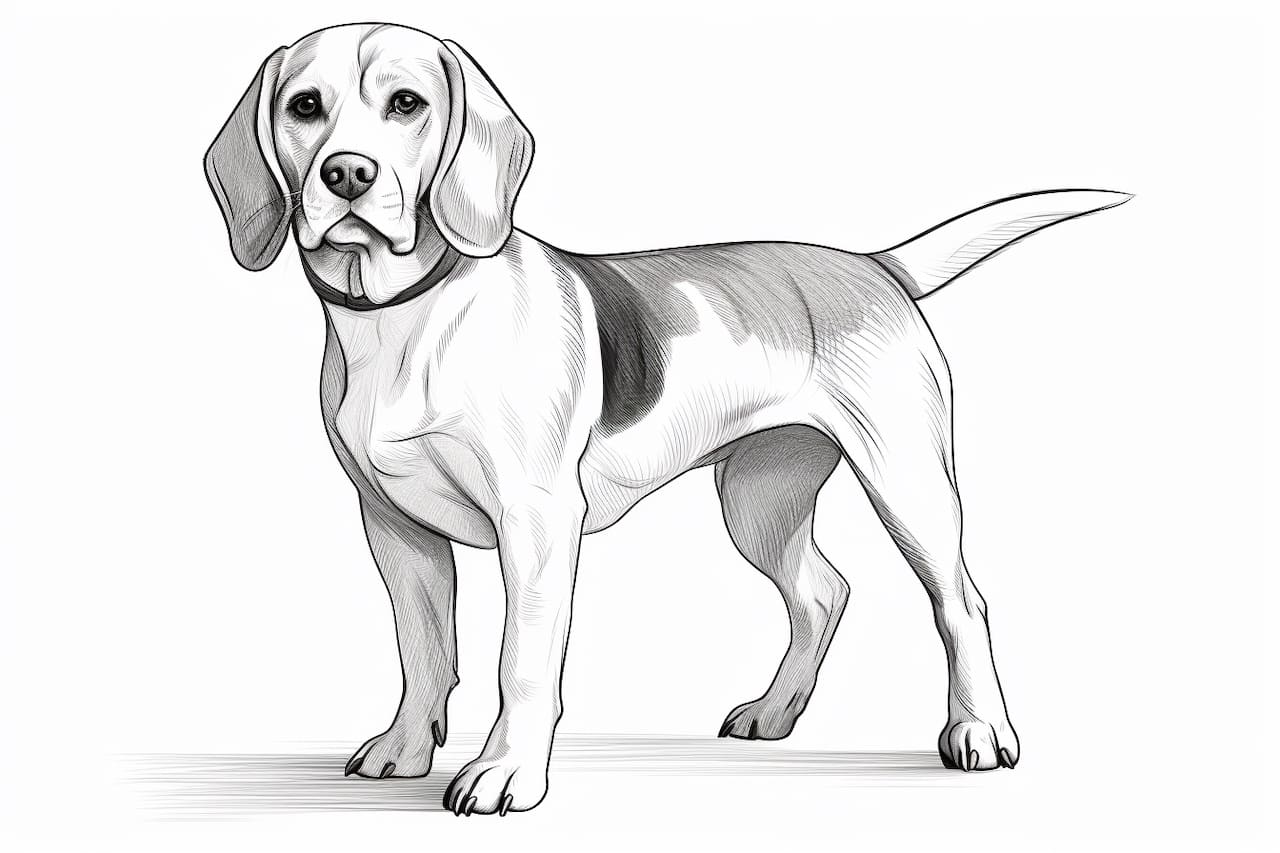
Welcome to this step-by-step tutorial on how to draw a Beagle! In this guide, we will break down the process into simple and easy-to-follow steps. Whether you are a beginner or an experienced artist, you will be able to create a realistic and adorable Beagle drawing by the end of this tutorial.
Materials Required
Before we get started, make sure you have the following materials on hand:
- Pencil
- Eraser
- Paper
- Colored pencils or markers (optional)
With these materials ready, let’s begin!
Step 1: Basic Outline
Start by drawing a large oval shape in the center of your paper. This will be the Beagle’s body. Next, draw a smaller oval shape on top of the body, slightly towards the right side. This will be the Beagle’s head. Connect the head and body with a curved line, representing the neck.
Step 2: Facial Features
In this step, we will focus on drawing the Beagle’s facial features. Start by drawing two vertical lines in the head oval to indicate the position of the eyes. Then, draw a curved line underneath the eyes to create the snout. Add a small circle at the end of the snout for the nose.
Next, draw two floppy ears on either side of the head. Beagles are known for their long and droopy ears, so make sure to capture that characteristic.
Step 3: Eyes and Details
Now let’s add some details to the Beagle’s face. Draw two ovals within the eye area to represent the eyes. Within each eye, draw a smaller circle to indicate the pupils. Add some shading around the eyes to give them depth and dimension.
Next, draw a curved line above the nose to create the Beagle’s brow line. This will add expression to the face. Then, draw a curved line underneath the snout to create the mouth. Add a small line in the middle of the mouth to define the lips.
Step 4: Body and Limbs
In this step, we will focus on adding details to the Beagle’s body and limbs. Start by drawing two curved lines extending from the body oval to create the front legs. At the end of each leg, draw a small oval shape for the paws.
Next, draw two slightly longer curved lines extending from the lower part of the body oval to create the hind legs. Again, draw small oval shapes at the end of each leg for the paws.
Step 5: Tail and Body Details
Now let’s add the Beagle’s tail. Draw a long, curved line extending from the back of the body oval. Beagles have a slightly curved tail that is often raised and wagging.
To add more details to the body, draw a curved line across the middle of the body oval to represent the belly. Then, draw a few short lines on the front legs and hind legs to indicate the fur texture.
Step 6: Fur and Shading
To give the Beagle drawing a more realistic look, we will add some fur texture and shading. Start by adding small, curved strokes around the face, ears, and body to represent fur. Be careful not to overdo it, as Beagles have short fur compared to some other breeds.
Next, add some shading to create depth and dimension. Shade the areas where shadows would naturally fall, such as underneath the body, legs, and tail. You can use a pencil or colored pencils to add shading.
Step 7: Final Touches
In the final step, go over your drawing and make any necessary adjustments. Erase any stray lines and refine the shape of the Beagle’s body and limbs. Darken certain areas, such as the eyes and nose, to make them stand out.
If you want to add color to your drawing, use colored pencils or markers to bring your Beagle to life. Beagles typically have a combination of brown, white, and black fur, but feel free to get creative with your color choices.
Conclusion
Congratulations on completing your Beagle drawing! By following these step-by-step instructions, you have created a realistic and adorable representation of this beloved breed. Remember, practice makes perfect, so keep drawing and exploring your artistic skills. We hope you enjoyed this tutorial and found it helpful in enhancing your drawing abilities.