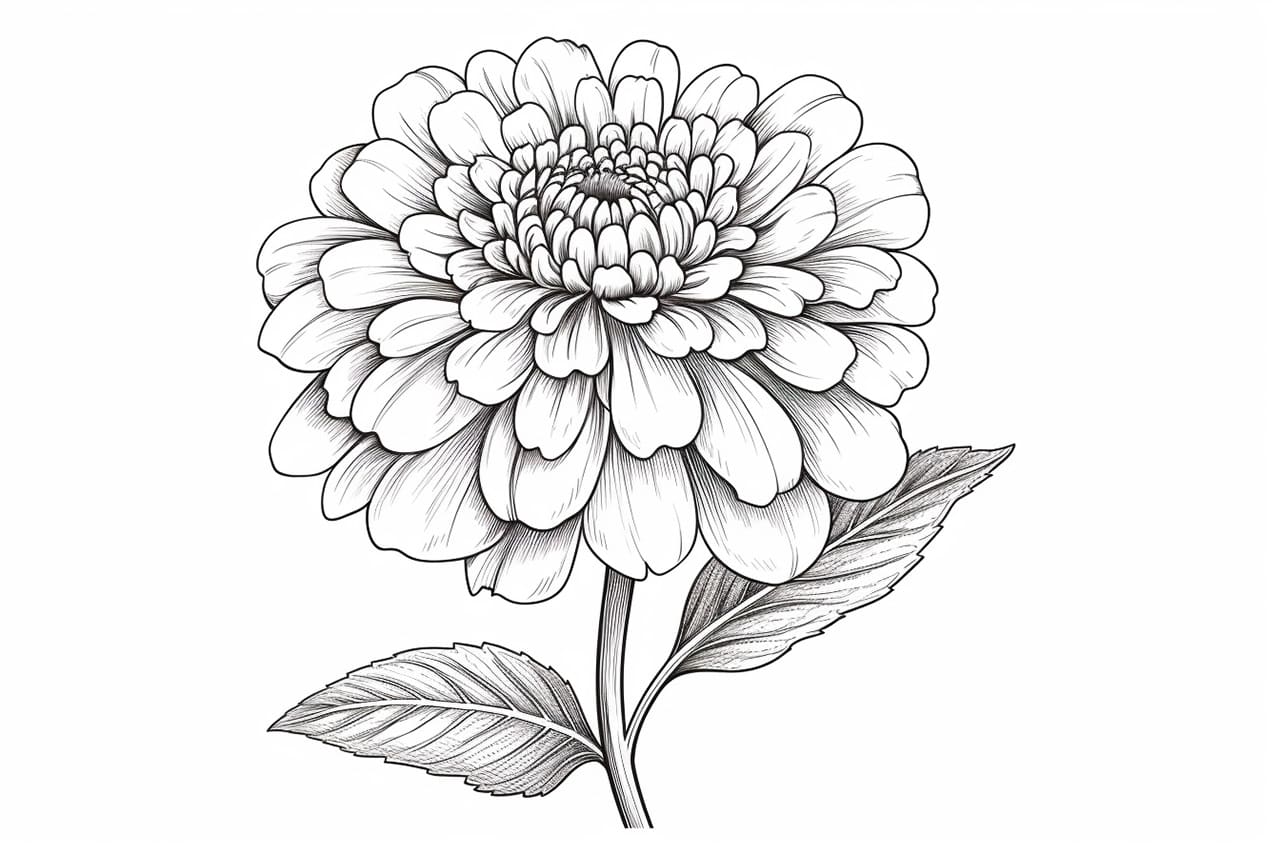
Welcome to this step-by-step guide on how to draw a beautiful zinnia flower. Whether you’re an experienced artist or just starting, this tutorial will help you create a stunning zinnia drawing. Zinnias are known for their vibrant colors and intricate petals, making them a great subject to practice your drawing skills. So, let’s gather our materials and get started!
Materials Required:
- Drawing paper
- Pencil
- Eraser
- Fine-tip markers or colored pencils
- Reference photo of a zinnia (optional)
Now that we have our materials ready, let’s begin creating our zinnia masterpiece!
Step 1: Sketch the Basic Shape
Start by lightly sketching a large oval shape in the center of your paper. This will serve as the base for your zinnia flower. Don’t worry about making it perfect, as we’ll be adding details later on.
Step 2: Add Petal Outlines
Next, let’s draw the outline of the zinnia’s petals. Zinnias typically have several layers of petals, so we’ll start with the outermost layer. Draw small, curved lines radiating from the center of the oval shape, extending towards the edge. Repeat this step to add more layers of petals, making each layer shorter and more rounded than the previous one.
Step 3: Define the Petals
Now, let’s define the shape of each petal. Starting with the outermost layer, add curved lines along the previously sketched outlines to give the petals depth and dimension. Make sure the lines curve inwards towards the center of the flower.
Step 4: Draw the Inner Petals
Moving inward, draw another layer of curved lines to represent the inner petals. These petals should be shorter and more tightly packed than the previous layer. Again, make sure the lines curve inwards towards the center.
Step 5: Detail the Petals
In this step, we’ll add more details to the petals. Starting with the outermost layer, add small lines along the edges of each petal to create texture. These lines should follow the curve of the petal and give the flower a more realistic look. Repeat this step for each layer of petals, working from the outermost to the innermost layer.
Step 6: Draw the Center
Now let’s move on to the center of the zinnia. Draw a small circle or oval shape in the middle of the flower. This will represent the center disk of the zinnia. Next, add short, curved lines radiating from the center disk to create the stamen. Finally, add more small lines around the center disk to create texture.
Step 7: Refine the Outline
In this step, we’ll go over the entire drawing and refine the outline. Use a darker pencil or fine-tip marker to trace over the main lines of the zinnia, making them more defined and bold. Pay attention to the outer shape of the flower as well as the individual petals.
Step 8: Erase Guidelines
Now that the outline is complete, use your eraser to carefully erase any remaining guidelines or sketch lines that are no longer needed. Take your time and be gentle to avoid smudging the drawing.
Step 9: Add Color
It’s time to bring our zinnia to life with color! Choose your preferred medium, whether it’s colored pencils, markers, or any other coloring tool. Start by coloring the petals, using light strokes to mimic the texture we created earlier. Gradually build up the color by layering different shades and blending them together. Continue coloring the center disk and stamen, adding depth and dimension with darker tones and highlights.
Step 10: Final Touches
Take a step back and assess your drawing. Are there any areas that need more definition or additional details? Use your pencil or fine-tip marker to make any necessary adjustments. You can also add shading to further enhance the three-dimensional appearance of the zinnia. Take your time and don’t be afraid to experiment!
Conclusion
Congratulations! You have successfully learned how to draw a zinnia flower. By following these step-by-step instructions, you can create a beautiful and realistic zinnia drawing. Remember to practice and experiment with different techniques to further improve your skills. So gather your materials, pick up your pencil, and let your creativity blossom with zinnia drawings!