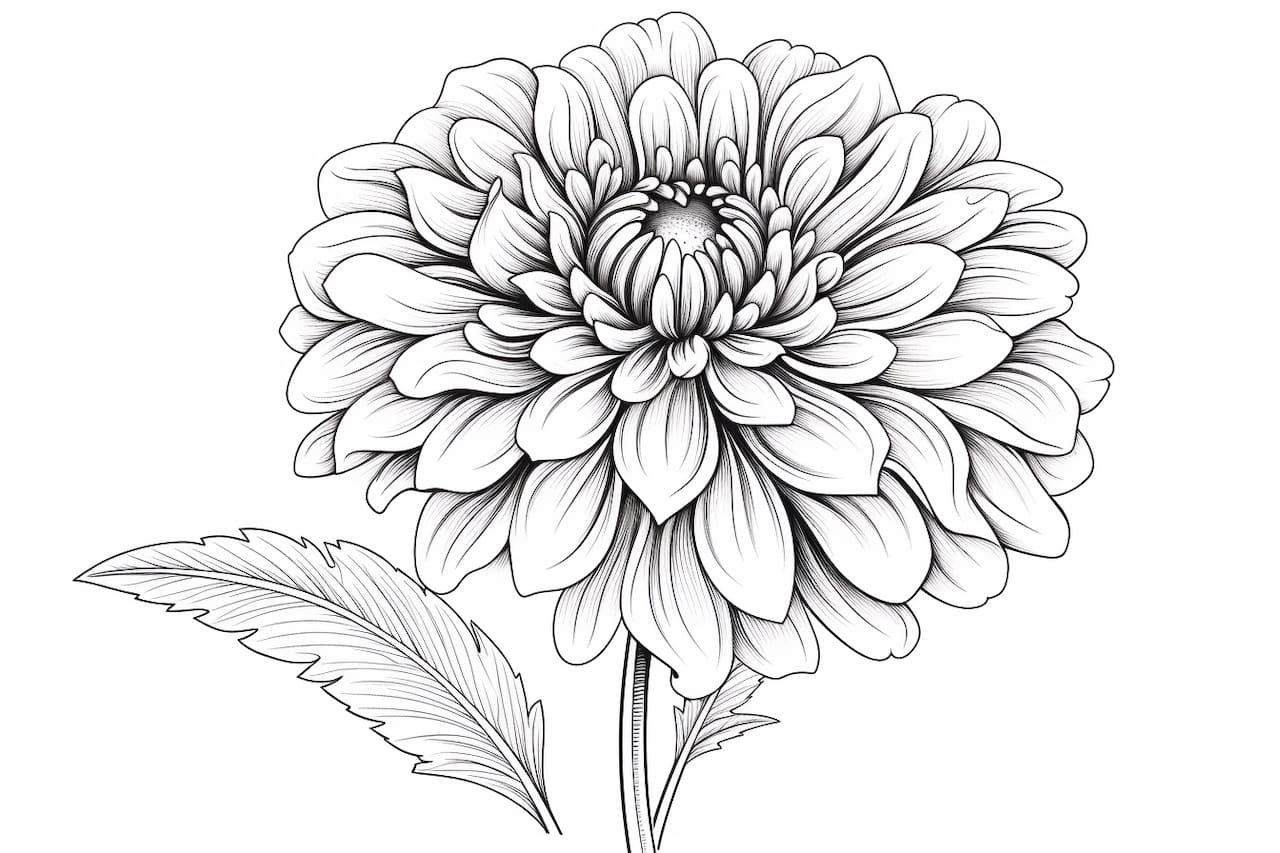
Welcome to this step-by-step guide on how to draw a dahlia flower. Dahlias are known for their intricate petal patterns and vibrant colors, making them a popular subject for artists. Whether you are a beginner or an experienced artist, this tutorial will walk you through the process of creating your own stunning dahlia drawing. So grab your pencils and let’s get started!
Materials Needed
Before we begin, let’s gather all the materials you will need for this drawing:
- Drawing paper
- Pencils (ranging from H to 6B)
- Eraser
- Pencil sharpener
- Ruler
- Compass (optional)
- Colored pencils or markers (optional)
Now that we have everything ready, let’s dive into the steps of drawing a dahlia!
Step 1: Sketch the Center of the Flower
Start by drawing a small circle in the center of your paper. This circle will serve as a guide for the center of the dahlia flower. You can use a compass to create a perfect circle, but if you don’t have one, don’t worry! You can freehand it by sketching a circle using your pencil and then refining it with a ruler.
Step 2: Add Petals to the Center
Around the circle, start adding small curved lines extending outwards. These lines will serve as the inner layer of petals. Make sure to leave some gaps between the petals, as dahlias typically have multiple layers of petals.
Step 3: Draw the Outer Petal Layer
Next, draw a larger circle around the inner layer of petals. This will serve as the guide for the outer layer of petals. Similar to the previous step, add curved lines extending outwards from this circle, but make them slightly longer than the inner layer of petals. Again, leave some gaps between the petals.
Step 4: Add More Petal Layers
Now, let’s add more layers of petals to give our dahlia drawing depth and texture. Draw another circle around the previous layer and repeat the process of adding curved lines for each layer. Remember to make the petals gradually longer as you move outward.
Step 5: Refine the Petal Shapes
Take a closer look at the shape of the petals and refine them as needed. Dahlias can have various petal shapes, such as pointed or rounded. Use your artistic judgment to tweak the curves and angles to your liking. Don’t be afraid to experiment!
Step 6: Add Details to the Petals
To make the petals look more realistic, add some subtle details. Draw small lines along the curved edges of the petals to indicate the texture and folds. This will give your dahlia drawing a three-dimensional appearance.
Step 7: Shade the Petals
Now it’s time to add shading to your dahlia drawing. Start by determining the light source. Imagine where the light is coming from and shade the areas that would be in shadow. Use a range of pencils, from lighter (H) for the highlighted areas to darker (6B) for the shadows, to create a realistic shading effect.
Step 8: Add Stem and Leaves
To complete your dahlia drawing, add a stem and some leaves. Draw a straight line extending from the bottom of the flower. Then, add a few elongated oval shapes along the stem to represent the leaves. Remember to add veins to the leaves and some shading to give them depth.
Conclusion
Congratulations! You have successfully learned how to draw a dahlia flower. By following these step-by-step instructions, you were able to create a beautiful and realistic dahlia drawing. Remember to practice and experiment with different techniques to further enhance your artistic skills. Enjoy the process and have fun exploring the world of botanical art!