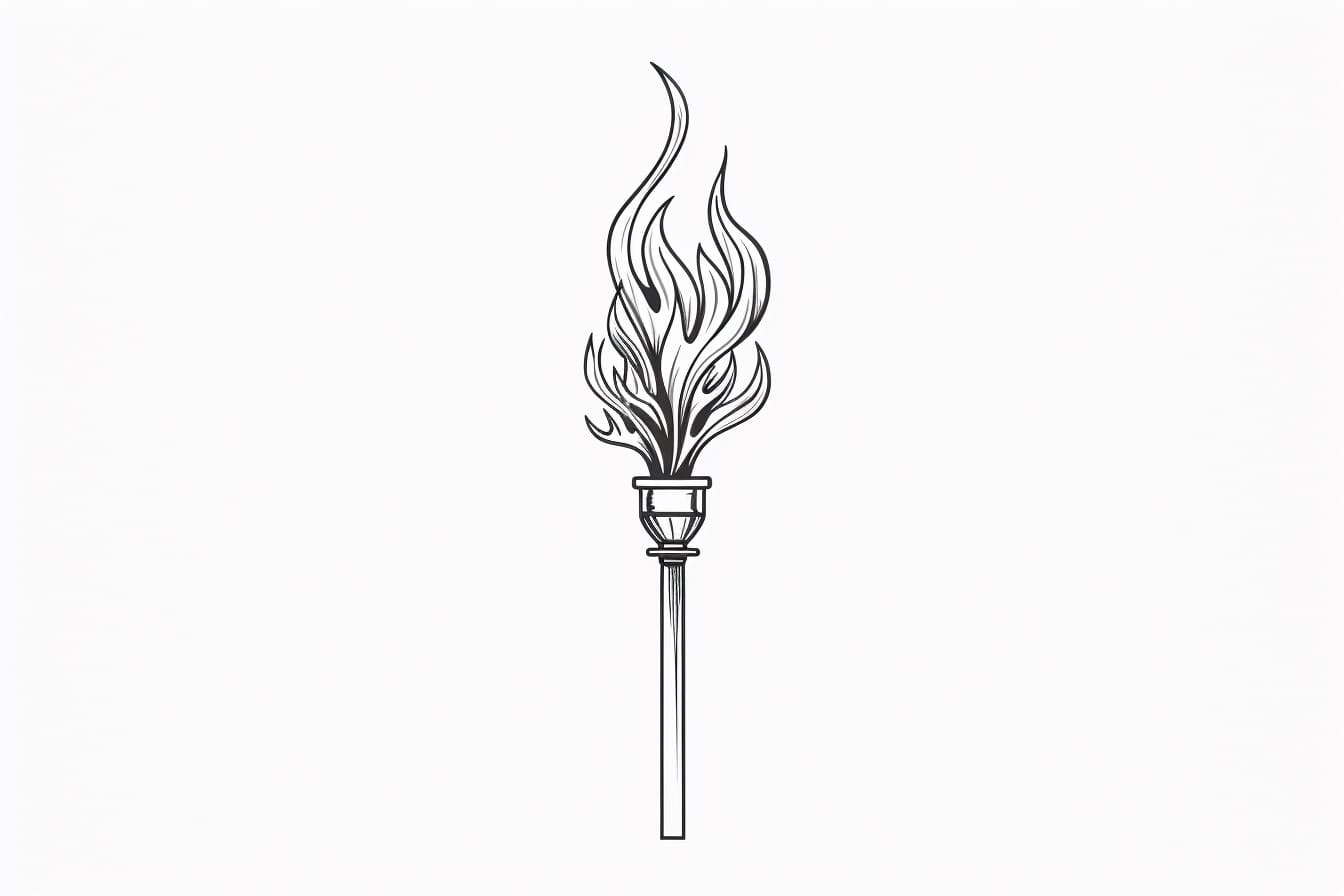
Are you interested in learning how to draw a torch? Whether you want to incorporate it into a larger artwork, create a stand-alone illustration, or simply improve your drawing skills, this step-by-step guide will show you how to draw a torch in a clear, clean, and concise manner. By following these instructions, you’ll be able to create a realistic and detailed representation of a torch. So, let’s get started!
Materials Required
Before we begin, let’s gather the materials you’ll need to complete this drawing:
- Pencil
- Eraser
- Paper
- Sharpener
Now that you have all the necessary tools, let’s dive into the step-by-step process of drawing a torch.
Step 1: Outline the Basic Shape
Start by drawing a vertical straight line that will serve as the handle of the torch. Make sure to leave enough space at the top for the flame. Next, draw a slightly curved line at the top of the handle to indicate the base of the flame holder.
Step 2: Add Detail to the Handle
Now, let’s add some texture and detail to the handle. Start by drawing several horizontal lines across the handle to create a ribbed effect. These lines should be evenly spaced and extend from the top to the bottom of the handle. Add some smaller lines around the base of the handle to give it a more realistic look.
Step 3: Shape the Flame Holder
To create the shape of the flame holder, draw a curved line that starts from the base of the handle and arcs outward. Bring the line back towards the handle, but leave a small gap to indicate an opening. This will be the area where the flame will emerge from.
Step 4: Draw the Flame
Now, it’s time to add the flame! Starting from the opening in the flame holder, draw a series of wavy lines that extend upward and outward. These lines should overlap and gradually get smaller as they reach the top of the flame. This will give the flame a dynamic and flickering appearance.
Step 5: Define the Flame Shape
To give the flame more definition and depth, draw a series of curved lines along the outer edges of the flame. These lines should follow the general shape of the flame and create a sense of movement. Add some smaller lines within the flame to suggest the glowing and flickering effect.
Step 6: Refine the Torch Handle
Now that the flame is complete, let’s go back to the handle for some refinements. Add some shading and additional texture to make the handle appear more realistic. Use short, curved lines to create a wood grain effect. Add subtle highlights and shadows to give the handle dimension.
Step 7: Finalize the Torch
In this final step, we will add the finishing touches to our torch drawing. Take a step back and examine your drawing. Erase any unnecessary lines and clean up any smudges or marks. Adjust the shading and highlights to create a sense of balance and realism. Once you are satisfied with the result, your torch drawing is complete!
Conclusion
Congratulations on completing your torch drawing! By following these step-by-step instructions, you have learned how to draw a torch in a detailed and realistic manner. Remember, practice makes perfect, so don’t be afraid to experiment with different techniques and styles. Keep honing your drawing skills, and soon you’ll be able to create stunning artworks that incorporate torches and other elements. Keep up the great work!