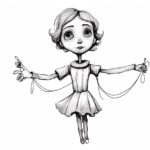
As an expert artist and drawing instructor, I will guide you through the process of how to draw a tooth fairy in a clear, clean, and concise manner. With step-by-step instructions, you can create a charming tooth fairy illustration that will spark your imagination and bring smiles to anyone who sees it.
Materials Required
Before we get started, make sure you have the following materials ready:
- Pencil
- Eraser
- Paper
- Colored pencils or markers (optional)
Now that you have all the necessary materials in hand, let’s begin our artistic journey to create a delightful tooth fairy!
Step 1: Sketch the Basic Body Shape
Start by sketching a basic oval shape for the tooth fairy’s head. This will serve as our foundation for the rest of the drawing. Add a curved line below the head to create the body.
Step 2: Draw the Facial Features
Now it’s time to bring our tooth fairy to life by adding facial features. Draw two large, almond-shaped eyes in the center of the head, leaving some space between them. Add a small curved line for the nose and a smiling mouth underneath.
Step 3: Add the Hair
Let’s give our tooth fairy some charming hair! Draw flowing, wavy lines around the head to create the hairstyle. Feel free to get creative with the hairstyle, adding curls or braids for an extra touch of magic.
Step 4: Define the Body
To create a more defined body shape, add two curved lines on either side of the initial body shape to represent the shoulders. Extend them downwards to indicate the arms. Connect the bottom of the body with a curved line to form the lower part of the fairy’s dress.
Step 5: Draw the Wings
Every tooth fairy needs a pair of beautiful wings. Start by drawing two large, curved lines extending from the fairy’s shoulders. Connect these lines with smaller curved lines to create the delicate details of the wings. Feel free to embellish the wings with additional patterns or designs, using your imagination.
Step 6: Add Details and Clothing
Now it’s time to add some delightful details to make your tooth fairy unique. Draw a crown or a tiara on top of the fairy’s head to signify her magical status. You can also add a wand in one hand and a small bag of teeth in the other. Don’t forget to decorate her dress with intricate patterns or sparkles to enhance her whimsical appearance.
Step 7: Refine and Erase
Take a step back and examine your drawing. Use your eraser to remove any unnecessary lines or mistakes. Now is the time to make any adjustments or tweaks to ensure your tooth fairy looks just the way you imagined.
Step 8: Add Colors (Optional)
If you want to take your drawing to the next level, grab your colored pencils or markers and add some vibrant hues to your tooth fairy. Let your creativity shine as you bring her to life with your favorite colors. Think about using soft pastels for her skin, pastel or bright colors for her outfit, and shimmering or contrasting shades for her wings.
Conclusion
Congratulations! You have successfully drawn your very own tooth fairy. With a few simple steps and a touch of creativity, you’ve created a magical illustration that will surely capture the hearts of those who see it. Remember, practice makes perfect, so keep honing your drawing skills and exploring your imagination. Have fun!


