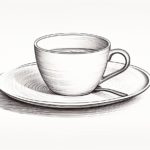
If you want to learn how to draw a tea cup, you’ve come to the right place! In this step-by-step tutorial, I will guide you through the process of creating a realistic and beautiful tea cup drawing. Whether you are a beginner or an experienced artist looking to sharpen your skills, this guide will provide you with clear and concise instructions to help you create a stunning tea cup artwork.
Materials Required
To get started, gather the following materials:
- Pencil: Use a graphite pencil with a medium or soft lead for sketching.
- Eraser: Have a soft eraser handy to correct any mistakes.
- Paper: Choose a smooth and sturdy paper suitable for drawing, such as bristol board or drawing paper.
- Ruler: Use a ruler for measuring and creating straight lines.
- Compass: A compass will come in handy for drawing circular shapes, such as the rim of the tea cup.
Now that you have all the necessary materials, let’s dive into the step-by-step process of drawing a tea cup.
Step 1: Sketch the Basic Shape
Start by lightly sketching a horizontal oval shape to represent the base of the tea cup. Make sure it is centered on the paper and proportional to the size you desire. This oval will serve as the foundation for the rest of the drawing.
Step 2: Draw the Handle
On the right side of the oval shape, draw a curved line that extends vertically and then curves back towards the base of the cup. This line will form the outer edge of the handle. Next, draw a smaller curved line within the first line, following its general shape. This will create the inner edge of the handle. Connect the two lines at the top and bottom to complete the handle.
Step 3: Add Depth to the Cup
To give the tea cup a three-dimensional appearance, draw a vertical line down the center of the oval shape, starting from the top rim and extending to the base. This line represents the side of the cup facing away from the viewer. Then, draw a horizontal line that slightly curves to indicate the bottom of the cup. Connect the end of this line to the sides of the cup, forming the base.
Step 4: Define the Rim and Base
Using the compass, draw a circle at the top of the oval shape to create the rim of the tea cup. Make sure it is centered and proportionate to the cup’s size. Next, add another smaller oval shape at the bottom of the cup to represent the base. This oval should align with the shape of the cup and be slightly wider.
Step 5: Refine the Shape
Now that the basic structure of the tea cup is in place, refine the shape by erasing any unnecessary lines and adjusting the curves and proportions as needed. Take your time during this step to ensure that the cup looks balanced and symmetrical.
Step 6: Add Details
To make the tea cup more realistic, add some details such as a decorative pattern or texture to the rim and base. You can also draw a small curved line near the base to create a shadow, giving the cup a sense of depth and dimension.
Step 7: Shade and Add Shadows
Now it’s time to bring your tea cup drawing to life through shading and shadows. Use your pencil to create subtle gradients by applying lighter pressure for lighter areas and darker pressure for shadows. Shade the areas of the cup that are facing away from the light source, such as the side opposite to the light. Add shadows underneath the cup and the handle to create a more realistic and three-dimensional effect.
Conclusion
Congratulations! You have successfully learned how to draw a tea cup. By following these step-by-step instructions and using your creativity, you can create beautiful tea cup drawings. Remember to practice regularly to improve your drawing skills and explore different styles and techniques. Enjoy your artistic journey, and happy drawing!