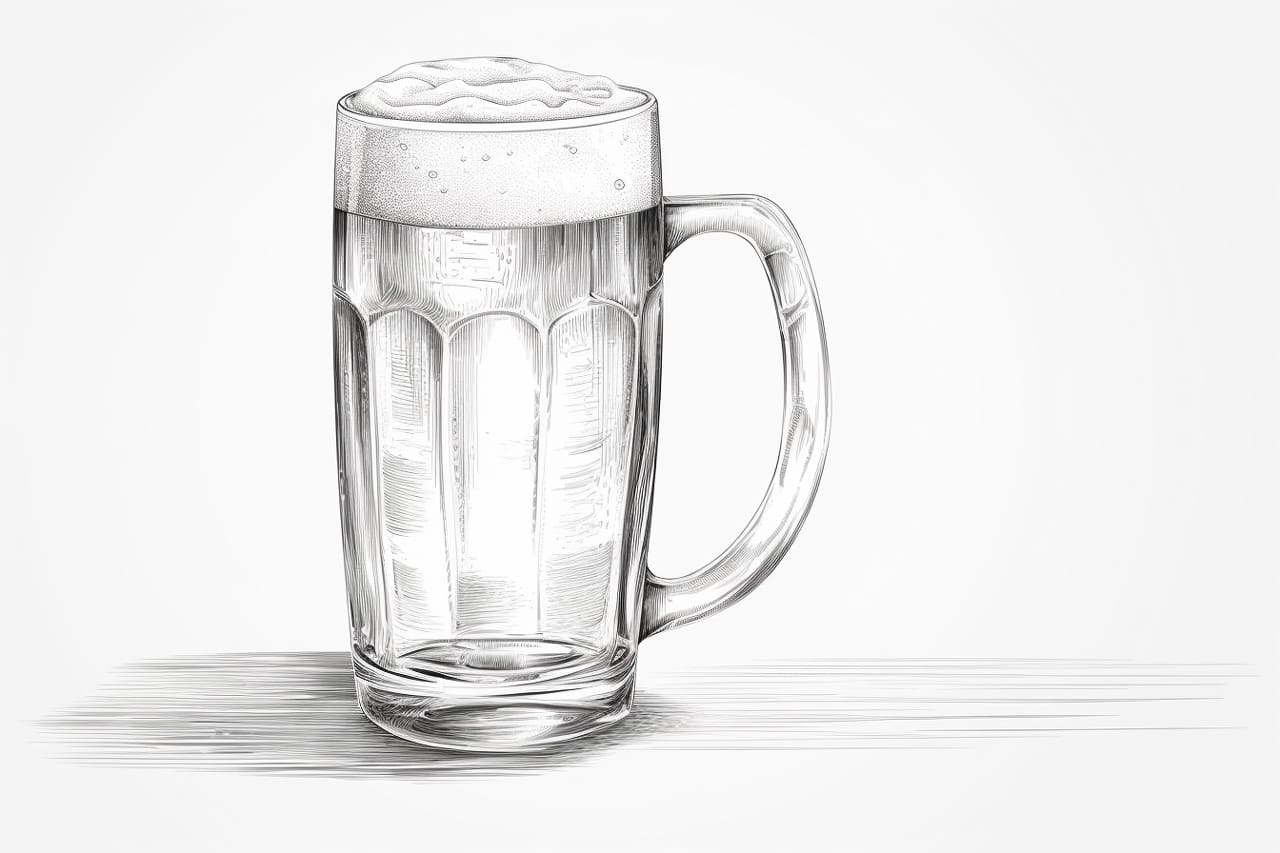
Have you ever tried to draw a beer but struggled to get it just right? Well, fear not! In this step-by-step guide, I will show you how to draw a delicious pint of beer with ease. Whether you’re a beginner or an experienced artist, these instructions will help you create a realistic and mouth-watering portrayal of everyone’s favorite beverage. So grab your pencils and let’s get started!
Materials Required
Before we jump into the drawing process, let’s make sure you have all the necessary materials. Here’s what you’ll need:
- Paper: Select a smooth and sturdy paper that can handle pencil and ink without smudging or tearing.
- Pencils: A range of graphite pencils (HB, 2B, and 4B) will allow you to create different shading and depth.
- Eraser: Choose a soft eraser to clean up any mistakes or unwanted lines.
- Ink pens: Optional but recommended for adding depth and definition to your drawing.
- Reference image: Find a high-quality photo of a beer or use an actual beer as a reference for accurate details.
Now that you have all your materials ready, let’s dive into the step-by-step process of drawing a beer.
Step 1: Outline the Glass
Start by drawing a smooth oval shape for the top of the beer glass. Keep it proportional and centered on your paper. Then, draw two straight lines downward from the oval to create the sides of the glass. Add a small curve at the bottom to close the shape.
Step 2: Add the Beer Foam
Inside the glass shape, draw a wavy line to represent the foam at the top of the beer. Make sure to leave some gaps and irregularities to make it look natural. The foam should extend slightly above the glass rim.
Step 3: Define the Glass
Now it’s time to add some details to the glass. Draw a curved line around the top rim of the glass to give it thickness. Then, draw two vertical lines from the rim down towards the base of the glass to create the sides. Add a slight curve at the bottom to show the curve of the glass.
Step 4: Draw the Beer
Inside the glass, lightly shade a rectangle shape starting from the bottom, leaving a small space for the reflection highlights. Use a darker pencil to add more darkness towards the bottom of the glass to represent the depth of the beer. Blend the shading gently with a blending stump or your finger for a smooth transition.
Step 5: Refine the Foam
With a lighter pencil, add some texture and definition to the foam. Draw small, irregular shapes along the top of the foam, creating a fluffy and natural appearance. Blend the foam gently with your eraser to soften the edges and make it look more realistic.
Step 6: Add Shadows and Highlights
To make your beer drawing pop, add some shadows and highlights. Use a darker pencil to shade the area where the beer meets the glass to create depth. Then, use a white ink pen or a white pencil to add highlights on the rim of the glass and the foam. This contrast will make your drawing look more three-dimensional.
Step 7: Add Details and Reflections
Now it’s time to add the final details to your beer drawing. With a fine ink pen, carefully trace the outline of the glass and foam, making it more defined and crisp. Pay attention to any reflections or highlights on the glass and add them using thin, curved lines.
Conclusion
Congratulations! You have successfully learned how to draw a beer. By following these step-by-step instructions, you can create a realistic and mouth-watering representation of a beer glass. Remember to practice and experiment with different shading techniques to improve your skills. So grab your materials, a cold beer for inspiration, and let your artistic abilities flow. Cheers!