If you’ve ever wondered how to draw a plane, you’re in luck! In this step-by-step guide, I’ll walk you through the process of drawing a plane in an easy and understandable way. Whether you’re a beginner or an experienced artist, this guide will help you create a realistic and impressive plane drawing. So grab your pencils and let’s get started!
Materials Required
Before we dive into the drawing process, let’s gather the materials you’ll need. Don’t worry, you won’t need anything fancy or expensive. Here’s what you’ll need:
- Paper: Choose a sheet of paper that is smooth and suitable for drawing. A standard letter or A4 size will work perfectly fine.
- Pencils: You’ll need a range of graphite pencils with different hardness levels. Start with a 2B pencil for sketching and shading, and have an HB pencil for lighter lines.
- Eraser: A good quality eraser will come in handy for correcting any mistakes or making adjustments to your drawing.
- Ruler: A straight edge ruler will help you draw precise and straight lines.
- Blending Stump or Cotton Swabs: These are useful for blending and shading certain areas of your plane drawing.
Now that you have all the necessary materials, let’s dive into the step-by-step process of drawing a plane!
Step 1: Sketch the Basic Shapes
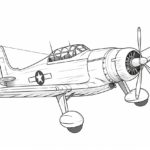
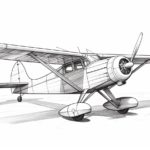
Start by lightly sketching the basic shapes that make up the plane. Draw a horizontal line near the top of your paper for the horizon. Then, draw a vertical line that will serve as the plane’s centerline. Next, draw a large oval shape slightly tilted to the right for the fuselage, or the main body of the plane. Add two smaller ovals on either side of the fuselage for the wings.
Step 2: Outline the Fuselage
Using a darker pencil, carefully outline the shape of the fuselage. Pay attention to the curves and angles as you trace along the oval shape you drew in the previous step. Remember that the front of the fuselage usually has a sharper angle than the back.
Step 3: Add Wings and Tail
Outline the wings by following the shape of the smaller ovals. Keep in mind that the wings might have some dihedral, which means they slope upward from the center to the tips. Add the tail by drawing a small triangle shape at the back of the fuselage.
Step 4: Draw the Details
Now it’s time to add some finer details to your plane drawing. Start by sketching the cockpit window near the front of the fuselage. Then, add the engine intake and exhaust ports on either side of the fuselage. Draw the landing gear underneath the wings, using straight lines and circles to represent the wheels.
Step 5: Refine and Shade
Once you have all the major details in place, it’s time to refine your drawing and add shading to give it depth. Use your softer pencil (2B or 4B) to darken the outlines and add shading to areas that are in shadow. Pay attention to the light source and add shading accordingly, keeping in mind that the underside of the plane will be darker than the top.
Step 6: Blend and Texture
To add a realistic touch to your plane drawing, use a blending stump or cotton swabs to blend the shading and create a smoother transition between light and dark areas. Additionally, you can add texture to the wings and fuselage by lightly drawing parallel lines to represent the panels and rivets.
Conclusion
Congratulations, you’ve successfully learned how to draw a plane easy! By following these step-by-step instructions, you can create a visually satisfying plane drawing that will impress your friends and family. Remember, practice makes perfect, so don’t hesitate to try drawing planes from different angles and perspectives. Keep honing your skills, and soon you’ll be drawing planes with ease.