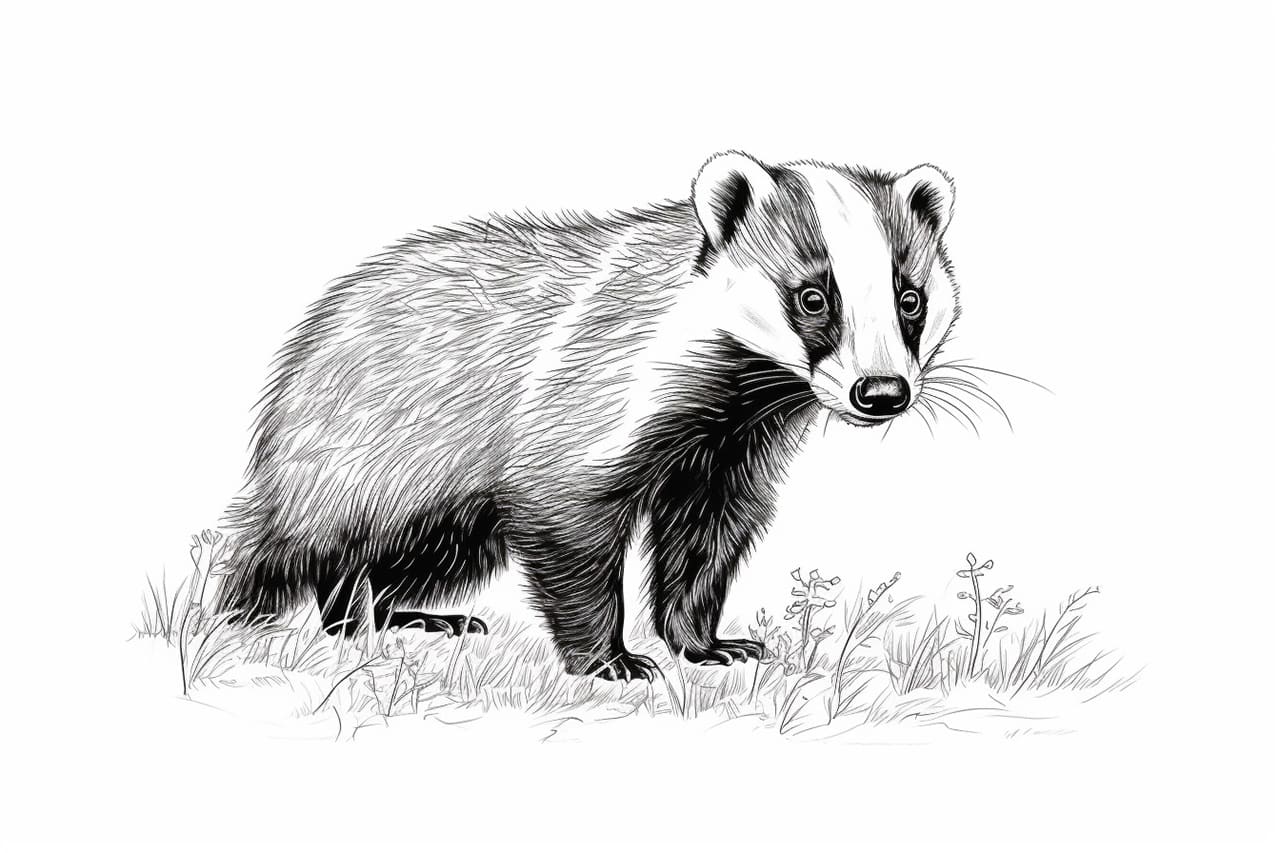
Badgers are fascinating creatures with their distinctive black and white markings. Whether you’re an experienced artist or just starting out, drawing a badger can be a rewarding and enjoyable challenge. In this step-by-step guide, I will show you how to draw a badger, from sketching the basic shapes to adding details and shading. So grab your pencils and let’s get started!
Materials Required
Before we begin, make sure you have the following materials:
- Drawing paper
- Pencil (HB or 2B)
- Eraser
- Fine-tipped black pen
- Colored pencils or markers (optional for coloring)
Now that you have everything you need, let’s delve into the process of drawing a badger!
Step 1: Sketch the Basic Shapes
To start, lightly sketch the basic shapes that will form the foundation of your badger drawing. Begin by drawing an oval shape for the badger’s head. Then, below the oval, draw a small rectangle for the body. Connect the head and body with a gentle curve to create the neck. Finally, add two small circles for the ears.
Step 2: Outline the Badger’s Body
Now that you have your basic guidelines and shapes in place, it’s time to outline the badger’s body with more precision and detail. This step is crucial in defining the overall form and structure of your badger drawing. Follow these steps to create a solid foundation for your badger illustration:
1. Refining the Head and Face: Begin by focusing on the head, which is a critical feature in capturing the badger’s character. Using your pencil, refine the outline of the head, ensuring it has a rounded appearance, and that it tapers smoothly into the neck. Pay attention to the placement of the ears, which are relatively small and rounded, situated on either side of the head. Badgers have distinctive facial markings, so be sure to emphasize the dark patches around their eyes and snout.
2. Shaping the Body: Extend your attention to the body. Badgers have a robust and low-to-the-ground physique. Outline the body, following the contours of the initial shapes you sketched. Maintain a smooth and flowing line as you connect the head, body, and neck. Badgers are known for their stocky build, so ensure that the body reflects this characteristic.
3. Symmetry and Balance: Keep an eye on symmetry and balance while outlining the body. Make sure the badger’s body appears proportional on both sides, as any asymmetry can affect the overall realism of your drawing. Take your time to achieve a symmetrical appearance.
4. Tail and Limbs: Extend the outline to include the tail and limbs. Badgers have short, bushy tails that you can represent with a curved line at the rear of the body. Outline the legs with a series of rounded shapes that gradually narrow toward the feet. Pay attention to the placement of the paws, which have sharp claws suitable for digging.
5. Muscle Definition: To add a touch of realism, consider lightly sketching in the muscles and contours of the badger’s body. Badgers are strong animals, so indicating subtle muscle definition can enhance the authenticity of your drawing.
6. Smooth and Fluid Lines: Throughout this step, maintain smooth and fluid lines as you refine the badger’s body. Avoid jagged or abrupt changes in the outline, as these can disrupt the natural flow of the animal’s form.
7. Attention to Detail: Remember that at this stage, you’re primarily focused on the overall shape and form of the badger. Details, such as fur texture and facial features, will be added in subsequent steps.
By carefully outlining the badger’s body with attention to shape, proportion, and symmetry, you’ve set the stage for a realistic and well-structured representation of this fascinating creature. With the foundational work complete, you’re ready to move on to the next steps where you’ll add intricate details and bring your badger drawing to life.
Step 3: Add Facial Features
Adding the facial features to your badger drawing is a crucial step in capturing its unique character and expression. Let’s dive into the details and bring your badger to life:
1. Eyes: Begin by focusing on the eyes, the windows to your badger’s soul. Inside the head shape, sketch two small, round circles to represent the eyes. Pay attention to their placement; badgers have eyes that are moderately spaced apart, giving them a wide field of vision. The eyes should sit just below the characteristic white markings on the face.
2. White Facial Markings: Above each eye, draw two small, elongated ovals to represent the distinct white markings on the badger’s face. These markings often extend up and behind the eyes, creating a unique and striking pattern. Ensure that they are symmetrical on both sides of the head.
3. Nose: In the center of the face, add a triangular shape for the badger’s nose. Badgers have a pointed snout, and this shape should reflect that characteristic. Position the nose slightly below the eyes and between the white facial markings.
4. Mouth and Jaw: Below the nose, sketch two short, curved lines to indicate the mouth. Badgers have small mouths with a slightly upturned appearance. Capture this subtle smile to convey their friendly demeanor. Extend these lines slightly outward to define the jawline.
5. Whiskers: To add a touch of realism and detail, you can lightly sketch in some whiskers on either side of the nose. Whiskers are a sensory feature for badgers and are typically short and fine. Keep them subtle to maintain the overall appearance.
6. Ears: Although we’re primarily focusing on facial features in this step, it’s worth noting that badgers have small, rounded ears. You can indicate the placement of the ears at the sides of the head, just behind the eyes. We’ll refine and add more details to the ears in a later step.
7. Symmetry and Proportion: Throughout this step, maintain a sense of symmetry and proportion in your badger’s facial features. Ensure that the eyes, ears, and white facial markings are balanced on both sides of the head, creating a harmonious and lifelike appearance.
By adding these facial features, you’ve given your badger drawing a sense of personality and individuality. The eyes, in particular, play a significant role in conveying the badger’s character. As you continue with the subsequent steps, you’ll refine these features further and add intricate details to create a charming and realistic depiction of this remarkable animal.
Step 4: Refine the Face
In this step, we will refine the details of the badger’s face. Start by adding pupils to the eyes, focusing on capturing the intensity of the badger’s gaze. Then, carefully shape the nose by adding nostrils and defining its triangular form. Add some fur-like lines around the face to give it a more realistic texture.
Step 5: Draw the Badger’s Ears and Stripes
Now let’s move on to the ears and distinctive black and white stripes on the badger’s face. Using curved lines, sketch the shape of the ears, adding some fur-like details. To create the stripes, draw a series of thin, wavy lines across the badger’s face, following the general shape of the white markings you outlined earlier.
Step 6: Define the Body
It’s time to define the badger’s body by adding more details. Start by drawing small lines across the badger’s chest and belly to represent the fur. Then, using gentle curves, outline the front and hind legs. Don’t forget to include the characteristic black and white markings on the legs.
Step 7: Create Texture and Fur
To make your badger drawing more realistic, focus on adding texture and fur details. Use short, curved lines throughout the body to represent the fur, following the contours of the badger’s shape. Emphasize the darker areas with more concentrated lines and gradually lighten them as you move towards the lighter areas.
Step 8: Finalize the Drawing
Now that you’ve added all the essential details, take a step back and assess your badger drawing. Erase any unnecessary guidelines or stray pencil marks. Once you’re satisfied with the overall composition, go over the outline and important features with a fine-tipped black pen or marker. This will give your drawing a clean and defined look.
Step 9: Add Color (Optional)
If you want to add some color to your badger drawing, now is the time to do it! Badgers have black and white fur, so you can use colored pencils or markers to add shading and texture to the different areas. Start by layering light gray for the white areas, gradually building up darker shades for the black ones. Blend the colors smoothly to create a realistic fur effect.
Conclusion
Congratulations on completing your badger drawing! By following these step-by-step instructions, you’ve learned how to sketch the basic shapes, add facial features, define the body, and create texture and fur details. Remember, practice makes perfect, so don’t be afraid to try drawing badgers from different angles or in various poses. Happy drawing!