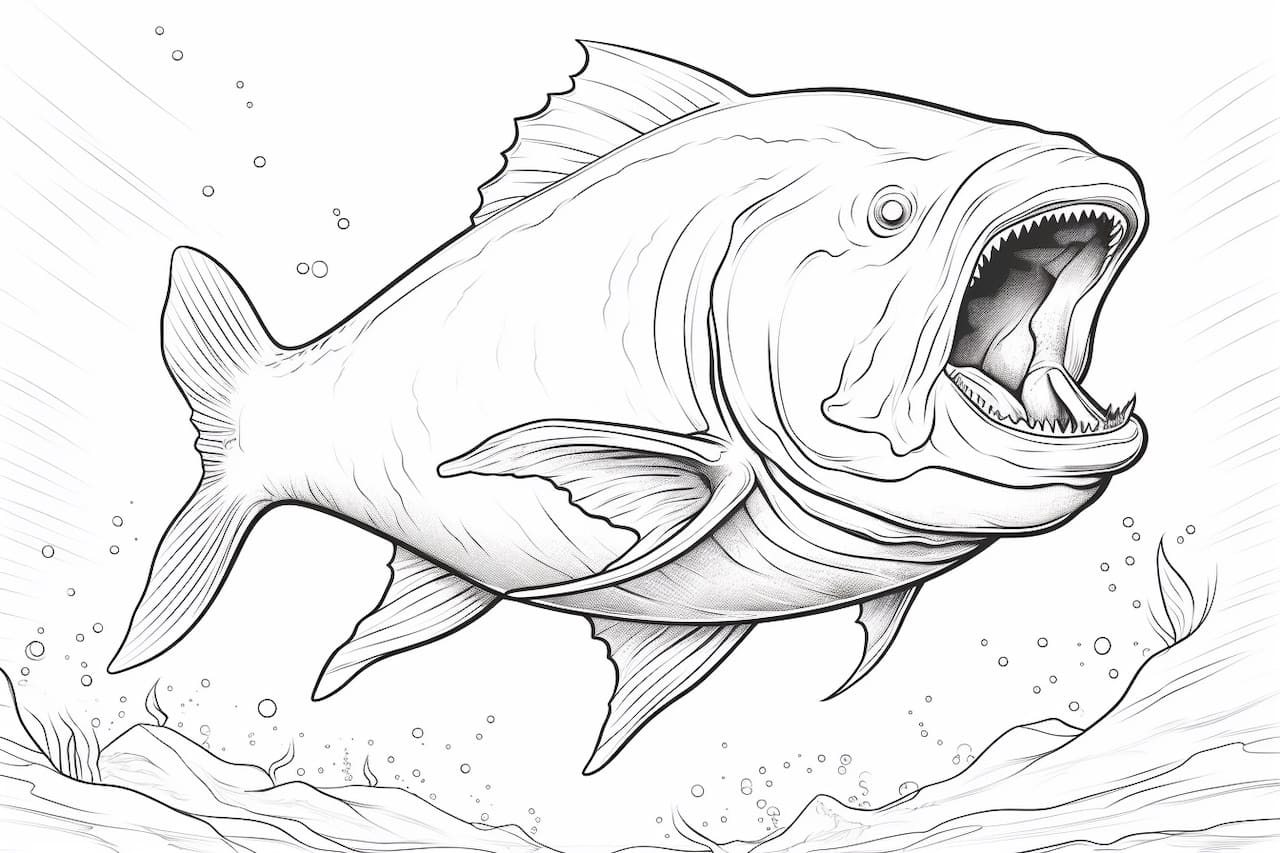
Welcome to this step-by-step guide on how to draw a piranha! In this tutorial, I will walk you through the process of creating a realistic and detailed piranha drawing. Whether you are an aspiring artist or simply enjoy doodling, this guide will help you create a captivating and lifelike portrayal of this notorious fish.
Materials Required
Before we begin, gather the following materials:
- Drawing paper
- Pencil (preferably an HB or 2B)
- Eraser
- Fine-tip black marker or pen
- Colored pencils or markers (optional)
- Reference image of a piranha (for inspiration)
Now that you have all the necessary materials, let’s dive into the step-by-step process of drawing a piranha!
Step 1: Sketch the Basic Shape
Start by lightly sketching a rough outline of the piranha’s body using a pencil. Begin with an oval shape for the body and add a smaller oval for the head. Connect the two shapes with a curved line to create the fish’s neck.
Step 2: Add the Details
Next, add the key features of the piranha. Draw a triangular shape for the tail at the end of the body. Add a slightly curved line starting from the head to represent the back of the fish. Sketch a half-circle for the eye on the side of the head and add a small pointy shape for the mouth.
Step 3: Refine the Shape
Once you have the basic framework, refine the shape of your piranha. Use smooth, curved lines to give the body more volume and a realistic look. Pay attention to the contours of the fish, making it appear sleek and streamlined. Erase any unnecessary guidelines or overlapping lines.
Step 4: Enhance the Details
Now it’s time to focus on the intricate details that make the piranha distinctive. Add sharp and pointy teeth along the mouth line, showing some teeth overlapping others. Sketch small, triangular fins on the back and bottom of the body. You can also draw scales along the body to give it texture and depth.
Step 5: Ink the Final Drawing
Once you are satisfied with your pencil sketch, use a fine-tip black marker or pen to ink the final lines. Trace over the main outlines and darken the key features, such as the eye, mouth, and teeth. Take your time and be careful to maintain the proportions and details of the piranha.
Step 6: Erase Excess Pencil Marks
After the ink has dried, carefully erase any remaining pencil marks using a soft eraser. Be gentle to avoid smudging the inked lines. Take your time and pay close attention to areas where the ink lines overlap with pencil marks.
Step 7: Add Color (optional)
If you prefer a colored piranha drawing, use colored pencils or markers to bring your artwork to life. Piranhas are often depicted with shades of gray, silver, or brown, with hints of red or orange on their lower jaw or fins. Experiment with different color combinations to achieve the desired effect.
Conclusion
Congratulations! You have successfully learned how to draw a piranha. By following these step-by-step instructions, you have created a captivating and lifelike portrayal of this ferocious fish. Remember to practice regularly to improve your drawing skills and explore different techniques. Keep exploring the fascinating world of art and let your creativity flourish!