How to Draw a Minecraft Sword
Learn how to draw a Minecraft sword with this step-by-step tutorial. Create a detailed and dynamic illustration of this iconic weapon from the popular video game.

Materials You'll Need
- Pencil
- Paper
- Eraser
![]() Welcome to an exciting world where artistry meets gaming! In this step-by-step guide, we will embark on a creative journey to learn how to draw a Minecraft sword, one of the most iconic weapons from the beloved video game. Whether you're a novice looking to dive into the world of drawing or a seasoned artist seeking to add a fun piece to your portfolio, this tutorial is designed for you.
Welcome to an exciting world where artistry meets gaming! In this step-by-step guide, we will embark on a creative journey to learn how to draw a Minecraft sword, one of the most iconic weapons from the beloved video game. Whether you're a novice looking to dive into the world of drawing or a seasoned artist seeking to add a fun piece to your portfolio, this tutorial is designed for you.
Drawing can be both an enjoyable hobby and a perfect way to express your passion for gaming. The Minecraft sword, with its distinctive pixelated design, offers a unique opportunity to practice your skills and unleash your creativity. Throughout this guide, I will break down the drawing process into simple, manageable steps, ensuring that you can follow along with ease and confidence.
Get ready to bring the vibrant world of Minecraft to your paper! We'll cover everything from basic outlines to intricate details, helping you create a stunning representation of this pixelated masterpiece. So, gather your materials, and let's get started on your artistic adventure!
Materials Required:
To draw a Minecraft sword, you will need the following materials:
- Pencil
- Paper
- Eraser
- Ruler
- Fine-tip black marker or pen (optional)
- Colored pencils or markers (optional)
Now that we have gathered our materials, let's get started with the drawing!
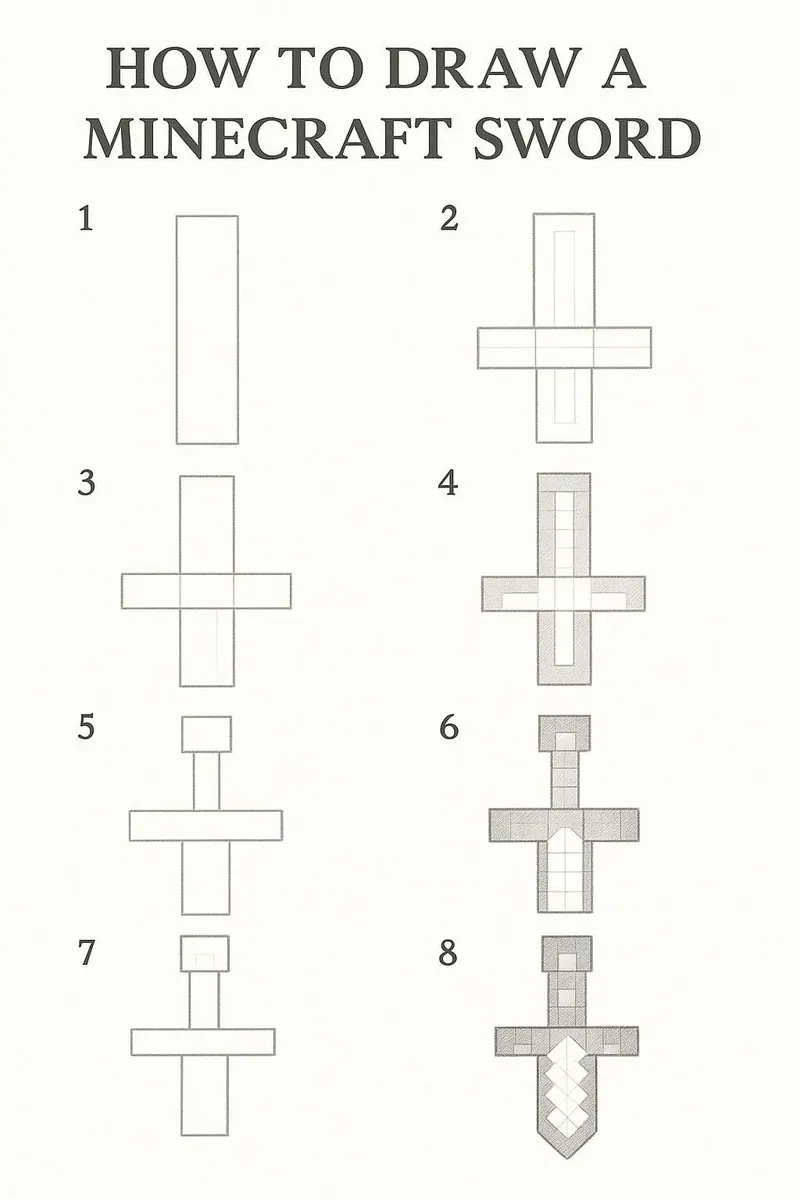
How to Draw a Minecraft Sword: Step-by-Step Guide
Minecraft swords are iconic, simple, and perfect for practicing clean lines, pixelated forms, and structured shapes. Drawing a Minecraft sword can be a fun project for beginners and fans of the game alike. This step-by-step guide will show you how to build the sword from basic rectangles to detailed pixel patterns, just like you see in the game. Grab your pencils, a ruler, and some coloring materials—and let's start crafting!
Step 1: Sketch the Basic Shape
Start by drawing a long vertical rectangle in the center of your paper.
- This rectangle forms the blade of your sword.
- Make sure it's narrow and tall, like a real sword blade.
- Use a ruler to keep your edges straight and sharp, reflecting Minecraft's blocky, pixel-perfect style.
Keep your lines light so you can easily adjust as you add details.
Step 2: Add the Sword Guard
Draw two horizontal rectangles crossing the blade near its bottom.
- These rectangles will form the guard (the horizontal piece between the blade and the handle).
- Let each end extend a bit past the width of the blade.
- Keep the ends slightly angled upward or make them straight depending on the style you want.
Think of the guard as two small arms reaching out to protect the player's hand!
Step 3: Draw the Handle
Below the guard, draw a vertical rectangle for the handle.
- The handle should be shorter and slightly thicker than the blade.
- Extend it downward, centered under the blade and guard.
If you want to replicate the classic diamond sword look, imagine the handle ending with a little pixelated square or pommel.
Step 4: Add Details to the Blade
To start defining the blade:
- Draw an inner vertical rectangle inside the blade, just a little smaller than the outer rectangle.
- Then, at the top of the blade, draw diagonal pixel shapes to form a point or tip.
- Minecraft weapons often feature stair-step edges or slight blocky angles, so feel free to mimic this pixelated look rather than smooth curves.
Keeping the pixel style will make your sword look more authentic to the game!
Step 5: Refine the Guard Design
Enhance the guard by adding depth:
- From the ends of the guard, draw short diagonal lines that angle back toward the blade, making the guard appear three-dimensional.
- Draw a small parallel line along the top of the guard to show thickness.
Imagine the sword being slightly 3D, not just flat—adding this extra touch will make it pop!
Step 6: Texture the Handle
Give the handle some character:
- Draw horizontal, evenly spaced lines across the handle to suggest wrapped grip or pixelated patterning.
- Each section can represent a different color later when you add shading or coloring.
Handles often alternate between darker and lighter colors for a checkerboard effect!
Step 7: Clean Up the Sketch
Use an eraser to remove:
- Any unnecessary guide lines
- Overlapping construction lines
- Stray marks around the edges
Keeping your drawing clean at this stage makes it easier when you ink or color.
Step 8: Ink Your Sword (Optional)
For a polished look:
- Carefully trace your final lines using a fine-tip black pen or marker.
- Emphasize the outlines of the blade, guard, and handle.
- Let the ink fully dry before erasing leftover pencil marks.
Use varied line thickness if you want to create a more stylized or dynamic sword!
Step 9: Add Color (Optional)
Time to bring your sword to life!
- Color the blade with shades of gray or metallic silver.
- The handle can be brown, dark gray, or black—classic for wood or obsidian handles.
- If you're drawing a diamond sword or custom sword, get creative with blue, teal, purple, or golden hues.
- Add some pixel shading by coloring some squares slightly darker to mimic the Minecraft pixelated style.
Layering your colors or using crosshatching can create a pixelated shading effect that feels more dynamic.
Conclusion: Crafting Your Masterpiece
Congratulations—you've completed your very own Minecraft sword drawing! By carefully building the sword piece by piece, adding details, shading, and color, you've captured the iconic pixelated style that makes Minecraft designs so unique.
With practice, you can draw even more swords—from enchanted blades to golden or netherite versions. Try experimenting with different styles, sword types, and colors to create your own unique arsenal. Keep practicing, keep crafting, and most importantly—have fun bringing your blocky creations to life!
Fun Facts About Minecraft Swords
- The sword is one of the first weapons most players craft in Minecraft, made by combining two blocks of material (like wood, stone, or diamond) with a stick.
- Minecraft swords can be crafted from different materials—wood, stone, iron, gold, diamond, and netherite—each with different durability and strength.
- Diamond swords are iconic for their bright teal color and powerful attack strength, making them a favorite among players for years.
- Netherite swords, introduced later, are even stronger and more durable than diamond swords—and they're fireproof too!
- Swords aren't just for combat—they can also be used to break certain blocks like cobwebs and bamboo much faster than by hand.
- Minecraft swords can be enchanted with special powers, like Sharpness (extra damage), Looting (better drops), Fire Aspect (sets enemies on fire), and Unbreaking (longer life).
- Gold swords look flashy, but they are actually weaker and less durable than many other materials—style over substance!
- Some Minecraft custom servers and mods introduce epic custom swords, featuring special skins, particle effects, and unique powers.
- The pixelated design of the Minecraft sword has become a pop culture icon, appearing in toys, costumes, and countless fan artworks.
- In Minecraft Dungeons and other spin-offs, swords often come with unique traits, magic effects, or colorful new designs, adding even more artistic inspiration!
Tip: When drawing a Minecraft sword, begin by using a grid system to maintain the pixelated style that defines the game's aesthetic. Lightly sketch a rectangle for the blade and a smaller rectangle for the hilt using a ruler to ensure straight edges; this will help you keep the proportions accurate. Once your basic outline is established, switch to a finer pencil or pen to outline the sword's details, like the pixel blocks on the blade and the texture of the hilt. Consider using colored pencils or markers to add depth; use lighter tones for highlights and darker shades for shadows, mimicking the blocky textures found in the game. Remember to take your time with each step, celebrating the process as you bring this iconic weapon to life!
Suggestions for Scenes and Settings for Minecraft Sword Drawings
- Heroic Pose: Draw your Minecraft character holding a glowing sword high against a blocky sunset, ready for adventure.
- Epic Battle: Illustrate a clash between your character and a mob horde (zombies, skeletons, or creepers!) with swords flashing in the chaos.
- Treasure Discovery: Show a Minecraft sword resting in a glowing chest deep inside a jungle temple or a spooky stronghold.
- Nether Duel: Create a fiery battle scene where a player swings a netherite sword at a blaze or piglin in the Nether's burning landscape.
- Sword on a Pedestal: Design a magical shrine where a legendary enchanted sword rests on a pedestal, surrounded by ancient stone ruins and vines.
- Diamond Sword Showcase: Draw a close-up of a sparkling diamond sword against a starry night sky, with pixel sparkles surrounding it.
- Crafting Table Creation: Depict the moment a player crafts their first sword at a crafting table, with tools, sticks, and ingots scattered around.
- Frozen Tundra Fight: Picture a player battling strays (frozen skeletons) with a sword in a snowy, icy landscape under the Northern Lights.
- Enchanted Sword Glow: Illustrate a sword glowing with enchantments like Fire Aspect or Sharpness, with runes floating in the air around it.
- End Portal Sword Charge: Create a dynamic scene where the player charges through the End portal, sword drawn, ready to face the Ender Dragon.