Welcome to this step-by-step tutorial on how to draw a meerkat! Meerkats are small and sociable mammals known for their curious and alert nature. By following these instructions, you’ll be able to capture the essence of these adorable creatures on paper. So let’s dive in and get started!
Materials Required
Before we begin, gather the following materials:
- Drawing paper
- Pencil
- Eraser
- Fine-tip black pen or marker
- Colored pencils or markers (optional)
Now that you have everything you need, let’s begin with the basic outline of the meerkat.
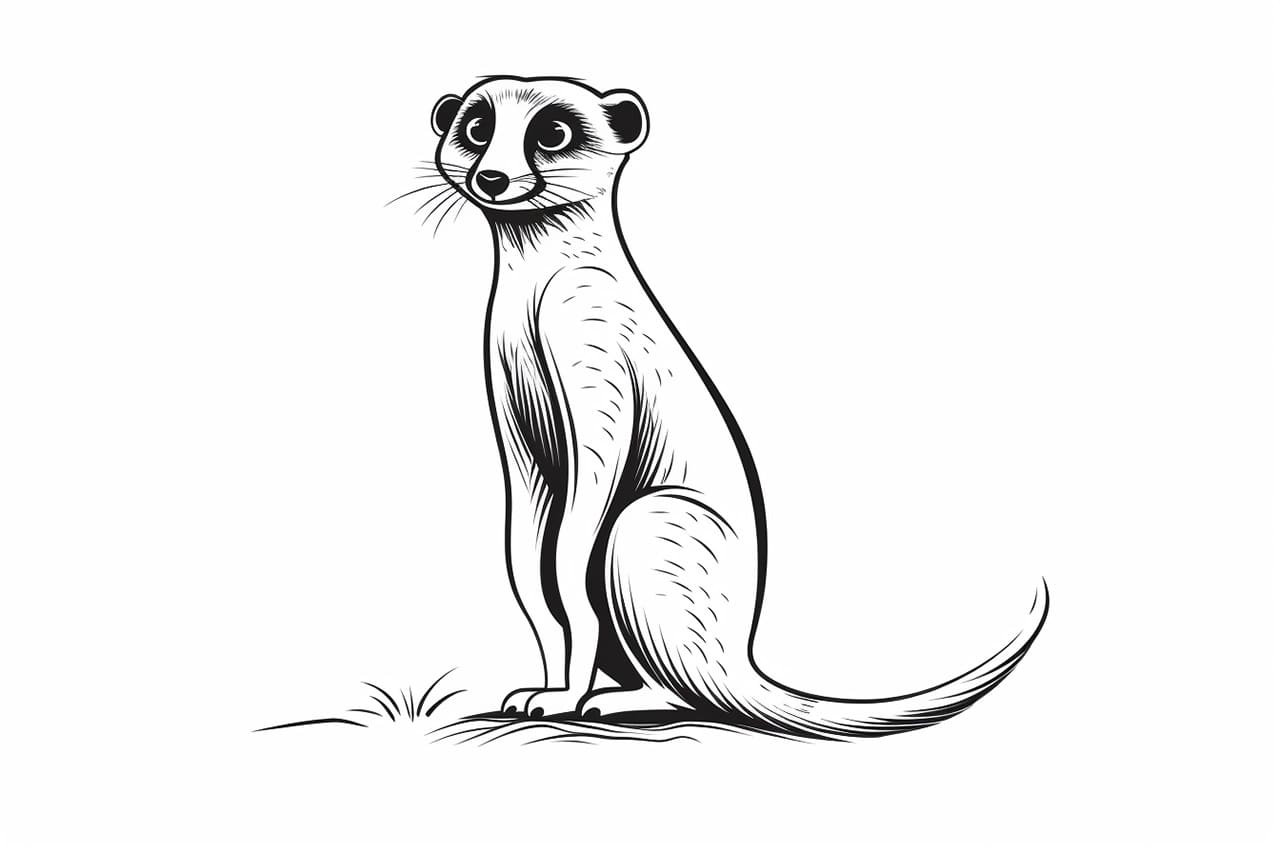
Step 1: Basic Guidelines
Start by drawing a circle for the meerkat’s head. It should be medium-sized, not too big or too small. Next, add a slightly slanted oval shape below the head, making it a bit elongated. This will be the meerkat’s body. Finally, sketch a horizontal line across the center of the head. This line will act as a guide for the facial features.
Step 2: Facial Features
Let’s focus on the meerkat’s face now. Using the horizontal guide line, draw two almond-shaped eyes above it. Meerkats have large, expressive eyes, so make sure they stand out. Next, draw a small triangular nose just below the eyes, towards the center of the circle. Add a tiny curved line inside the nose for the nostrils.
Now, let’s add some ears. Meerkats have rounded ears that are quite large compared to their head size. Draw two half-circle shapes on either side of the head, just above the eyes.
Step 3: Body and Limbs
Extend the body below the head by drawing a curved line that connects to the oval shape. This will be the meerkat’s back. On the left side of the body, draw another curved line, starting from the middle and tapering towards the end. This will be the meerkat’s front leg.
Next, draw another slightly curved line on the right side of the body, starting from the middle and sloping downwards. This will be the meerkat’s hind leg. To complete the legs, draw two small ovals at the bottom of each leg for the feet.
Step 4: Adding Details
Now that we have the basic outline, let’s add some details to make our meerkat more lifelike. Start by drawing the meerkat’s tail on the right side of the body, just above the hind leg. Meerkats have long, thin tails with a tuft of hair at the end.
Next, add some fur details around the meerkat’s face and body. Meerkats have a light-colored fur with darker markings, so use short, curved lines to represent the texture of their fur.
Step 5: Finalizing the Drawing
It’s time to finalize our meerkat drawing! Using a fine-tip black pen or marker, go over the main lines of your drawing. Erase any pencil lines that are no longer needed. This will give your meerkat a clean and finished look.
If you’d like, you can also add some color to your drawing using colored pencils or markers. Meerkats have a sandy-colored fur, so shades of brown, beige, and tan would work well. Don’t forget to add darker tones for their markings.
Conclusion
Congratulations! You’ve successfully learned how to draw a meerkat. These fascinating animals are not only fun to observe but also make adorable subjects for your artwork. Remember to practice and experiment with different poses and expressions to enhance your skills.
We hope you enjoyed this step-by-step tutorial on how to draw a meerkat. Now you can create your own meerkat-inspired illustrations and share them with others. Happy drawing!