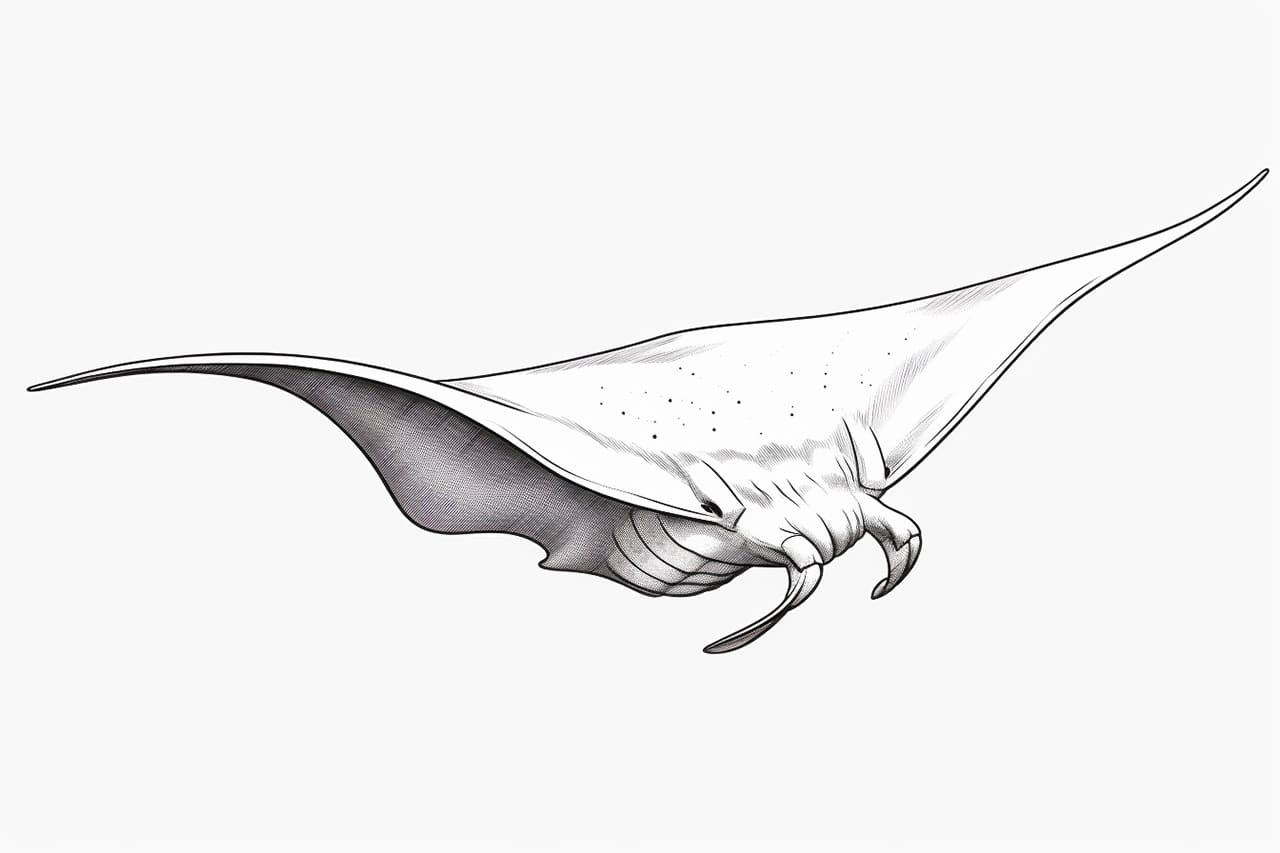
Welcome to this step-by-step guide on how to draw a manta ray! Whether you are a beginner or an experienced artist, this tutorial will provide you with clear and concise instructions to create a stunning manta ray illustration. So let’s dive in and explore the graceful movements of this magnificent sea creature!
Materials Required
To get started, you will need the following materials:
Now that you have gathered your materials, let’s move on to the step-by-step instructions.
Step 1: Basic Outline
Begin by drawing a large oval shape that will serve as the body of the manta ray. Position it diagonally on your paper to create a more dynamic composition. Now, add a smaller oval shape on one side of the larger oval, slightly overlapping it. This will form the head of the manta ray.
Step 2: Wings
Extend two long, curved lines from the body to create the wings of the manta ray. The wings should connect with the head and taper towards the ends. Take your time to achieve the desired shape and ensure that both wings are symmetrical.
Step 3: Fins
Next, draw two triangular shapes on either side of the body, near the middle part of the wings. These will be the pectoral fins of the manta ray. Make sure they are proportionate to the rest of the body and aligned with the flow of the wings.
Step 4: Eyes and Mouth
Add a small, oval-shaped eye on each side of the head. Position them towards the front, but slightly angled towards the center. Then, draw a gentle curve beneath the head to represent the mouth of the manta ray.
Step 5: Details
To enhance the realism of your drawing, it’s time to add some details. Start by drawing a series of short, horizontal lines along the wings and body to create the characteristic pattern found on a manta ray’s skin. Don’t worry about making them perfect – irregularity adds to the natural look.
Step 6: Texture
Now, let’s add some texture to the manta ray’s body. Begin by lightly shading the areas between the lines you just drew. This will create a subtle and natural-looking texture. Remember to shade in the same direction as the lines to maintain consistency.
Step 7: Shadows and Highlights
To make your drawing more visually appealing, it’s crucial to add shadows and highlights. Identify the main light source in your drawing and shade the opposite side of each shape accordingly. This will create a sense of depth. Use your pencil to blend the shading for a smoother appearance.
Step 8: Finalize with Ink
Once you are satisfied with your sketch, trace over the lines with a fine-tip black marker or pen. This will give your drawing a clean and finished look. Use confident strokes, paying attention to the details and contours of the manta ray.
Step 9: Color (optional)
If you prefer a colorful illustration, you can now use colored pencils or markers to bring your manta ray to life. Research different species of manta rays to get inspiration for their unique color patterns. Use light strokes and build up layers for a more vibrant and realistic result.
Conclusion
Congratulations! You have successfully learned how to draw a manta ray. By following these step-by-step instructions, you have created a beautiful illustration capturing the elegance of this remarkable creature. Remember to practice regularly to refine your skills and experiment with different techniques. Enjoy the creative journey!