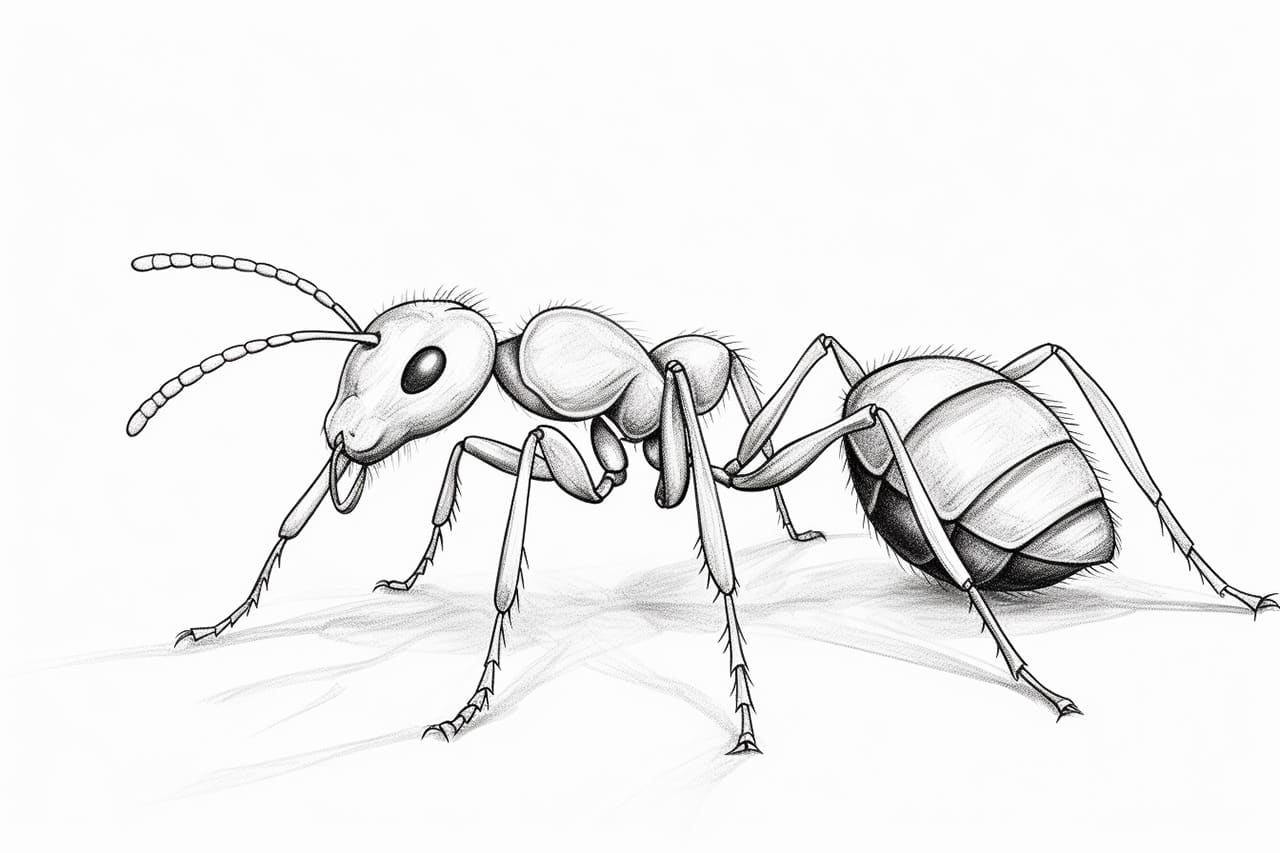
Welcome to this step-by-step guide on how to draw a leafcutter ant. Leafcutter ants are fascinating creatures known for their unique ability to cut and carry leaves back to their nests. In this tutorial, we will break down the process of how to draw a leafcutter ant into simple and easy-to-follow steps. Whether you are a beginner or an experienced artist, this guide will help you create a realistic and detailed representation of this incredible insect.
Materials Required
Before we begin, let’s gather the materials you will need to complete this drawing:
- Drawing paper
- Pencil (preferably a mechanical pencil or a set of drawing pencils)
- Eraser
- Fine-tip black pen or marker
- Colored pencils or markers (optional)
Now that you have your materials ready, let’s dive into the drawing process!
Step 1: Basic Shapes
Start by lightly sketching an oval shape for the body of the leafcutter ant. This oval should be slightly elongated and positioned diagonally. Then, add a smaller oval shape on top of the first oval, representing the ant’s head. Finally, sketch a line connecting the two ovals to indicate the ant’s thorax.
Step 2: Antennae and Legs
Above the head, draw two curved lines that taper towards the end to form the antennae. Next, draw six thin and elongated shapes attached to the thorax, which will serve as the ant’s legs. Keep in mind that leafcutter ants have long legs and a distinctive stride.
Step 3: Body Details
Add some details to the body of the ant. Sketch two small circles near the front of the head to represent the ant’s eyes. Then, draw a small triangular shape beneath the head as the ant’s mouth. On the thorax, add a few short, curved lines to create the illusion of segments.
Step 4: Ant’s Mandibles
Leafcutter ants are renowned for their strong jaws, known as mandibles. Draw two curved lines below the head, pointing outward and converging together slightly towards the tips. These lines will represent the mandibles of the ant.
Step 5: Leaf Carrying
Now, let’s draw the ant carrying a leaf. Start by sketching a large, curved shape above the ant’s body, indicating the leaf. The leaf should be slightly larger than the ant itself. Add some details like veins or jagged edges to make it more realistic.
Step 6: Add Texture
To give your drawing more depth and texture, add some details to the ant’s body and legs. Use short, curved lines to create a textured effect, especially on the ant’s legs and head. This will make the ant’s exoskeleton appear more realistic.
Step 7: Refine and Ink
Carefully go over your pencil lines with a fine-tip black pen or marker. This step will make your drawing stand out and look more polished. Start with the ant’s body, legs, and antlers, then move on to the leaf. Once you’ve traced over your lines, allow the ink to dry before erasing any remaining pencil marks.
Step 8: Color (Optional)
If you prefer to add some color to your drawing, now is the time to do it. Leafcutter ants are typically dark brown or black in color, but feel free to experiment and get creative with your color choices. Use colored pencils or markers to bring your drawing to life. Remember to color in a way that emphasizes shadow and highlights, to make your drawing more realistic.
Conclusion
Congratulations! You have successfully learned how to draw a leafcutter ant. By following these step-by-step instructions, you have created a detailed representation of this remarkable insect. We hope you enjoyed this tutorial and found it helpful in improving your drawing skills.
Remember, practice makes perfect, so keep sketching and exploring your creativity. Happy drawing!