How to Draw a Human Heart
Learn how to draw with this step-by-step tutorial.
Materials You'll Need
- Drawing paper
- Pencil (HB or 2B)
- Eraser
- Markers
The human heart, with its intricate network of veins, arteries, and chambers, is not only a vital organ but also a powerful symbol in art and science. Artists often choose to depict the heart because it represents life, emotion, and complexity. Whether you are interested in medical illustration, anatomy studies, or simply want to deepen your understanding of the human body, learning how to draw a human heart can open up new creative possibilities. This subject allows you to explore both the scientific accuracy of anatomical illustration and the expressive qualities that make the heart a universal symbol of feeling and vitality.
Many artists are drawn to the challenge of capturing the heart's unique structure, with its muscular walls, branching vessels, and dynamic form. By learning how to draw a human heart, you'll develop valuable observation skills and attention to detail, which are essential for both realistic and stylized artwork. This tutorial is designed to guide you through each step, starting with simple shapes and gradually building up to the complex details that make the heart so fascinating. Whether you are a beginner looking to practice basic shading and proportion, or a more experienced artist aiming to create a highly realistic depiction, you'll find techniques here to suit your skill level.
Remember, drawing the human heart may seem daunting at first, but with patience and practice, you'll not only improve your artistic skills but also gain a deeper appreciation for the beauty of anatomy. Take your time, enjoy the process, and don't be afraid to experiment with different materials or styles. By the end of this guide, you'll have the confidence and knowledge to create your own compelling illustration of this remarkable organ. Let's get started on your journey to mastering how to draw a human heart!
Materials Required
Before we begin, it is essential to gather the necessary materials. Here are the items you will need:
-
Pencil: Use a medium or hard graphite pencil for the initial sketch and outline.
-
Paper: Choose a smooth surface paper, preferably drawing paper, to ensure smooth lines and easy erasing.
-
Eraser: Have a kneaded or vinyl eraser handy to correct any mistakes and smudges.
-
Fine-tip Markers or Pens: These will be used for outlining and adding details to your drawing.
-
Reference Image: Find a clear reference image of a human heart to help you understand its structure and details.
With these materials in hand, let's get started on our journey to draw a human heart.
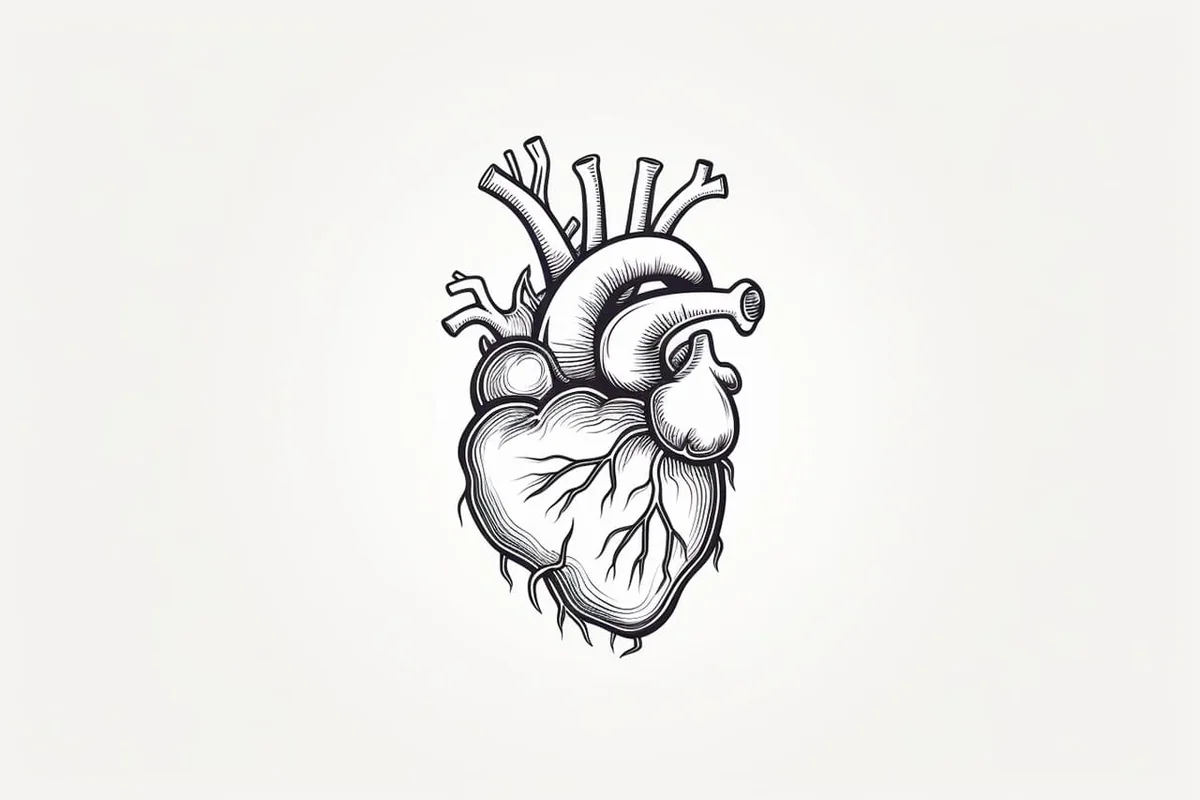
Step 1: Basic Shapes
Begin by drawing a vertical oval shape in the center of your paper. This will serve as the main body of the heart. Next, draw two small circles on the top of the oval. These will represent the pulmonary veins. Finally, draw a small tube-like shape at the bottom of the oval, which will serve as the aorta.
Step 2: Connecting the Shapes
Now, connect the shapes we have drawn in the previous step. Starting from the top circles, draw two curving lines that gradually merge into the main oval shape. These lines will represent the atria of the heart. Next, connect the aorta shape to the bottom of the oval using a curved line. This will represent the ventricle of the heart.
Step 3: Outlining the Heart
Using your pencil, carefully outline the basic shapes we have drawn. Pay attention to the curves and proportions, ensuring that they are accurate. Take your time with this step, as it will serve as the foundation for the rest of the drawing. Once you are satisfied with the outline, gently erase any unnecessary guidelines.
Tip: As you work through the steps of drawing the human heart, consider taking breaks to step back and assess your progress from a distance. This can help you spot any inaccuracies in proportions or shapes that are less noticeable when you're closely focused on the details. Additionally, don't hesitate to refer to multiple reference images to capture different angles and textures, which can enhance the realism of your drawing.
Step 4: Adding Details
Now it's time to add more details to our heart drawing. Start by drawing the superior vena cava, which is a large vein located at the top right of the heart. Next, draw the pulmonary arteries and veins on the right side of the heart. These vessels are responsible for carrying oxygenated and deoxygenated blood to and from the lungs.
Step 5: Adding Texture and Shadows
To make your heart drawing more realistic, add texture and shadows. Use light, curved lines to create a ribbed texture on the atria and ventricle. Shade the areas where the blood vessels overlap or appear deeper, creating a sense of depth and dimension. Pay attention to the light source and add shading accordingly. This will give your drawing a three-dimensional appearance.
Step 6: Final Details
In this final step, add any remaining details to your heart drawing. Take a closer look at your reference image and observe the valves, veins, and arteries. Draw these details with precision and accuracy, keeping in mind their placement and size. Remember to take your time and be patient during this step, as it will make a significant difference in the final result.
Mistake Alert: A common mistake when drawing the human heart is making it appear too symmetrical or "heart-shaped" like the simple Valentine's symbol, rather than reflecting its true anatomical form. This happens because many artists rely on familiar symbols instead of closely observing reference images, leading to oversimplified or inaccurate depictions. To avoid this, study real anatomical diagrams and notice how the heart's left and right sides are uneven, with different shapes and sizes for each chamber and a noticeable tilt. Focus on sketching the heart's asymmetry and the unique angles of its veins and arteries—this attention to detail will make your drawing much more realistic and visually interesting!
Conclusion
Drawing a human heart may seem like a daunting task, but with the right guidance and a bit of practice, it can be an enjoyable and rewarding experience. By following the step-by-step instructions provided in this guide, you can create a realistic and detailed representation of the human heart. Remember to pay attention to the proportions, details, and shadows, as they play a crucial role in capturing the essence of this vital organ. So grab your pencils, gather your materials, and let your artistic skills shine as you embark on this creative journey.
Fun Facts About Human Heart
-
The human heart beats about 100,000 times per day, pumping blood throughout the body.
-
Your heart is roughly the size of your own fist and weighs between 250 to 350 grams.
-
The heart pumps approximately 2,000 gallons of blood every day through your circulatory system.
-
There are four chambers in the human heart: two atria and two ventricles.
-
The heart has its own electrical system, called the cardiac conduction system, which controls your heartbeat.
-
Heart cells stop dividing early in life, so your heart muscle cells are mostly as old as you are.
-
The "lub-dub" sound of your heartbeat is caused by the closing of heart valves as blood moves through the chambers.
-
Women's hearts typically beat faster than men's, averaging about 78 beats per minute compared to 70 for men.
-
The heart can continue to beat for a short time even when disconnected from the body, as long as it has an oxygen supply.
Suggestions for Scenes and Settings for Human Heart Drawings
-
A highly detailed anatomical heart surrounded by delicate blooming flowers, symbolizing the connection between life and nature.
-
A cross-section of a human heart, labeled with scientific terms, ideal for a medical illustration or educational poster.
-
A heart intertwined with tree roots and branches, merging the concepts of growth, strength, and emotion.
-
A stylized heart drawn as if it were made of glass, with reflections and transparency to convey fragility and beauty.
-
An anatomical heart with vibrant, abstract colors radiating from it, representing emotions like love, passion, and excitement.
-
A pair of hands gently holding a realistic heart, symbolizing care, healing, or the preciousness of life.
-
A human heart depicted as a mechanical organ with gears and wires, exploring the fusion of biology and technology.
-
A close-up of the heart's surface, focusing on the textures, veins, and arteries for a study in detail and shading.
-
An anatomical heart floating in water, with ripples and reflections, to symbolize calmness or the flow of emotions.
-
A heart breaking open to reveal tiny scenes of people, memories, or dreams inside, suggesting the depth and complexity of human feelings.