How to Draw a Haunted House
Learn how to draw with this step-by-step tutorial.
Materials You'll Need
- Drawing paper
- Pencil (HB or 2B)
- Eraser
- Colored pencils
- Markers
Haunted houses have long captured our imaginations, appearing in spooky stories, movies, and Halloween decorations. With their creaky windows, crooked roofs, and mysterious silhouettes, haunted houses make for thrilling and atmospheric drawing subjects. Learning how to draw a haunted house allows you to combine elements of architecture, fantasy, and storytelling all in one piece of art. Whether you're interested in creating a chilling scene for a Halloween card, adding a haunted touch to your sketchbook, or simply exploring your creativity, this subject offers endless possibilities for customization—think eerie glowing windows, twisted trees, or even ghostly figures lurking in the doorway.
This tutorial on how to draw a haunted house is designed for artists of all levels. Beginners will find clear, step-by-step guidance on constructing the basic shapes and structure of the house, while more experienced artists can experiment with adding their own creepy details and atmospheric effects. Drawing a haunted house is a wonderful way to practice perspective, shading for mood, and using line work to create texture and depth. You'll have the chance to play with dramatic lighting and shadows to make your scene truly come alive (or undead!).
So gather your drawing materials and get ready to unleash your imagination. No matter your skill level, you'll discover new techniques and creative confidence as you work through each stage of building your haunted house. Remember, every haunted house is unique, and the most important thing is to have fun and let your creativity guide you. Let's get started on your spooky masterpiece!
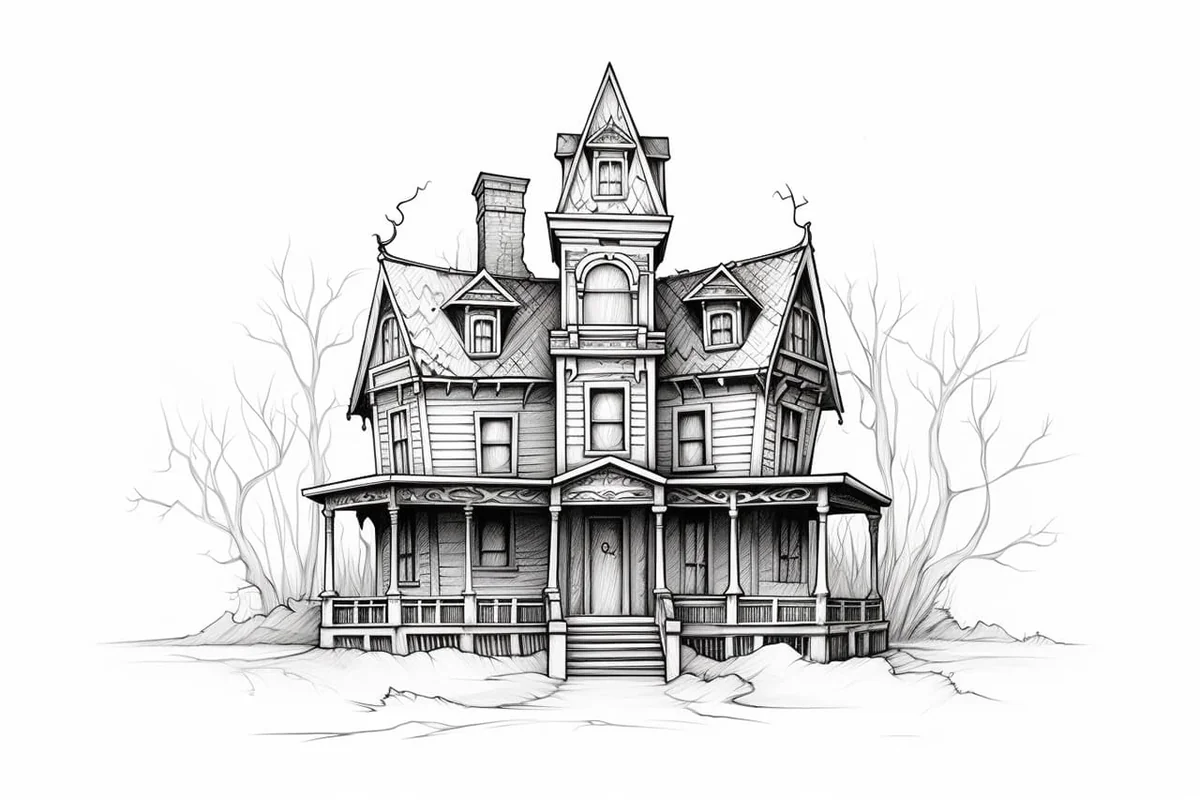
Step 1: Outline the Basic Shape of the House
Start by lightly sketching the outline of the haunted house using a pencil. Picture in your mind the classic shape of a spooky old house – a rectangular base with a triangular roof. Keep the lines loose and sketchy, as you'll be refining them later.
Step 2: Add the Roof Details
On the top of the triangular roof, sketch some uneven and jagged lines to give the haunted house an aged and weathered look. Add a few broken and missing shingles to create a more dilapidated appearance.
Step 3: Draw the Windows and Doors
Using the house's rectangular shape as a guide, draw in the windows and doors. Remember, this is a haunted house, so feel free to make the windows crooked, broken, or boarded up. Add some cracks and cobwebs to enhance the eerie atmosphere.
Step 4: Sketch the Chimneys and Turrets
Tip: As you draw your haunted house, consider incorporating varying line weights and textures to enhance the eerie atmosphere; for example, use thicker lines for the outer edges to create a strong silhouette, while employing finer lines for details like cracks, cobwebs, and shadows. This will add depth and dimension to your drawing, making it feel more dynamic and alive.
To give your haunted house more character, draw some chimneys and turrets. Sketch irregular and jagged shapes to make them look worn down and desolate. Don't be afraid to experiment with different shapes and sizes to achieve a more ominous feel.
Step 5: Add Details to the Walls
Now it's time to add some texture to the haunted house walls. Use short, diagonal lines to create the appearance of weathered wood or cracked brickwork. Vary the direction and length of the lines to make the walls look more worn and menacing.
Step 6: Refine the Outline
With the details in place, go over the main outline of the haunted house with bolder and firmer lines. Clean up any stray pencil marks, and make sure the edges are defined and sharp. This step will give your drawing a more polished and finished look.
Step 7: Ink Your Drawing
Using fine-tip pens or markers, carefully trace over the pencil lines. Start with the main outline, and then move on to the details. Be patient and take your time to ensure smooth and clean lines. You can also add thicker lines to emphasize certain areas or create shading effects.
Step 8: Erase the Pencil Marks
Once the ink has dried, gently erase the pencil marks with an eraser. Take care not to smudge the ink, especially in areas with thicker lines. This step will give your drawing a neater appearance and make the ink lines stand out more.
Step 9: Add Color (Optional)
If you prefer a colored haunted house, now is the time to bring it to life. Use colored pencils or markers to add shades of gray, black, and dark colors to create a spooky atmosphere. Experiment with different color combinations to evoke the haunting ambiance you desire.
Wild Inspiration: Imagine a haunted house perched precariously on the back of a gigantic, lumbering tortoise as it trudges through a misty, moonlit swamp—its windows flicker with ghostly lights, and trailing vines dangle from the porch, brushing the creature's ancient shell. Perhaps spectral figures peer out from the crooked attic while swamp will-o'-the-wisps swirl around the tortoise's legs. Take this concept even further by designing the house so its architecture mimics the natural curves and textures of the tortoise's shell, blurring the line between dwelling and creature. This wild mash-up invites you to experiment with organic forms, eerie lighting, and a sense of magical movement, creating a haunted house that's not only spooky, but spectacularly alive.
Conclusion
Congratulations on completing your spooky haunted house drawing! This step-by-step tutorial has helped guide you through the process. Remember to practice and experiment with different techniques to develop your unique style.
Drawing a haunted house can be a fun and creative way to express your artistic skills, and with practice, you'll be able to create even more intricate and detailed haunted house drawings.
So grab your materials, let your imagination run wild, and have fun creating your own haunted house masterpiece!
Gallery of Haunted House Drawings


Fun Facts About Haunted Houses
-
The concept of the haunted house dates back to the Victorian era, when people became fascinated with ghosts and the supernatural.
-
The first commercial haunted house attraction opened in 1915 in Liphook, England, and was called the Orton and Spooner Ghost House.
-
Haunted houses are a popular Halloween tradition in the United States, with over 1,200 professional haunted attractions operating each year.
-
Many haunted houses in folklore are inspired by real-life abandoned or historic buildings.
-
The Winchester Mystery House in California is one of the most famous real haunted houses, known for its maze-like design and ghost stories.
-
Haunted house attractions often use psychological tricks like darkness, sudden noises, and unexpected movements to scare visitors.
-
The popularity of haunted houses in pop culture soared after the release of horror films like "The Haunting" (1963) and "Poltergeist" (1982).
-
Some haunted house attractions require visitors to sign waivers due to their intense scares.
Suggestions for Scenes and Settings for Haunted House Drawings
-
A haunted mansion perched on a jagged cliff, with lightning illuminating the night sky and ghostly figures peering from broken windows.
-
An abandoned Victorian house surrounded by twisted, leafless trees and overgrown gravestones, with eerie mist creeping along the ground.
-
A dilapidated cottage in the woods, its roof caved in and jack-o'-lanterns glowing on the porch, while shadowy silhouettes lurk in the windows.
-
A haunted house at the end of a crooked fence-lined lane, with a flickering lantern and bats swooping overhead under a full moon.
-
An old, crumbling manor with boarded-up windows and a rickety, swinging sign reading "Keep Out," as spectral hands reach from the shadows.
-
A spooky treehouse hidden among gnarled branches, with spectral children playing nearby and mysterious lights shining from within.
-
A haunted house reflected in a dark, still pond, with the reflection showing ghostly apparitions that aren't visible above ground.
-
A house overtaken by creeping vines and giant cobwebs, with a witch's silhouette crossing the threshold and black cats watching from the steps.
-
An eerie haunted house on a desolate hill, with a crooked weather vane spinning in the wind and thunderclouds rolling in behind it.
-
A haunted house in the middle of a foggy cornfield, with scarecrows coming to life and mysterious lights glowing from the attic window.