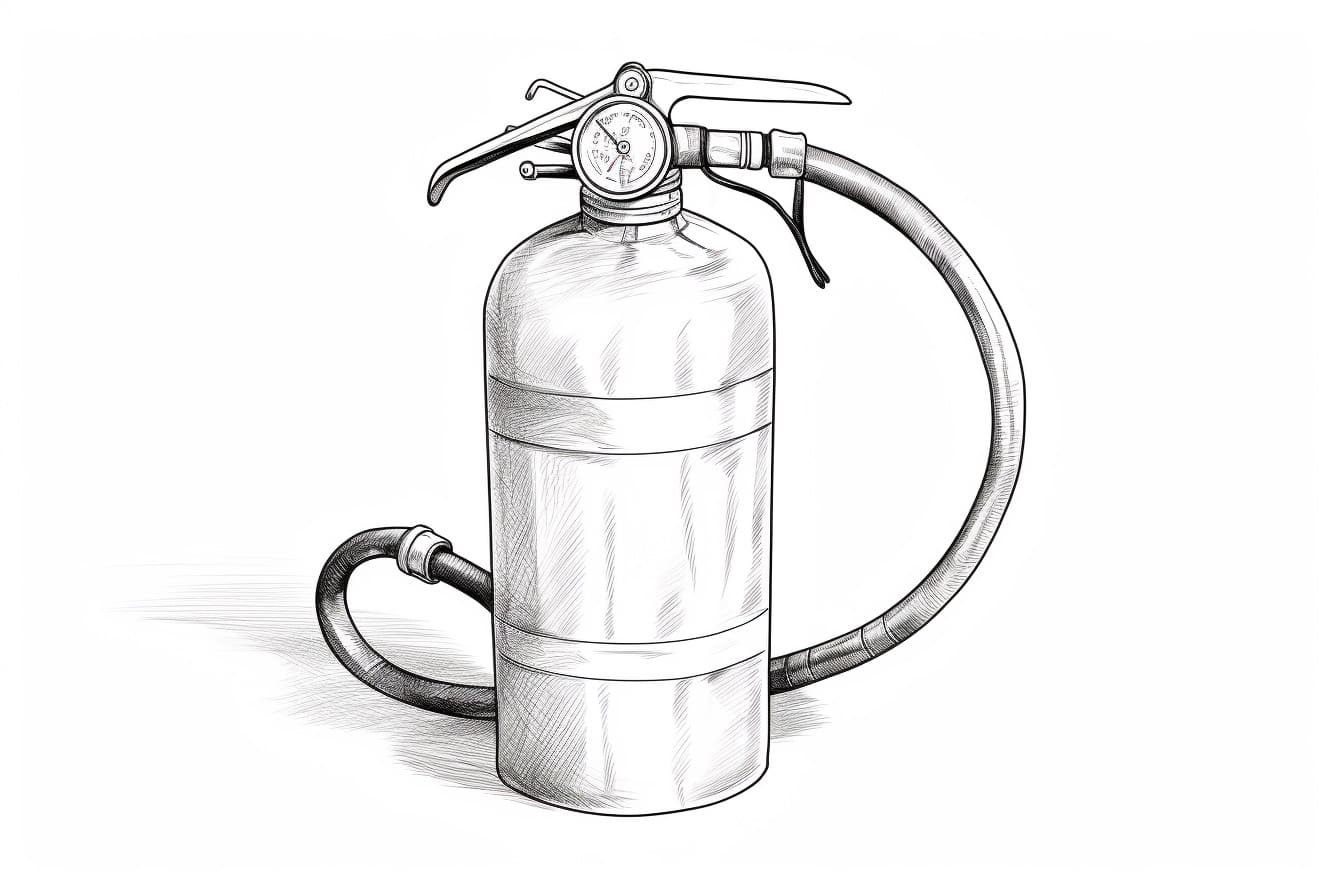
Fire safety is an important aspect of our lives, and fire extinguishers play a crucial role in keeping us safe. If you’re someone who enjoys drawing or wants to learn how to draw everyday objects, why not try your hand at drawing a fire extinguisher? In this step-by-step guide, I will walk you through the process of creating a realistic and detailed drawing of a fire extinguisher. So, let’s grab our sketching tools and get started!
Materials Required
Before we begin, gather the following materials:
- Drawing paper
- Pencil
- Eraser
- Ruler
- Fine-tip black marker
- Colored pencils or markers (optional)
With these supplies in hand, you’ll be well-equipped to create a visually striking fire extinguisher drawing.
Step 1: Basic Shape of the Fire Extinguisher
Start by lightly sketching a vertical rectangular shape on your drawing paper. This will form the basic outline of the fire extinguisher. Use a ruler to ensure straight and even lines. Remember, you can always erase any mistakes along the way, so don’t worry about perfection at this stage.
Step 2: Handle and Lever
At the top of the fire extinguisher, near the center, draw a horizontal rectangle. This will serve as the handle. Then, at the bottom of the extinguisher, draw a rounded rectangle for the lever. The lever should curve outward slightly towards the user. Take your time to get these proportions right, as they are essential for creating a realistic representation.
Step 3: Cylinder Shape
Now, it’s time to give the fire extinguisher its cylindrical shape. Starting from the top, draw a slightly curved line that follows the contours of the rectangular shape. As you reach the bottom, curve the line outward slightly to create the base of the extinguisher. Make sure the sides are symmetrical and the lines are smooth.
Step 4: Pressure Gauge and Nozzle
Towards the top of the extinguisher, draw a circular shape for the pressure gauge. Inside the circle, draw a smaller circle to represent the dial. Divide the dial into sections using short, curved lines. Then, below the gauge, draw a curved line that extends outwards to create the nozzle. The nozzle should be slightly tilted upwards.
Step 5: Details and Labels
Now that the basic structure of the fire extinguisher is complete, it’s time to add some finer details. Sketch rectangles and squares with rounded edges along the length of the extinguisher to represent various labels and instructions. You can also add a band near the base of the extinguisher for additional detail.
Step 6: Shadows and Highlights
To bring your fire extinguisher drawing to life, add shading and highlights. Identify a light source, and imagine where the shadows and highlights would fall on the extinguisher. Use your pencil or colored pencils to lightly shade the areas that would be in shadow, and add brighter tones to the areas that would catch the light.
Step 7: Outline with a Marker
Once you’re satisfied with your shading, go over the main lines of your drawing with a fine-tip black marker. This will create a clean, finished appearance and make your drawing stand out. Be careful not to go over any shading or details that you want to keep.
Conclusion
Congratulations! You have successfully drawn a fire extinguisher. By following these step-by-step instructions, you were able to create a detailed and accurate representation of this essential safety equipment. Remember, practice is key to improving your drawing skills, so don’t be afraid to experiment with different materials and techniques. Keep exploring the world of art and continue to enhance your creativity.
Now that you’ve mastered drawing a fire extinguisher, you can apply the same techniques to draw other everyday objects. Whether it’s a coffee mug, a bicycle, or a smartphone, the possibilities are endless. So grab your sketchbook and bring your favorite objects to life on paper!