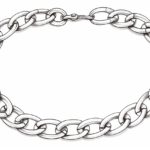
Drawing a necklace chain can add elegance and detail to your artwork. Whether you are an aspiring artist or simply enjoy creating beautiful images, learning how to draw a necklace chain is a valuable skill to have. In this step-by-step guide, I’ll walk you through the process, providing clear and concise instructions along the way. By the end, you’ll be able to create stunning necklace chains that will enhance your drawings. So, let’s get started!
Materials Required
To draw a necklace chain, you’ll need the following materials:
- Pencil: A good quality pencil will allow you to create precise and clean lines. Choose a pencil with a hardness suitable for your drawing style.
- Paper: Select a smooth, sturdy paper that can handle the weight of your pencil shading without tearing or smudging.
- Eraser: A kneaded eraser or a soft eraser will be useful for correcting any mistakes or lightening areas of your drawing.
Now that you have the necessary materials, let’s dive into the step-by-step process of drawing a necklace chain.
Step 1: Start with a Guideline
Begin by lightly sketching a guideline that represents the center of your necklace chain. This guideline will help you maintain the symmetry and shape of your chain as you draw. You can simply draw a straight line or a gently curving line depending on the style of chain you wish to create.
Step 2: Define the Links
Next, start by drawing the first link of your necklace chain. To do this, draw a small oval shape along the guideline, slightly elongated horizontally. This will serve as the basic shape for the links in your chain.
Step 3: Add Depth to the Links
To create depth and dimension, add a curve to the top and bottom sections of each oval link. This will give the appearance of a three-dimensional object. Ensure that the curve is consistent throughout each link to maintain a cohesive chain design.
Step 4: Connect the Links
Now, draw a smaller oval shape at the top and bottom of each link, connecting them together. These smaller ovals will represent the overlapping sections of the links, creating a more realistic and intricate chain.
Step 5: Refine the Shapes
Refine the shapes of your links by adding smooth curves and adjusting any uneven areas. Pay attention to the angles and curves of each link to maintain a sense of realism. Take your time during this step, as accuracy in shape and proportion will greatly enhance the final result.
Step 6: Shade the Chain
To create a sense of texture and shading, lightly shade the areas between the links. Use a gentle hatching technique, applying light strokes to indicate shadows and depth. Vary the pressure of your pencil to create a smooth gradient effect, with darker shades in the recessed areas and lighter shades on the raised surfaces.
Step 7: Add Highlights
To make your necklace chain look even more realistic, add highlights to the raised areas of the links. Leave small sections of the links untouched or use an eraser to create highlights that catch the light. This contrast will add depth and make your chain appear more metallic and reflective.
Step 8: Final Details
Take a moment to examine your drawing and make any necessary adjustments. Pay attention to the overall shape and form of the chain, ensuring that it has a consistent and pleasing appearance. Erase any unwanted lines or smudges, and refine any areas that need further attention.
Conclusion
Congratulations! You have successfully learned how to draw a necklace chain. By following these step-by-step instructions and using your creativity, you can now add beautiful, intricate necklace chains to your drawings. Experiment with different styles and designs to create chains that suit your artistic vision. Drawing necklace chains may seem challenging at first, but with practice and patience, you will be able to master this skill and incorporate stunning chains into your artwork. Enjoy the process and have fun creating!