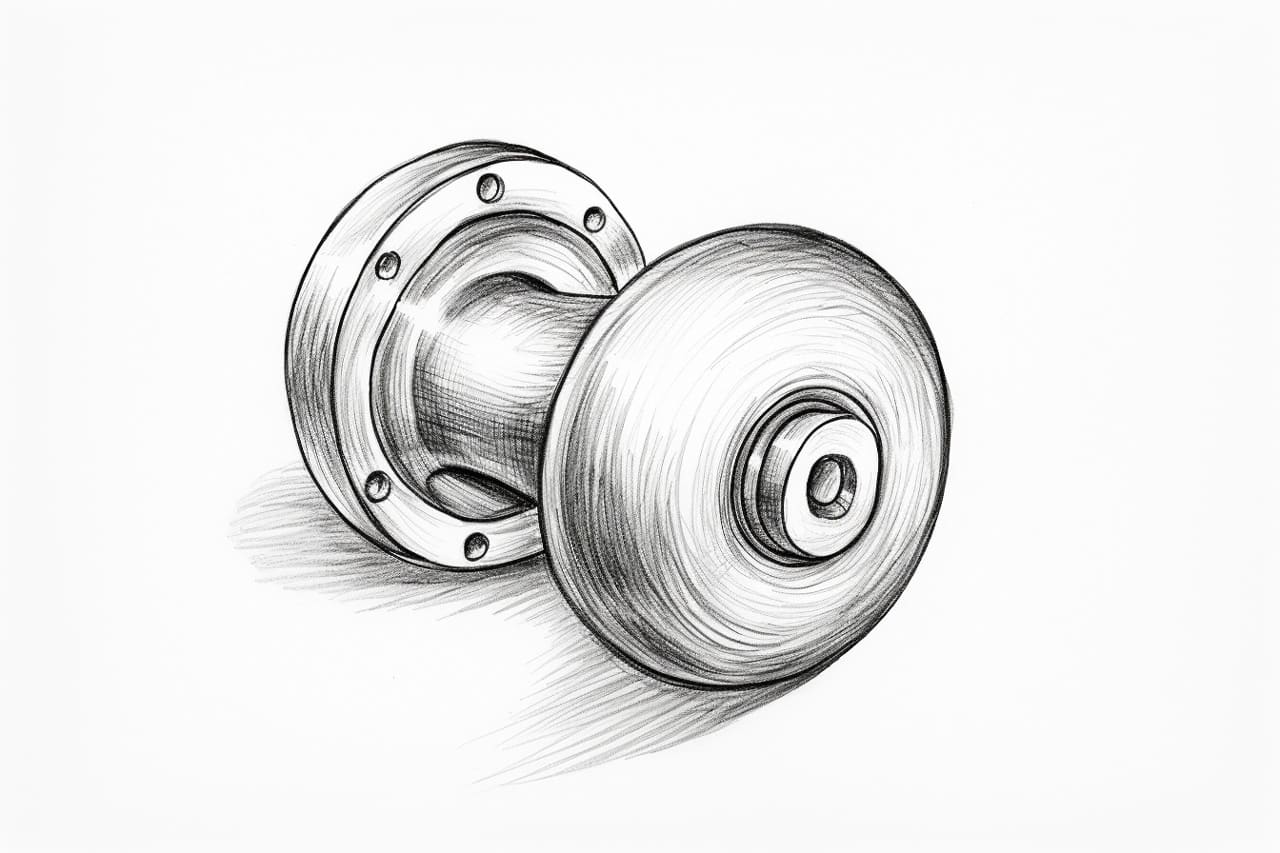
Are you interested in learning how to draw? Drawing is a wonderful skill that allows you to express yourself creatively and bring your imagination to life. In this tutorial, we will guide you through the process of how to draw a doorknob—a common yet essential element in any realistic drawing. So, grab your drawing materials, and let’s get started!
Materials Required:
Before we begin, make sure you have the following materials:
- Drawing paper
- Pencil (preferably an HB or 2B)
- Eraser
- Ruler
- Protractor (optional)
- Compass (optional)
- Reference image of a doorknob (optional, for inspiration)
Now that you have your materials ready, let’s dive into the step-by-step process of drawing a doorknob.
Step 1: Sketch the Basic Shape
Start by sketching a circle to form the base of the doorknob. You can use a compass to draw a perfect circle or simply freehand it. The size of the circle will depend on the perspective you want to achieve in your drawing.
Step 2: Add Details
Within the circle, draw a smaller circle that represents the central part of the doorknob. This is the part you usually grip to open or close the door. Make sure it is aligned with the center of the larger circle.
Next, draw a horizontal line across the center of the smaller circle. This line will serve as a guide for drawing the grooves on the doorknob.
Step 3: Create Depth and Texture
To give the doorknob a three-dimensional look, we need to add shading and texture. Start by shading the outer parts of the doorknob, gradually darkening the pencil strokes towards the edges. This will create the illusion of depth.
Now, focus on the central part of the doorknob. Draw horizontal lines across the smaller circle, following the guide line you sketched earlier. These lines will represent the grooves on the doorknob. Keep the lines evenly spaced and parallel to each other.
Step 4: Refine the Details
After establishing the basic shape and shading, it’s time to refine the details of the doorknob. Use your pencil to darken the outlines of the larger and smaller circles. This will make the doorknob stand out more and give it a polished appearance.
Next, add some highlights to enhance the metal-like quality of the doorknob. Lightly shade a small curved area near the edge of the larger circle, opposite the side where the grooves are located. This will simulate the reflection of light on a shiny surface.
Step 5: Final Touches
Now that the doorknob is taking shape, take a step back and evaluate your drawing. Make any necessary adjustments to the shading or overall proportions. Use your eraser to remove any unwanted pencil marks or smudges.
If you want to take your drawing to the next level, consider adding a door frame or a door handle to complete the scene. This will provide context and make your doorknob drawing more realistic and visually appealing.
Congratulations! You have successfully drawn a doorknob. Keep practicing this technique, and soon you’ll be able to draw various objects with ease and precision.
Conclusion
Drawing a doorknob may seem like a simple exercise, but it is a great way to develop your observation skills and improve your understanding of depth and texture. By following the step-by-step instructions in this tutorial and practicing regularly, you’ll be able to create realistic and detailed drawings of any subject.
Remember, drawing is a journey of self-expression, creativity, and continuous improvement. So, keep exploring, experimenting, and pushing your boundaries as an artist. Happy drawing!