As an expert artist and drawing instructor, I will guide you step-by-step in how to draw a cuttlefish. With a few materials and a little practice, you’ll be able to create a stunning representation of this fascinating sea creature.
Materials Required
Before we begin, let’s gather the materials you’ll need for this drawing:
- Drawing paper
- Pencils (HB, 2B, and 4B)
- Eraser
- Blending stump or cotton swabs
- Reference picture of a cuttlefish (optional, but helpful for accuracy)
Now that we have everything ready, let’s dive into the world of drawing a cuttlefish!
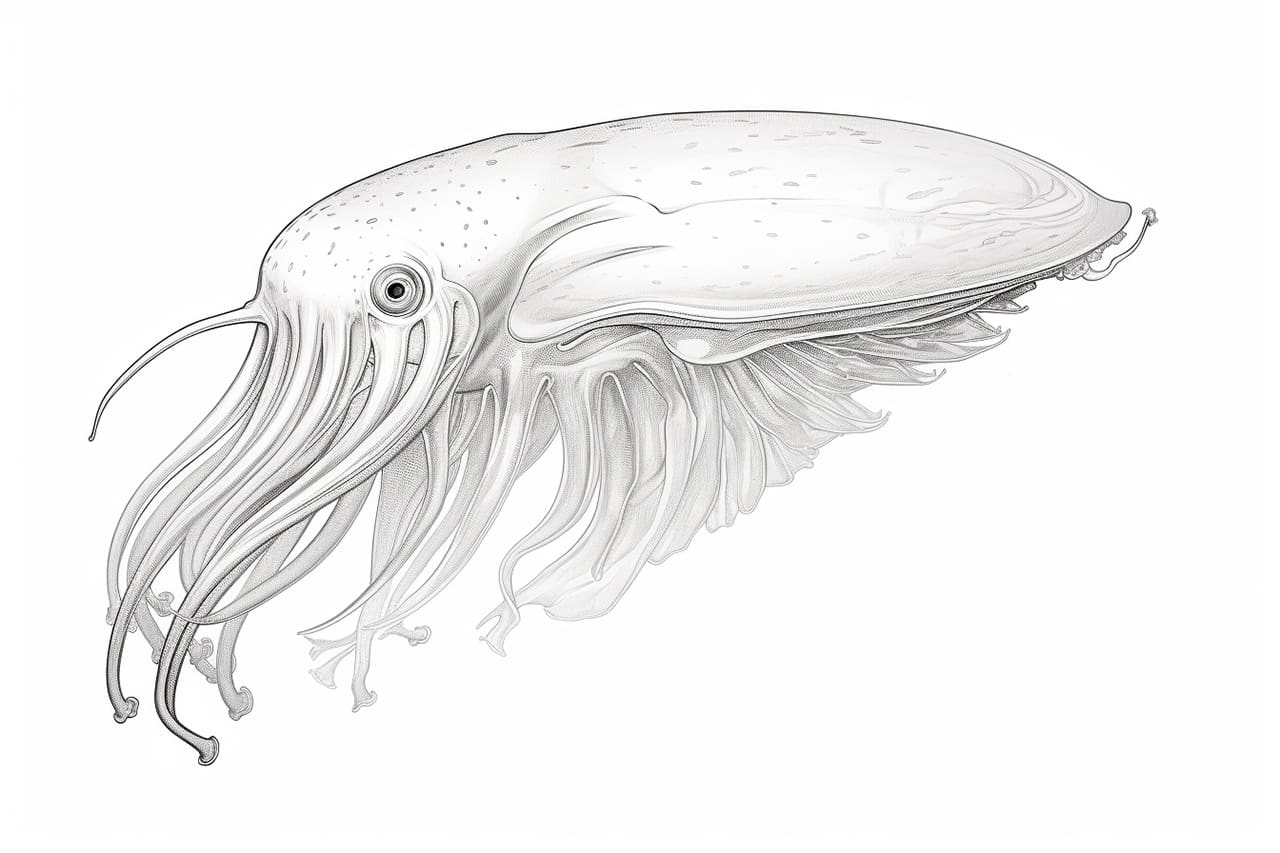
Step 1: Basic Shape
Start by sketching a rough oval shape for the cuttlefish’s body. You can use a light HB pencil for this initial step. Don’t worry about getting it perfect; this is just a guide.
Step 2: Tentacles and Arms
Add in the long, slender tentacles and arms of the cuttlefish. They should be positioned around the mouth area. You can use gentle, curved lines to create a natural flow.
Step 3: Eyes and Fins
Draw two large circular eyes on either side of the head. Inside each eye, add a smaller circle for the iris and a small dot for the pupil. Then, sketch in the fins on the sides of the body, starting from the base of the head and extending towards the tail.
Step 4: Textured Skin
Cuttlefish have unique, textured skin. Using your 2B pencil, lightly draw a series of overlapping diamond-shaped patterns on the body and fins. These patterns mimic the cuttlefish’s skin texture.
Step 5: Body Details
Refine the shape of the cuttlefish’s body by adding more curves and contours. Pay attention to the proportions and make sure everything looks balanced. Take your time to get it just right.
Step 6: Suckers
Cuttlefish have suction cups called “suckers” on their tentacles and arms. Use your 4B pencil to draw small circles along the length of each tentacle and arm. These circles represent the suckers.
Step 7: Darken the Eyes
Using your 4B pencil, darken the outline of the eyes, iris, and pupil. Add shading to create depth and make the eyes stand out. Blend the shading with a blending stump or a cotton swab to soften the edges.
Step 8: Shading and Shadows
To make your cuttlefish look more three-dimensional, add shading and shadows. Identify the light source and imagine where the shadows would fall. Use your 2B and 4B pencils to create a gradual transition from light to dark.
Step 9: Finishing Touches
Take a moment to review your drawing and make any necessary adjustments. Pay attention to the details, such as the texture of the skin, the shapes of the fins, and the overall proportions. Erase any stray lines or smudges.
Conclusion
Congratulations! You have successfully learned how to draw a cuttlefish. With patience and practice, you’ll continue to refine your skills and create even more impressive artworks. Remember, drawing is a journey, and each step brings you closer to becoming the artist you aspire to be.
I hope you enjoyed this step-by-step guide on how to draw a cuttlefish. Keep exploring different subjects and experimenting with various techniques. Happy drawing!