Do you love chocolate chip cookies? Have you ever wanted to capture their deliciousness on paper? In this step-by-step guide, I will show you how to draw a chocolate chip cookie with mouth-watering realism. Whether you’re a beginner or an experienced artist looking for a fun project, this tutorial is for you. So grab your pencils, paper, and let’s get started!
Materials Required
To draw a chocolate chip cookie, you will need the following materials:
- Pencil: Choose a medium-soft pencil, such as a 2B or 4B, for sketching and shading.
- Eraser: A kneaded eraser is preferred, as it can be shaped to erase small details.
- Paper: Use a smooth drawing paper or sketchbook that can handle shading.
Now that you have your materials ready, let’s begin the cookie drawing process!
Step 1: Sketch the Basic Shape
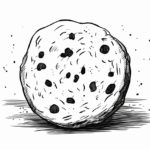
Start by lightly sketching a rough circle on your paper. This will serve as the overall shape of your cookie. Don’t worry about making it perfect at this stage; we will refine it later on. Keep your pencil strokes light so that they are easy to erase if needed.
Step 2: Add Texture
Next, we want to give our cookie some texture. Chocolate chip cookies have a slightly uneven surface, with small cracks and bumps. Use your pencil to lightly draw lines and curves around the edges of the circle to mimic this texture. Make the lines a bit wavy and irregular to create a realistic effect.
Step 3: Define the Edges
Now that we have the basic shape and texture, it’s time to define the edges of the cookie. Darken the outline of the circle, making it slightly thicker in some areas to create a more organic look. Pay attention to the texture lines we added earlier and adjust the outline accordingly, making sure it follows the contours of the cracks and bumps.
Step 4: Add the Chocolate Chips
What’s a chocolate chip cookie without its chocolate chips? Inside the cookie’s surface, draw a bunch of small, irregular ovals to represent the chocolate chips. Space them out unevenly and vary their sizes to make it look more natural. Be sure not to overcrowd the cookie with too many chips – we want them to be visible but not overwhelming.
Step 5: Shade the Cookie
To make our cookie appear more three-dimensional, we need to add shading. Start by identifying a light source on your paper. This will determine where the highlights and shadows fall. Shade the parts of the cookie that are farther away from the light source by applying light pressure with your pencil. Gradually increase the pressure as you move towards the areas that receive more light.
Step 6: Enhance the Texture
To give our cookie a more realistic texture, we need to enhance the cracks and bumps. Using your pencil, darken some of the texture lines we drew earlier, particularly the ones that are in shadow. Add some smaller cracks and jagged lines in random places to add depth and character to the cookie’s surface.
Step 7: Add Reflective Highlights
To make our chocolate chip cookie look even more delicious, we can add some reflective highlights. Identify the areas of the cookie that are directly facing the light source and carefully erase small sections to create highlights. These highlights will make the cookie appear glossy and more tempting.
Step 8: Final Details
We are almost done! Take a step back to assess your drawing. Are there any areas that need adjustment or refining? Pay attention to the overall shape, texture, shading, and highlights. Make any necessary tweaks to ensure your cookie looks as realistic as possible. Don’t be afraid to experiment and add your personal touch to the drawing.
Conclusion
Congratulations! You have successfully drawn a realistic chocolate chip cookie. This step-by-step guide has provided you with the techniques and tips needed to capture the essence of this delightful treat on paper. Remember to practice regularly and have fun with your drawings. Who knows, maybe one day you’ll be able to enjoy a plate of actual cookies while admiring your artwork. Happy drawing!