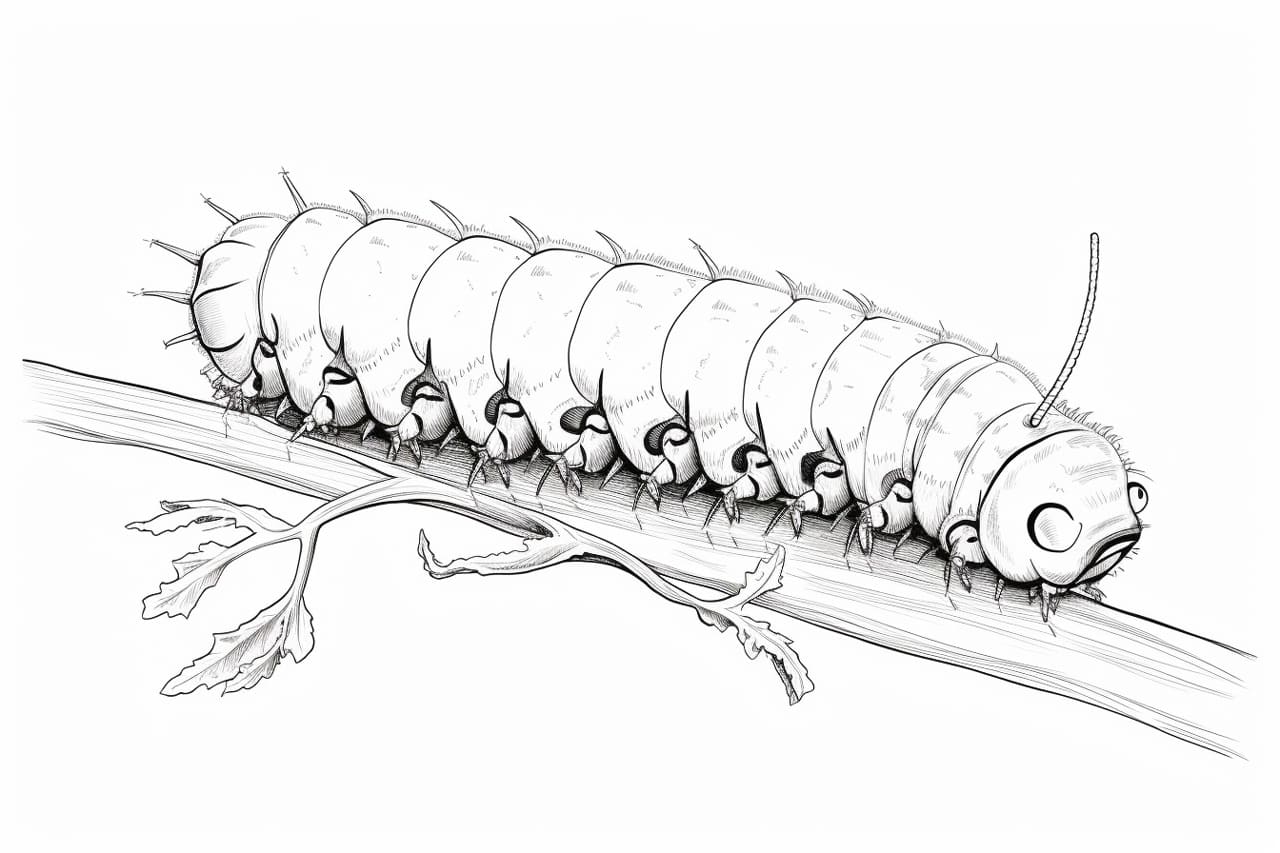
Welcome to this step-by-step guide on how to draw a caterpillar! Whether you are a beginner or an experienced artist, this tutorial will help you create a cute and colorful caterpillar. Drawing insects can be a fun and rewarding experience, and with a little practice, you’ll be able to capture the charm of these fascinating creatures on paper. So grab your drawing supplies and let’s get started!
Materials Required
Before we begin, make sure you have the following materials:
- Paper: Use a smooth, medium-weight paper that is suitable for drawing. A sketchbook or drawing pad works well.
- Pencils: Have a range of pencils with different lead hardness, such as HB, 2B, and 4B. These will allow you to create light and dark lines.
- Eraser: Choose a soft eraser that doesn’t leave smudges behind. A kneaded eraser is ideal for lifting graphite lines cleanly.
- Sharpener: Use a pencil sharpener to keep your pencils sharp and ready for precise drawing.
- Colored Pencils (optional): If you want to add color to your caterpillar, have a set of colored pencils or markers handy.
Now that you have your materials ready, let’s delve into the step-by-step process of drawing a caterpillar!
Step 1: Sketch the Basic Shapes
Start by drawing a rough outline of the caterpillar’s body. Begin with a curved line for the head, and then draw a series of small circles connected together to form the body. Keep the circles slightly overlapping, creating a wavy pattern. Don’t worry too much about perfection at this stage; we’ll refine the shapes later.
Step 2: Add Details to the Head
Next, let’s add some details to the caterpillar’s head. Draw two small, circular eyes near the top of the head, leaving some space between them. Then, add a small oval shape for the mouth. This will give your caterpillar a friendly expression.
Step 3: Refine the Body
Now it’s time to refine the shape of the caterpillar’s body. Start by smoothing out the wavy pattern, making it more continuous and flowing. You can use light, curved lines to connect the circles, giving the body a sense of movement. Feel free to adjust the size and shape of the circles as you go along, making your caterpillar as chubby or slim as you like.
Step 4: Add Segments and Feet
Caterpillars have multiple segments on their bodies, which we’ll create by drawing overlapping ovals along the length of the body. Start at the head and work your way down, adding ovals that become progressively larger towards the middle of the body. To give your caterpillar more character, you can also add small, curved lines on each segment to represent its feet.
Step 5: Refine the Features
Now that the basic structure of your caterpillar is in place, it’s time to refine its features. Begin by adding more definition to the head. Draw a small, curved line above each eye to represent the eyebrows. Then, add a few short, curved lines on the forehead to indicate the texture of the caterpillar’s skin.
Step 6: Draw the Antennae
Caterpillars have two long and thin antennae on their heads. To draw them, extend two curved lines from the top of the head, making them slightly longer than the body. Add a small, rounded tip at the end of each line for realism.
Step 7: Add Color (Optional)
If you want to add color to your caterpillar, this is the time to do so. Use colored pencils or markers to bring your caterpillar to life. Caterpillars come in various colors, so feel free to choose any combination you like. Whether you want a vibrant rainbow caterpillar or one with more subtle hues, have fun experimenting with color!
Step 8: Finalize the Details
To finish your caterpillar drawing, take a moment to review the overall composition. Look for any areas that need further refinement or adjustment. Darken the main lines of your drawing, adding depth and contrast. Erase any unnecessary guidelines or stray marks. Once you are satisfied with the result, your caterpillar drawing is complete!
Conclusion
Congratulations on completing your caterpillar drawing! By following these step-by-step instructions, you have learned how to create a charming caterpillar from scratch. Remember, practice makes perfect, so don’t hesitate to draw more caterpillars or explore other insect illustrations. Drawing is a wonderful way to express your creativity and improve your skills as an artist. Enjoy the process, and have fun bringing your caterpillar, and other creatures, to life on paper!