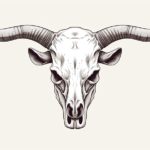
Drawing a bull head can be a challenging yet rewarding task. With the right techniques and a little practice, you can create a stunning representation of this powerful animal. In this step-by-step guide, we will walk you through the process of drawing a bull head, from constructing the basic shapes to adding intricate details. So grab your drawing supplies and let’s get started!
Materials Needed
Before we begin, make sure you have the following materials:
- Paper: A sketch pad or drawing paper will work well for this project.
- Pencils: We recommend using a range of graphite pencils, such as HB, 2B, and 4B, to achieve different shading effects.
- Eraser: A kneaded eraser or a soft eraser will be useful for correcting any mistakes.
- Blending Tools: You can use a blending stump or a tortillon to blend and soften your pencil strokes.
- Reference Image: Find a clear reference photo of a bull head to guide you throughout the drawing process.
Now that you have all your materials ready, let’s dive into the step-by-step instructions.
Step 1: Construct Basic Shapes
Start by drawing a circle for the bull’s head. To ensure accuracy, lightly sketch the circle using a light pencil stroke. Next, draw a rectangle below the circle. This rectangle will serve as the base for the bull’s snout. Make sure the dimensions of the rectangle are proportional to the size of the circle.
Step 2: Add Facial Features
Divide the circle into quadrants using light guidelines. These guidelines will help you align the facial features correctly. Sketch two almond-shaped ovals within the upper quadrants of the circle for the bull’s eyes. Add a small circle within each eye to represent the iris.
Step 3: Define the Snout
Using the rectangle as a guide, draw a curved line that connects the bottom of the circle to the bottom of the rectangle. This will create the shape of the bull’s snout. Add a curved line from the top of the snout to define the bridge of the nose.
Step 4: Outline the Horns
Position the horns on either side of the bull’s head. Draw two curved lines that extend outward from the top of the circle. Angle the lines slightly downward and then curve them back up, creating the shape of the horns. Remember that bull horns can vary in size and shape, so feel free to experiment with different designs.
Step 5: Refine the Facial Features
Start adding details to the bull’s face. Darken the outline of the eyes and add shading to create depth. Use short, directional strokes to emulate the texture of fur around the eyes and across the snout. Add a small dot above each eye to represent the bull’s nostrils.
Step 6: Emphasize the Horns
Give the horns more definition by adding curved lines along their length. Add slight curves and grooves to make the horns appear more realistic and three-dimensional. Pay attention to the direction of the lines, as they should follow the shape of the horns.
Step 7: Shade and Add Texture
Now it’s time to add shading and texture to bring your bull head drawing to life. Begin by shading the dark areas around the eyes, nose, and inside the nostrils. Use a range of pencils to achieve different shades of gray, blending them together with a blending stump for a smoother transition.
To create the illusion of fur, use short, controlled strokes in the direction of the bull’s hair. Vary the pressure and density of your strokes to add depth and texture. Take your time during this process and observe your reference image closely to capture the intricate details.
Step 8: Refine and Add Final Details
Carefully review your drawing and make any necessary adjustments. Refine the shapes, add more shading, and enhance the contrast between light and dark areas. Pay attention to the wrinkles and creases around the bull’s eyes and snout, as they contribute to its realistic appearance. Don’t forget to add highlights to make certain areas pop.
Conclusion
Congratulations! You have successfully learned how to draw a bull head. Remember, drawing is all about practice, so don’t hesitate to experiment and try new techniques. With each drawing, you’ll improve your skills and develop your unique artistic style. Keep exploring and creating, and soon you’ll be able to tackle more complex subjects. Happy drawing!