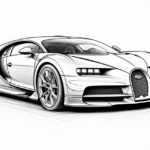
Welcome to this step-by-step guide on how to draw a Bugatti Chiron! The Bugatti Chiron is a renowned supercar known for its sleek design and powerful performance. In this article, I will guide you through the process of drawing this iconic vehicle, providing detailed instructions along the way to help you achieve a realistic representation of the Bugatti Chiron. So, let’s grab our drawing materials and get started!
Materials Required
Before we begin, make sure you have the following materials ready:
- Pencil: Choose a medium-soft graphite pencil, such as a 2B or 4B, for sketching and shading.
- Eraser: Have a kneaded eraser or a soft eraser handy to correct any mistakes or lighten certain areas.
- Paper: Use a smooth sheet of drawing paper or a sketchbook that can handle graphite shading.
Now that we have gathered our materials, let’s move on to the step-by-step process of drawing a Bugatti Chiron!
Step 1: Basic Outline
Start by lightly sketching a rectangle shape that will roughly represent the body of the car. This will serve as our basic framework. Then, add two slightly slanted lines on top of the rectangle to indicate the windshield and roof.
Step 2: Front and Rear Sections
Divide the rectangle into three equal parts horizontally. The middle section represents the cabin, while the other two sections will be used for the front and rear portions of the car respectively. Sketch the front section by drawing a curved line from the top left corner of the rectangle towards the middle. Then, draw a similar but slightly smaller curve for the rear section.
Step 3: Hood and Roof
To create the hood, draw a slightly curved line starting from the top of the front section and extending towards the windshield. Keep the line smooth and sleek to capture the Bugatti Chiron’s aerodynamic design. Next, add a curved line for the roof, connecting the windshield with the rear section of the car.
Step 4: Side Panels and Doors
Now, it’s time to add the side panels. Draw two vertical lines starting from the front section and extending towards the rear section, slightly curving them outwards. These lines will define the sides of the car. Then, add another pair of lines within each side panel to represent the doors.
Step 5: Wheels and Wheel Arches
Position the wheels by drawing two circles within the lower portion of the front and rear sections. Ensure that the wheels are proportionate to the body of the car. Next, sketch the wheel arches by drawing curved lines that follow the general shape of the wheels. These arches will add depth and realism to your drawing.
Step 6: Details of the Body
Now, let’s focus on the details of the Bugatti Chiron. Add lines to indicate the side air vents, located near the front wheels and behind the front wheel arches. Then, draw small circles within the wheels to represent the rims. You can also add some lines to indicate the brake discs and calipers if you wish to include these details.
Step 7: Headlights and Grille
The Bugatti Chiron is known for its distinctive front grille and headlights. Sketch the grille by drawing a series of horizontal and vertical lines within the front section, giving it a honeycomb-like appearance. Then, add the headlights by drawing two oval shapes on either side of the grille. Make sure the headlights follow the contours of the car’s body.
Step 8: Windows and Windshield
To draw the windows, start by adding a straight line that connects the roof with the rear section of the car. This will represent the side windows. Then, draw another curved line starting from the windshield and extending towards the rear section to represent the rear window. Finally, add the windshield by drawing a curved line connecting the roof with the front section.
Step 9: Shading and Textures
Now that you have completed the outline of the Bugatti Chiron, it’s time to add shading and textures to bring your drawing to life. Start by darkening the areas that are meant to be in shadow, such as the wheel arches, underside, and areas between the body panels. Use smooth, even strokes to create a realistic shading effect. Pay attention to the reflections and highlights on the car’s surface to capture its glossy appearance.
Step 10: Final Touches
Take a step back and assess your drawing. Make any necessary adjustments to ensure that the proportions and details are accurate. Add any additional shading or details that you feel are needed to enhance the overall realism of your drawing. Use your eraser to clean up any stray lines or smudges, and refine the contours and shapes as necessary.
Conclusion
Congratulations! You have successfully learned how to draw a Bugatti Chiron. By following these step-by-step instructions and using your creativity, you have created a stunning representation of this iconic supercar. Remember, practice is key to improving your drawing skills, so don’t be discouraged if your first attempt doesn’t turn out exactly as you hoped. Keep refining your techniques and experimenting with different styles to develop your own unique artistic voice. Happy drawing!