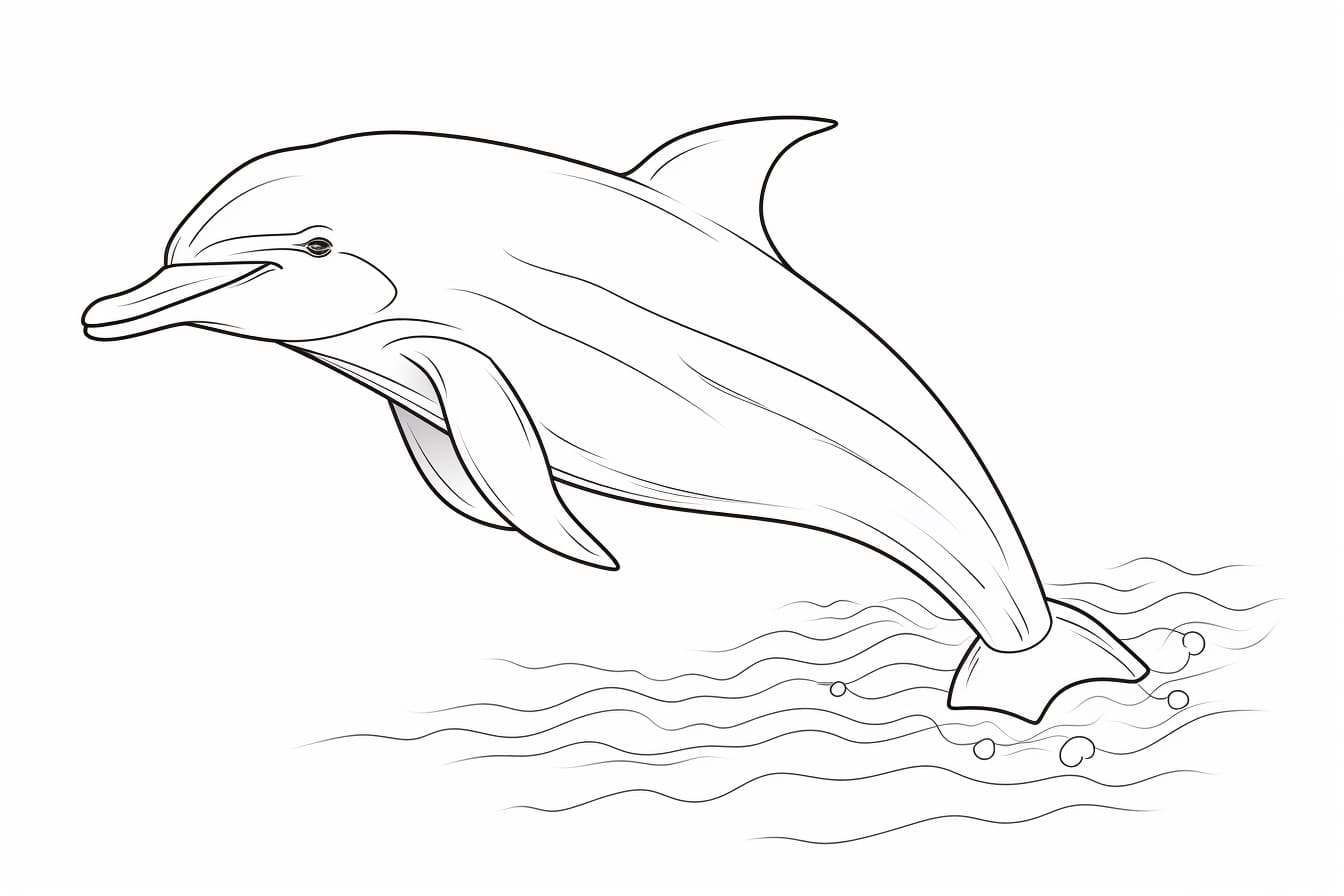
Are you fascinated by the grace and beauty of bottlenose dolphins? Do you want to capture their majestic essence on paper? Whether you’re an aspiring artist or simply looking for a fun and creative activity, learning how to draw a bottlenose dolphin can be an enjoyable and rewarding experience. In this step-by-step guide, we will walk you through the process of creating your very own lifelike dolphin drawing.
Materials Required
Before we begin, let’s gather all the materials you’ll need to bring your dolphin drawing to life:
- Drawing paper or sketchbook
- Pencil
- Eraser
- Fine-tip black marker or pen
- Colored pencils or markers (optional)
- Reference image of a bottlenose dolphin
Now that you have all the necessary materials, let’s dive into the process of drawing a bottlenose dolphin.
Step 1: Basic Outline
Start by lightly sketching a circle in the center of your drawing paper. This circle will serve as the dolphin’s head. Next, draw a slightly curved line extending from the bottom of the circle to represent the dolphin’s body. Add a small triangular shape at the end of the body for the tail.
Step 2: Facial Features
Within the circle, draw a curved line from top to bottom, dividing it into two equal halves. These lines will help in placing the dolphin’s facial features accurately. Next, add a small oval shape near the top of the circle for the eye. Within the eye, draw a smaller circle and shade it, leaving a tiny white spot to create a sense of light reflection.
Step 3: Snout and Mouth
Extend a curved line from the bottom of the eye, curving it downwards for the snout. At the tip of the snout, draw a small horizontal line to represent the dolphin’s mouth. Add a slight curve at the end of the mouth to give it a smiling appearance.
Step 4: Body Details
Using the initial curved line as a guide, add a slightly curved line above it to define the dolphin’s back. Then, draw a gentle curve along the bottom of the body to depict the belly.
Step 5: Pectoral Fins
Positioned on each side of the dolphin’s body, draw two curved lines that taper towards the end to create the pectoral fins. Make sure to leave a small gap between the fins and the body.
Step 6: Dorsal Fin
At the top of the dolphin’s back, draw a triangular shape for the dorsal fin. It should be tall and slightly curved backward.
Step 7: Tail and Flippers
Extend the triangular shape you drew for the tail in Step 1 by adding two curved lines that meet at a point. Next, add a slightly curved line connecting the dorsal fin and the tail, indicating the dolphin’s back. For the flippers, draw two elongated triangular shapes, one on each side of the body, near the head.
Step 8: Refine and Detail
Now that you have the basic structure of your dolphin, go over your initial sketch and refine any uneven lines. Add smaller details such as a curved line along the bottom of the eye to represent the eyelid. Don’t forget to erase any unnecessary guidelines.
Step 9: Ink and Outline
Using a fine-tip black marker or pen, carefully go over the refined lines of your dolphin drawing. Start with the head and work your way down to the tail, being mindful of each curve and contour. Take your time and be patient as you trace the outline of your dolphin.
Step 10: Coloring (Optional)
If you’d like to add some color to your drawing, now is the time to do so. Bottlenose dolphins are known for their grayish-blue coloring on the top and a lighter shade on their belly. Use colored pencils or markers to fill in these areas, adding shading and highlighting to create a more realistic appearance.
Conclusion
Congratulations! You’ve successfully learned how to draw a lifelike bottlenose dolphin. By following these step-by-step instructions, you’ve captured the elegance and charm of these magnificent creatures on paper. Remember to practice regularly and experiment with different techniques to further enhance your artistic skills. So grab your pencil and paper, and let your creativity soar as you create your own beautiful dolphin masterpieces.