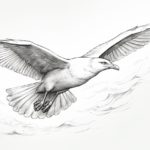
Welcome to this step-by-step guide on how to draw a seagull! Seagulls are beautiful and graceful birds that are often found near bodies of water. By following these simple instructions, you will be able to create a realistic and detailed drawing of a seagull. Whether you are a beginner or an experienced artist, this tutorial will provide you with the necessary guidance to bring your seagull to life on paper. So grab your drawing materials and let’s get started!
Materials Required
Before we begin, let’s gather the necessary materials for this drawing tutorial. You will need:
- Pencils (preferably graphite pencils of varying degrees, such as 2B, 4B, and 6B)
- Eraser (a kneaded eraser works best for this project)
- Drawing paper (a medium-weight or heavy-weight paper would be ideal)
- Drawing board (to provide a sturdy surface for your paper)
- Reference image of a seagull (you can find one online or use a picture of your own)
Now that you have all your materials ready, let’s dive into the step-by-step process of drawing a seagull.
Step 1: Sketch the Basic Shape
Start by lightly sketching an oval shape in the center of your paper. This will serve as the seagull’s body. Next, draw a smaller oval at the top of the body to represent the head. Connect the head to the body with a curved line.
Step 2: Define the Wing and Tail
Extend a long, curved line from the left side of the body to create the first wing. The wing should have a slightly tapered shape, broader towards the body and narrower towards the tip. Repeat this step on the right side to form the second wing. For the tail, draw a short, straight line extending downwards from the back of the body.
Step 3: Add Details to the Head
Now let’s focus on the seagull’s head. Sketch a small circle for the eye on the left side of the head. Inside the eye, draw a smaller circle to represent the pupil. Leave a tiny white dot to add a hint of light reflection. Beneath the eye, draw a curved line to create the beak. Make the beak slightly pointed at the end. Add a small dot at the tip of the beak to indicate the nostril.
Step 4: Refine the Body and Wings
To give the seagull a more realistic appearance, we need to add some feather details. Starting from the body, draw short, curved lines extending towards the wings. These lines represent the feathers on the bird’s body. Continue this pattern along the wings, making the lines longer and more defined as you move towards the tips. Remember to keep the lines curved, following the shape of the wings.
Step 5: Outline the Tail
Give the tail some texture by adding a few short, horizontal lines across it. These lines will mimic the appearance of feathers. Make the lines slightly curved to match the tail’s shape. You can also add a few thin lines on the wings to suggest feathers.
Step 6: Draw the Legs and Feet
Now let’s draw the seagull’s legs and feet. Extend two long, slim lines downwards from the body to form the legs. At the bottom of each leg, draw a small triangular shape for the feet. Seagulls have webbed feet that help them swim, so make sure to include the webbing between each toe.
Step 7: Refine and Shade
To give your seagull drawing depth and dimension, add shading to the different areas. Start by using a lighter pencil (2B) to shade the body, wings, and tail. Apply the pencil strokes in the direction of the feathers, following the curvature of each part. Gradually build up the shading by layering darker pencil strokes (4B or 6B) in areas that require more contrast, such as the shadows beneath the wings and the body. Use your eraser to create highlights on the beak, head, and wings by gently lifting off some of the graphite.
Conclusion
Congratulations! You have now successfully drawn a seagull. By following these step-by-step instructions and practicing regularly, you will be able to improve your drawing skills and create more realistic and detailed artwork. Remember to be patient with yourself and have fun during the process. We hope you enjoyed this tutorial on how to draw a seagull.