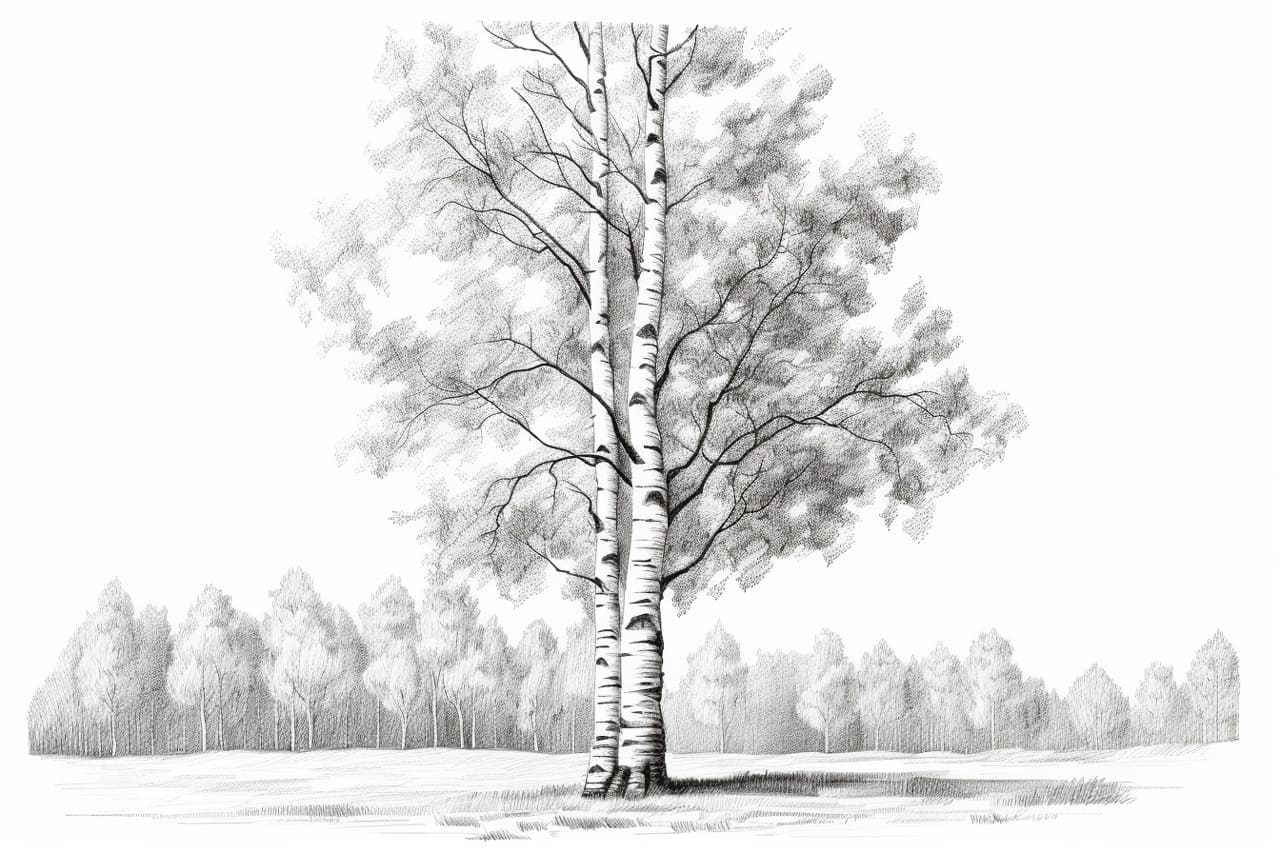
Whether you are an experienced artist or just starting out, drawing trees can be a fun and rewarding exercise. Birch trees, with their distinctive white bark and graceful branches, make for an interesting subject to capture on paper. In this step-by-step guide, we will walk you through the process of drawing a beautiful birch tree. So grab your pencils and paper, and let’s get started!
Materials Required
Before we begin, gather the following materials:
- Drawing paper: Choose a smooth surface paper that is suitable for sketching. A heavier weight paper will work best.
- Pencils: Use a range of pencils such as HB for light sketching, 2B for shading, and 4B or 6B for darkening the shadows.
- Eraser: A kneaded eraser is ideal for removing or lightening pencil marks.
- Blending stump: This tool is useful for blending and smudging pencil lines to create smooth transitions.
- Reference photo: Find a high-quality image of a birch tree to use as a reference while drawing.
Now that you have gathered the necessary materials, let’s dive into the step-by-step process of drawing a birch tree.
Step 1: Outline the Trunk and Branches
Start by lightly sketching the basic shape of the trunk and main branches. Use a light pencil, such as an HB, to keep the lines faint. Observe the reference photo and try to replicate the overall shape and angle of the tree. Focus on capturing the curvature and flow of the branches.
Step 2: Add Details to the Trunk
Once you have the basic structure in place, start adding details to the trunk. Birch trees have a distinctive white bark with dark horizontal lines. Use short, vertical strokes to indicate the texture of the bark. Vary the pressure on the pencil to create a realistic effect. Leave some areas blank to represent the lighter parts of the bark.
Step 3: Sketch the Branches and Twigs
Next, focus on sketching the smaller branches and twigs. Birch trees have delicate branches that often hang downwards. Use light, thin lines to represent these branches. Pay attention to the angle and direction of each branch, as well as their connection to the main trunk.
Step 4: Add Leaves or Catkins
Depending on the season, birch trees can have either leaves or catkins. If drawing a summer or spring scene, add small triangular-shaped leaves to the tree. Start by lightly indicating the clusters of leaves at the end of some branches. Then, carefully fill in the details to represent the individual leaves.
If drawing a winter scene, birch trees typically have catkins, which are hanging clusters of small buds. Sketch these catkins using thin, curved lines hanging down from the branches.
Step 5: Shade the Trunk and Branches
To give your birch tree a three-dimensional look, add shading to the trunk and branches. Use a softer pencil, such as a 2B, to darken the areas that are in shadow. Observe the reference photo for guidance on where the shadows fall. Use short, diagonal strokes to create a textured effect on the bark.
Step 6: Add Shadows to the Leaves or Catkins
If drawing leaves, use a light pencil, such as an HB, to shade the areas of the clusters that are in shadow. Pay attention to the direction of the light source in your reference photo and shade accordingly. Use small, circular motions to create a natural texture.
For catkins, shade the areas that are closer to the branches and create a smooth transition towards the bottom. Use softer pencils, like 2B or 4B, for darker shadows.
Step 7: Blend and Smudge
To create smooth transitions and soften harsh lines, use a blending stump to blend and smudge certain areas of your drawing. This technique can be particularly useful when shading the trunk and branches. Use the blending stump to gently blend the pencil strokes together, creating a more realistic and organic look.
Step 8: Refine and Add Details
Take a step back and evaluate your drawing so far. Look for any areas that need refinement or additional details. Add any necessary adjustments to the shape of the branches or the texture of the bark. Use an eraser to lighten any lines that may need adjustment or to create highlights on the trunk or branches.
Step 9: Finalize the Background
If desired, add a background to your birch tree drawing to give it a sense of place. This could be a simple landscape or a more complex natural setting. Experiment with different techniques such as stippling, hatching, or cross-hatching to create texture and depth in the background.
Conclusion
Drawing a birch tree can be a rewarding experience that allows you to capture the beauty of nature on paper. By following these step-by-step instructions and using the right materials, you can create a realistic and detailed representation of a birch tree. So, grab your pencils and enjoy the process of bringing this elegant tree to life.