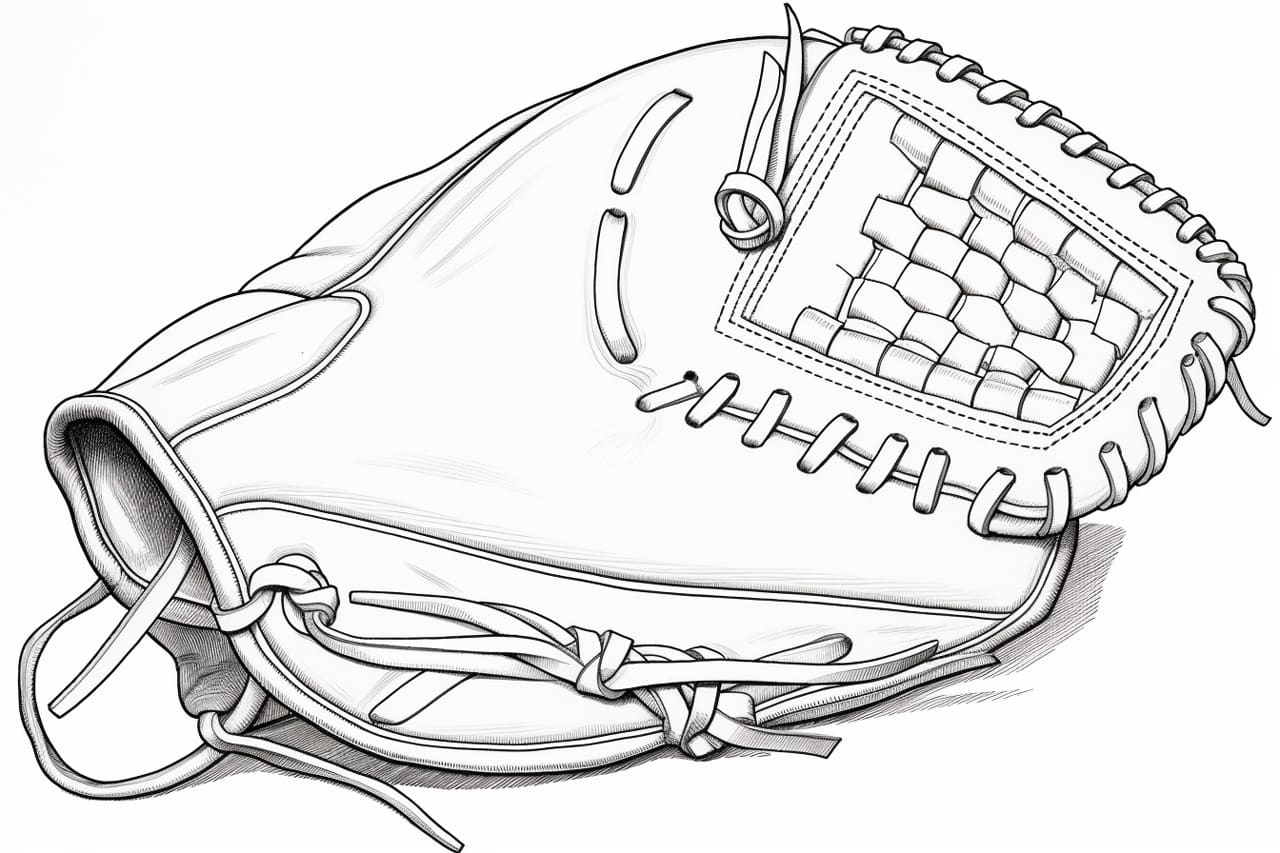
Are you a fan of baseball? Have you ever wanted to draw a baseball glove but didn’t know where to start? Well, you’re in luck! In this step-by-step guide, I will show you how to draw a realistic baseball glove in a clear and concise manner. Even if you have little to no experience in drawing, you will be able to follow along and create a beautiful baseball glove masterpiece.
Materials Required:
Before we dive into the steps, let’s gather all the materials you will need:
- Pencil
- Eraser
- Drawing paper
- Fine-tip black marker (optional)
- Colored pencils or markers (optional)
Now that we have our materials ready, let’s begin our drawing journey!
Step 1: Sketch the Basic Shape
Start by lightly sketching the basic shape of the baseball glove. We will use simple geometric shapes to outline the glove’s main form. Begin with an oval shape as the palm of the glove. Then, draw a smaller circle just above the oval for the thumb. Connect these two shapes with a curved line to represent the top of the glove. Finally, draw a long oval shape extending downward from the palm for the pocket.
Step 2: Add the Finger Slots
Next, let’s add the finger slots to the glove. Draw five small ovals in a row on the top of the glove, just above the palm. These ovals represent the openings where the fingers will go. Make sure they are evenly spaced and sized.
Step 3: Refine the Shape
Now that we have the basic structure, let’s refine the shape of the glove. Carefully outline the edges of the glove, making them appear more realistic and three-dimensional. Use smooth, curved lines to give the glove a natural and organic look. Pay attention to the details, such as the curves and folds in the leather.
Step 4: Add Details
To make the glove look more realistic, it’s important to add some details. Start by drawing stitching lines on the edges of the glove. These lines should follow the shape of the glove and mimic the stitching found on a real baseball glove. Don’t worry about making them perfectly straight or uniform – a little variation adds to the authenticity.
Step 5: Shade the Glove
Now it’s time to add some shading to give the glove depth and make it look more three-dimensional. Identify the light source in your drawing, and shade the areas that would be in shadow accordingly. Use a lighter touch with your pencil to gradually build up the shading, creating a smooth and realistic effect. Pay attention to the folds and creases in the leather, as they will require more shading to create a sense of depth.
Step 6: Add Texture
To make the glove appear more realistic, let’s add some texture to the leather. Use short, curved lines to create a cross-hatch pattern on the surface of the glove. This will simulate the texture of the leather and add visual interest to your drawing. Take your time and be patient as you add this detail, making sure to vary the direction and length of the lines to give it a natural look.
Step 7: Ink and Outline
If you want to give your drawing a bolder and more defined look, now is the time to ink and outline your sketch. Take a fine-tip black marker and carefully trace over the lines of your drawing. Once the ink is dry, erase any remaining pencil marks, leaving only the clean, dark lines of your baseball glove.
Step 8: Color (Optional)
If you prefer to add some color to your drawing, you can use colored pencils or markers to bring your baseball glove to life. Choose colors that closely resemble a real glove, such as tans, browns, or blacks. Apply the colors lightly at first and gradually build up the intensity as needed. Pay attention to the highlights and shadows to make your coloring more realistic.
Conclusion
Congratulations! You have successfully learned how to draw a baseball glove from scratch. With just a few simple steps, you were able to create a realistic and impressive representation of this essential baseball equipment. Remember to keep practicing and experimenting with different techniques to further enhance your drawing skills. Enjoy the process and have fun creating!