If you’re a hockey fan or aspiring artist, drawing a hockey goalie can be a thrilling and rewarding experience. Hockey goalies are known for their dynamic poses and unique gear, making them a fascinating subject for art. In this step-by-step guide, we will walk you through the process of how to draw a hockey goalie in a realistic and dynamic way. So grab your sketchbook and pencils, and let’s get started!
Materials Required:
To begin drawing a hockey goalie, you will need the following materials:
- Sketchbook or drawing paper
- Pencils (ranging from HB to 4B for shading)
- Eraser
- Fine-tip markers or pens (optional, for outlining)
- Colored pencils or markers (optional, for adding color)
Step 1: Begin with Basic Shapes
To start, we will sketch out the basic shapes that will serve as the foundation for our goalie drawing. Begin by lightly sketching an oval shape for the goalie’s head. Then, add a rectangular shape underneath the head for the body. Next, draw two intersecting lines across the head shape to help position facial features later on. Lastly, lightly sketch a circle for each shoulder, and two ovals for the upper arms.
Step 2: Add Facial Features
Now that we have the basic shapes in place, let’s add some facial features to our goalie. Use the intersecting lines on the head as a guide for positioning the eyes, nose, and mouth. Remember to keep your lines light and loose to allow for adjustments later. Once you are satisfied with the placement, go ahead and darken the lines and add any additional details, such as eyebrows or facial hair.
Step 3: Define the Body Shape
In this step, we will define the body shape of our goalie drawing. Start by adding more structure and details to the rectangular shape we sketched earlier. Use curved lines to portray the goalie’s chest and waist, and add some angular lines to indicate the hips and legs. Pay attention to the body proportions, ensuring that the goalie looks balanced and athletic.
Step 4: Sketch the Goalie’s Gear
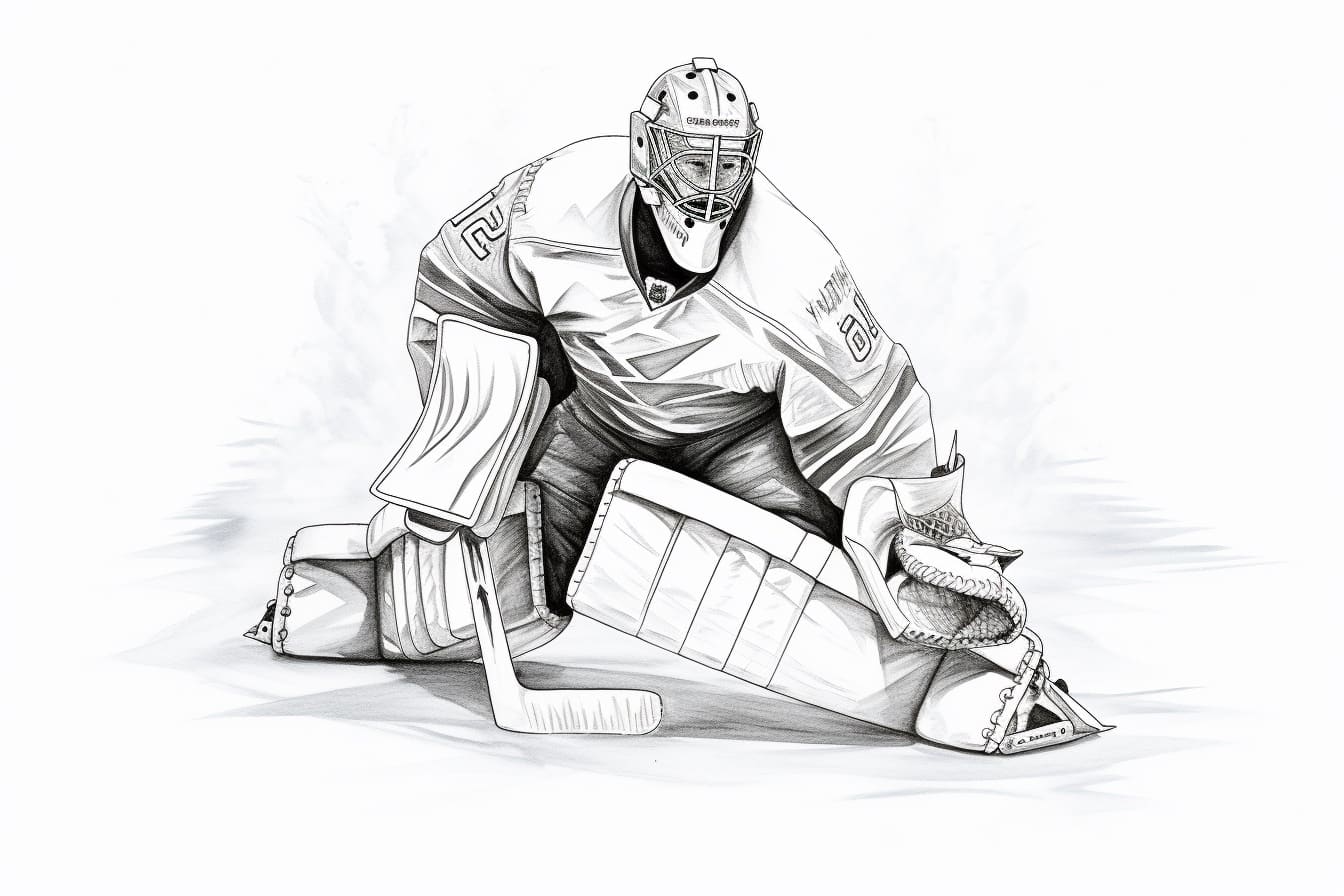
One of the most distinctive features of a hockey goalie is their gear. In this step, we will sketch out the goalie’s equipment, starting with the helmet and mask. Pay attention to the shape of the helmet, especially the cage and any additional details, such as straps or logos. Next, sketch in the chest protector, leg pads, and gloves. Take your time to capture the details and shape of each piece of gear accurately.
Step 5: Add Details to the Face and Gear
Now that our goalie is taking shape, let’s add some final details to their face and gear. Start by adding more definition to the facial features, such as the eyes, nose, and mouth. Pay attention to any shadows or highlights that may appear on the goalie’s face. Next, add more details to the gear, such as straps, logos, or any unique designs. Take your time and pay attention to the small details that make each piece of equipment stand out.
Step 6: Sketch the Posed Goalie
In this step, we will sketch the goalie in a dynamic and action-oriented pose. Use your imagination or reference photos to create a pose that reflects the intensity and agility of a hockey goalie. Pay attention to the position of the goalie’s legs, arms, and body. Add any necessary lines to indicate movement or tension in the pose. Once you are satisfied with the sketch, go ahead and darken the lines to make them stand out.
Step 7: Refine and Shade
Now that our goalie is sketched, it’s time to refine the drawing and add shading to create depth and dimension. Start by going over the sketch lines with a darker pencil or fine-tip marker to make them more defined. Then, use a range of pencils from HB to 4B to add shading and highlights to the drawing. Pay attention to the light source and add shadows and highlights accordingly. Take your time with this step as it can greatly enhance the realism of your drawing.
Step 8: Optional – Add Color
If you prefer to add color to your drawing, now is the time to do so. Use colored pencils or markers to add color to the goalie’s gear or background. Remember to layer the colors gradually and use reference images to match the colors accurately. Be mindful of the materials you are using and choose ones that are suitable for the texture of your paper.
Conclusion
Congratulations! You have successfully learned how to draw a hockey goalie. By following these step-by-step instructions, you have created a dynamic and realistic representation of a hockey goalie. Remember to practice regularly and experiment with different poses and styles to further develop your artistic skills. So keep your pencils sharp and continue exploring the exciting world of drawing hockey players!