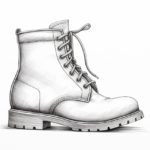
Cowboy boots are a classic icon of the Wild West, representing style, ruggedness, and adventure. Whether you’re a fan of western fashion, a budding artist, or simply looking to expand your drawing skills, learning how to draw cowboy boots can be a fun and rewarding experience. In this step-by-step guide, I will walk you through the process of drawing cowboy boots, providing clear instructions and helpful tips along the way. So grab your sketchbook and let’s get started!
Materials Required
Before we begin, make sure you have the following materials ready:
- A pencil – preferably a mechanical pencil or one with a good eraser
- Paper – choose a smooth and sturdy paper that can handle pencil lines
- An eraser – for correcting any mistakes or lightening pencil lines
- Colored pencils or markers (optional) – if you wish to add color to your drawing
Now that you have your materials ready, let’s dive into the step-by-step process of drawing cowboy boots.
Step 1: Basic Shape
Start by drawing a simple rectangular shape that will serve as the base of the boot. This shape will represent the foot area. You can make it as wide or narrow as you like, depending on the style of boots you want to create.
Step 2: Add Curves
Next, add curves to the rectangular shape to give it a more three-dimensional appearance. Start by rounding the corners, creating a smooth transition from the sides to the top and bottom. This will form the basic shape of the boot.
Step 3: Heel and Toe
Now, focus on the bottom part of the boot. Draw a small rectangle at the back of the boot to represent the heel. At the front, draw a curved shape to indicate the toe of the boot. Make sure the toe curves slightly upward to give it a realistic look.
Step 4: Shaft
Moving on to the upper part of the boot, draw two parallel lines extending from the top of the basic shape. These lines will serve as the guides for the shaft of the boot. The length and height of the shaft will vary depending on the style you want to depict.
Step 5: Heel Counter
At the back of the boot, draw a rounded shape that connects the shaft and the heel. This is called the heel counter and adds structure to the boot.
Step 6: Decorative Elements
Now comes the fun part – adding decorative elements to make your cowboy boots unique. Draw patterns, stitching lines, or any other design details that you want to include. Feel free to let your creativity flow and personalize your boots!
Step 7: Details and Texture
To make your cowboy boots look more realistic, add additional details and texture. Draw thin lines to represent stitching along the edges and seams of the boot. You can also add shading and highlights to create depth and dimension.
Step 8: Erase and Refine
Carefully erase any unnecessary lines and smudges. Take a step back and assess your drawing. Make any necessary adjustments or refine certain areas to achieve the desired look.
Step 9: Optional – Adding Color
If you want to add color to your drawing, now is the time to do so. Use colored pencils or markers to bring your cowboy boots to life. Experiment with different shades and tones to create a realistic or stylized effect.
Conclusion
Congratulations! You have successfully learned how to draw cowboy boots. From the basic shape to the intricate details, this step-by-step guide has provided you with the necessary instructions to create your very own pair of cowboy boots on paper. Remember, practice makes perfect, so keep drawing and exploring your creativity. Whether you’re creating a western-themed artwork or simply want to add a touch of the Wild West to your sketchbook, drawing cowboy boots can be a rewarding artistic endeavor.