
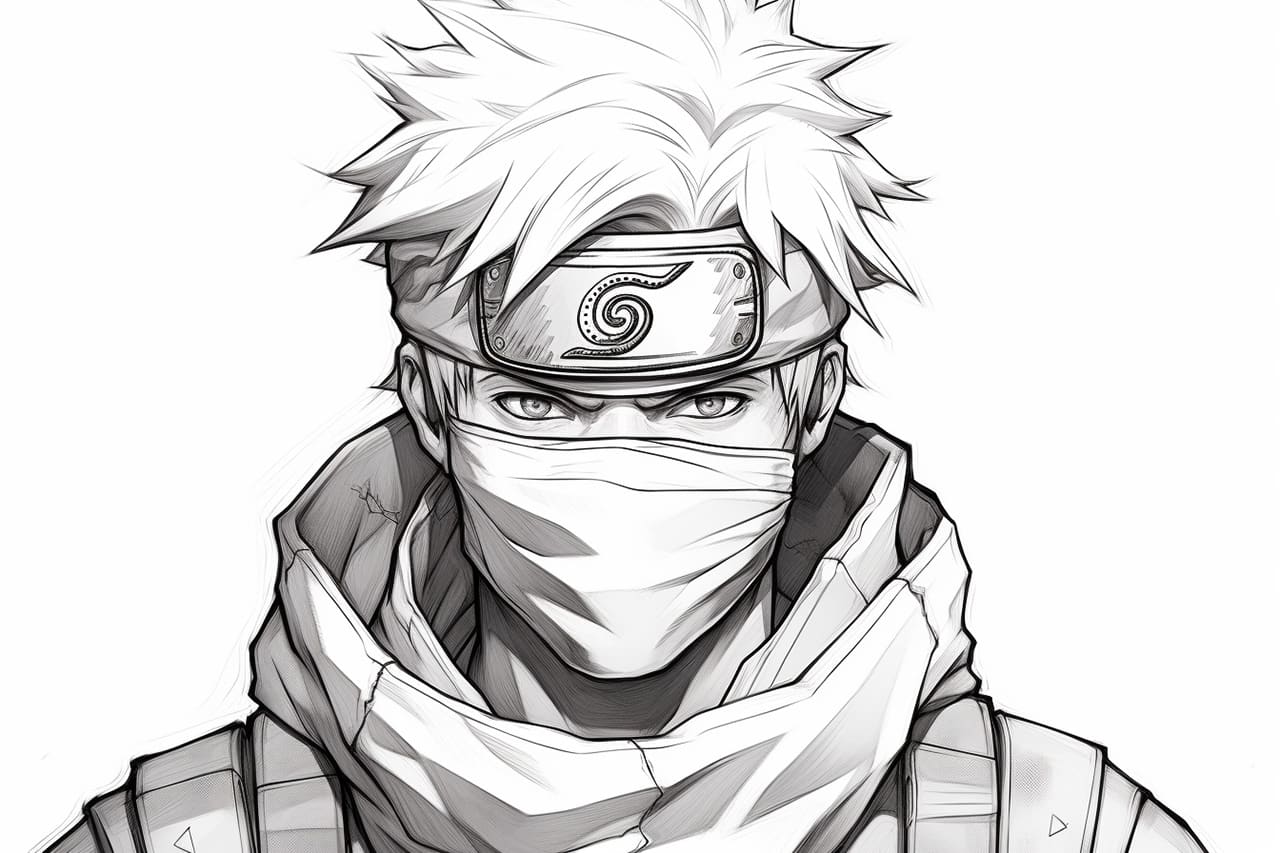
Kakashi Hatake is a beloved character from the popular anime and manga series Naruto. With his distinctive silver hair, mask, and Sharingan eye, Kakashi has become an icon in anime. In this step-by-step guide, we will explore how to draw Kakashi in a simple and accessible way. Whether you are a beginner or an experienced artist, this guide will help you capture the essence of Kakashi’s character in your drawings.
Materials Required
Before we begin, gather the following materials:
- Drawing paper
- Pencil
- Eraser
- Fine-tip black marker
- Colored pencils or markers (optional)
Now that we have our materials ready, let’s dive into the step-by-step process of drawing Kakashi!
Step 1: Basic Shape and Guidelines
Start by drawing a medium-sized circle in the center of your paper. This will serve as Kakashi’s head. Below the circle, draw a vertical line to represent the center of his face. Add a horizontal line across the circle, intersecting the vertical line. This will give you a guideline for positioning Kakashi’s facial features.
Step 2: Facial Features
Using the guidelines as reference points, draw two slightly slanted almond shapes for Kakashi’s eyes. Leave a small gap between the eyes for his mask. Next, draw a curved line below the eyes to indicate his nose. Kakashi’s mouth will be hidden by the mask, so no need to draw it.
Step 3: Mask and Hair
Trace the outline of Kakashi’s mask using curved lines that follow the shape of his face. Make sure the mask covers the area between his eyes and falls slightly below his nose. Next, draw Kakashi’s spiky hair. Start from the top of his head and create distinct strands that fall on both sides of his face. Don’t forget to include his signature strand of hair that hangs between his eyes.
Step 4: Sharingan Eye
Kakashi’s Sharingan eye is an important characteristic of his appearance. Draw a circle in the center of his left eye, leaving a small white gap around the edges. Inside the circle, draw several curved lines radiating from a central point. This will create the illusion of the Sharingan eye.
Step 5: Face Details
Let’s focus on Kakashi’s face now. Draw his eyebrows as two slightly curved lines that sit above his eyes. Add some lines below his eyes to represent his under-eye bags. These details will add depth and realism to your drawing.
Step 6: Neck and Collar
Extend two lines down from Kakashi’s head to create his neck. Then, draw two curved lines on each side of his neck to form his collar. This collar is a prominent feature of his attire.
Step 7: Body Outline
Kakashi wears a high-collared vest with rolled-up sleeves. Draw the outline of his torso, making sure to emphasize the shape of the vest. Add some curved lines to indicate the folds and creases of the fabric.
Step 8: Arms and Hands
Position Kakashi’s arms on either side of his body. Draw the shape of his arms by using simple curved lines. Don’t forget to add his hands, which can be drawn as basic closed fists or with specific hand gestures if you prefer.
Step 9: Legs and Feet
Extend two lines downward from Kakashi’s torso to create his legs. Draw the outline of his pants, which should be slightly baggy and extend down to his ankles. Finally, draw his feet, keeping in mind that Kakashi wears standard ninja boots.
Step 10: Final Details and Cleanup
Take a moment to review your drawing and make any necessary adjustments. Erase any stray lines or guidelines, making sure to keep the cleanest and most accurate lines in your final drawing. You can also use a fine-tip black marker to outline your drawing and make it stand out. If you prefer, you can add shading and color using colored pencils or markers to bring your drawing to life.
With practice, you’ll improve your ability to capture Kakashi’s unique features and recreate his dynamic persona. Remember, each artist has their own style, so don’t be afraid to make this drawing your own. Have fun and enjoy the process!
Conclusion
In this step-by-step guide, we have explored the process of drawing Kakashi from Naruto. Beginning with the basic shape and guidelines, we gradually added the facial features, hair, body, and final details. By following these steps and using your creativity, you can depict Kakashi’s character in your own unique way. Keep practicing and experimenting with different techniques, and soon you’ll be able to draw Kakashi with ease.
Related posts:
 How to Draw Nemo: A Step-by-Step Guide
 How to Draw a Bulldog: A Step-by-Step Guide
 How to Draw a Braid: A Step-by-Step Guide
 How to Draw a Dove: A Step-by-Step Guide
 How to Draw Bulbasaur: A Step-by-Step Guide
 How to Draw a Realistic Snake: A Step-by-Step Guide
 How to Draw a Skirt: A Step-by-Step Guide for Aspiring Artists
 How to Draw a Cornucopia: A Step-by-Step Guide